Most kitchen renovations are funded by denial. You tell yourself the cabinets are “fine,” the backsplash is “classic,” and the lighting is “functional enough.” Then the day comes when you’re actually trying to cook and the kitchen just won’t cooperate. The counters are covered. That stuck cabinet door catches again. And the overhead light makes everything look tired.
The good news: a kitchen remodel on a budget doesn’t mean a half-hearted one. After years of helping homeowners create storage systems and spatial order, I’ve watched the same pattern repeat. The changes that cost the least often transform the most. Most of what makes a kitchen feel dated has nothing to do with its bones. It’s all about finish, organization, and light.
These 16 ideas range from a $30 weekend afternoon to a $500 weekend project. Some are permanent, some are reversible. Most of them compound — do three together and the kitchen won’t look like you made three changes. It’ll look like you renovated. That’s the system, and it works.
1. Fresh Cabinet Paint: The Highest-ROI Budget Upgrade
If you could spend $5,000 and get back $4,000 of it when you sell, you’d call that a good investment. That’s roughly what cabinet painting delivers. Remodeling Magazine’s Cost vs. Value report puts the ROI at around 84% for minor kitchen remodels that include freshly painted cabinets. As a kitchen remodel on a budget strategy, this one has the clearest math. Cabinet painting costs a fraction of full replacement while delivering most of the visual impact. Compare it to full cabinet replacement at $15,000 or more, and the case is made.
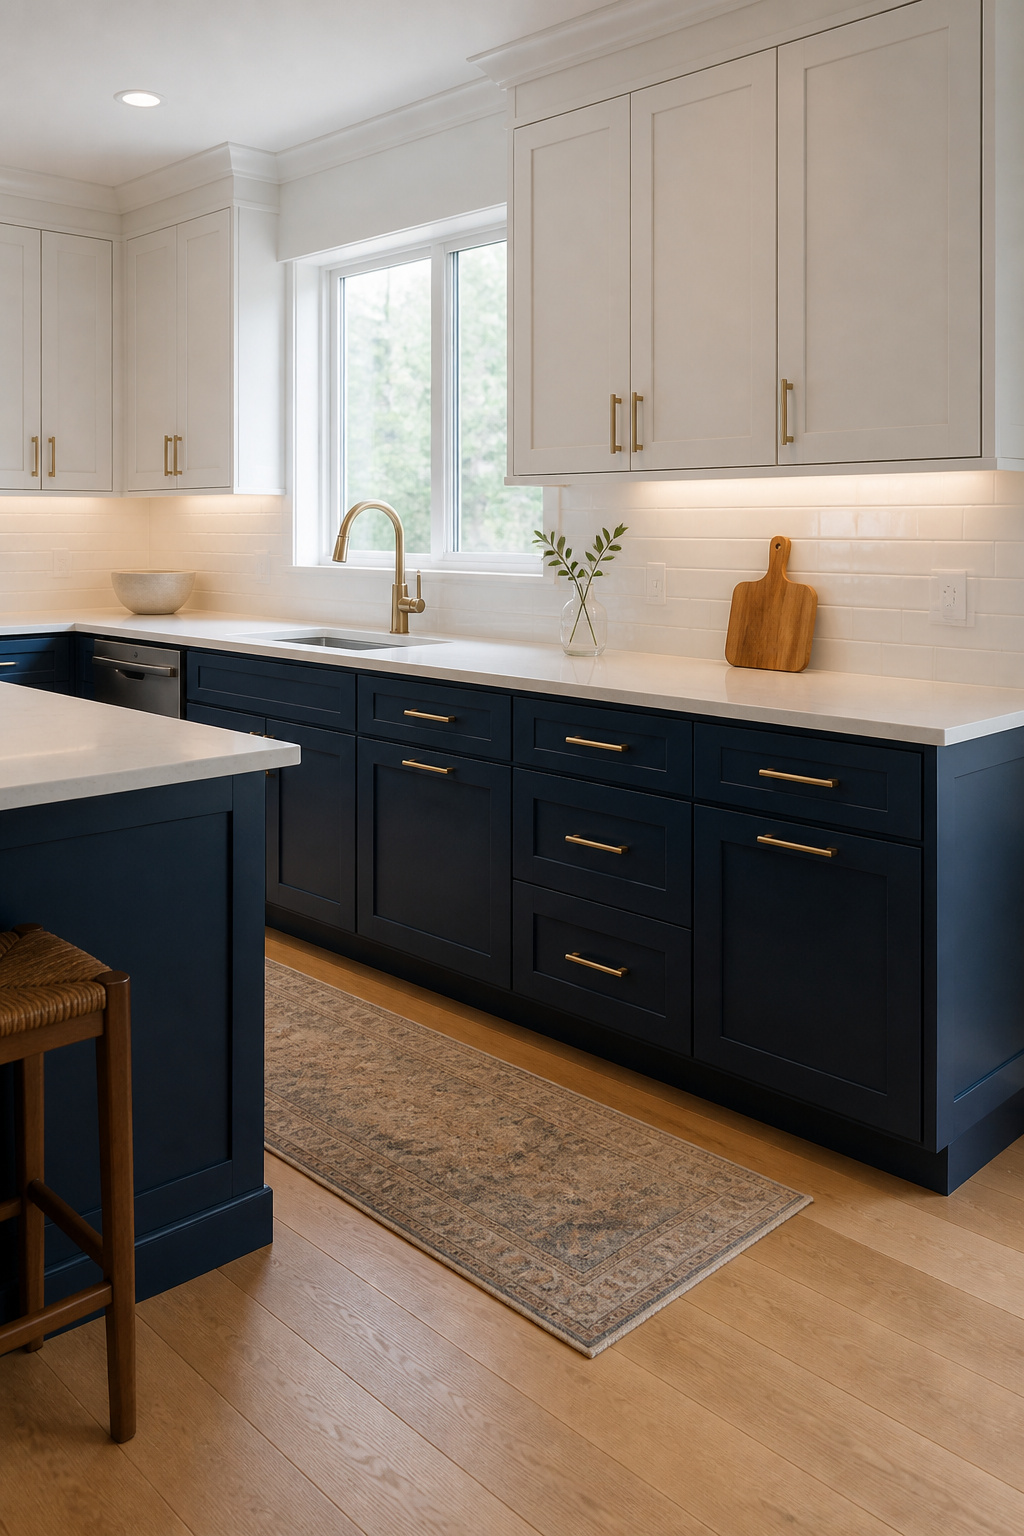
Cabinets occupy 30–40% of a kitchen’s visual real estate. So when the color changes, the whole room changes. Going from honey oak or dated white to deep navy, sage green, or warm black repositions everything else in the room. Suddenly the appliances look intentional. The countertops look considered.
Prep is where DIY cabinet projects succeed or fail. The sequence: degrease thoroughly with TSP or a dedicated degreaser. Then sand lightly with 100–150 grit to give the primer something to grip, and prime with KILZ or Benjamin Moore Fresh Start before applying paint. In fact, skipping primer is the most common DIY failure point and the main reason cabinet paint jobs start chipping within a year.
For paint quality, Benjamin Moore Advance (waterborne alkyd enamel) consistently tops comparison tests — excellent leveling, a near-factory-smooth finish, and easy water cleanup. Sherwin-Williams Emerald Urethane Trim Enamel is the professional-grade alternative. Both cure to a hard, wipeable surface. Use semi-gloss or satin finish only — anything flatter won’t hold up to regular cleaning. You can look through kitchen cabinet makeover ideas to see the full range of what a paint job achieves before committing to a color.
2. Swapping Upper Cabinets for Open Shelving
There’s a wall in nearly every small kitchen where the upper cabinets feel less like storage and more like a lid pressed down on the space. Remove them, replace with floating shelves, and the kitchen breathes. The visual weight lifts, the ceiling reads higher, and suddenly there’s a wall worth looking at.

This works best in kitchens under 150 square feet and on walls that don’t face the stove. That second condition matters. Grease aerosolizes when you cook and coats every exposed surface within 8 feet of the burners. Open shelves directly above the range means re-washing your displayed ceramics every two weeks. On a side wall or breakfast area, though, that risk drops to nearly zero.
The display question makes or breaks open shelving. Specifically, what goes on the shelves: matching glassware, a cohesive plate set, a few cookbooks, one plant. What doesn’t: mismatched containers, anything that came in cardboard packaging, or items used less than monthly. The rule is simple: if you wouldn’t style it on a coffee table, it doesn’t belong on an open kitchen shelf. Also, leave 30–40% of shelf space visually open. A jammed shelf looks worse than the cabinet it replaced.
Budget shelving options are solid: IKEA EKBY brackets with a solid wood shelf run $30–$60 per shelf. A DIY version using 2×10 lumber cut to length and mounted on pipe brackets comes to $40–$70 and has more character. Either way, anchor into studs — a loaded kitchen shelf with dishes can reach 50–60 pounds. If the open shelving vs upper cabinet tradeoffs feel hard to weigh, many homeowners do a hybrid: remove two or three upper cabinets, replace with shelves, and keep the rest for closed storage.
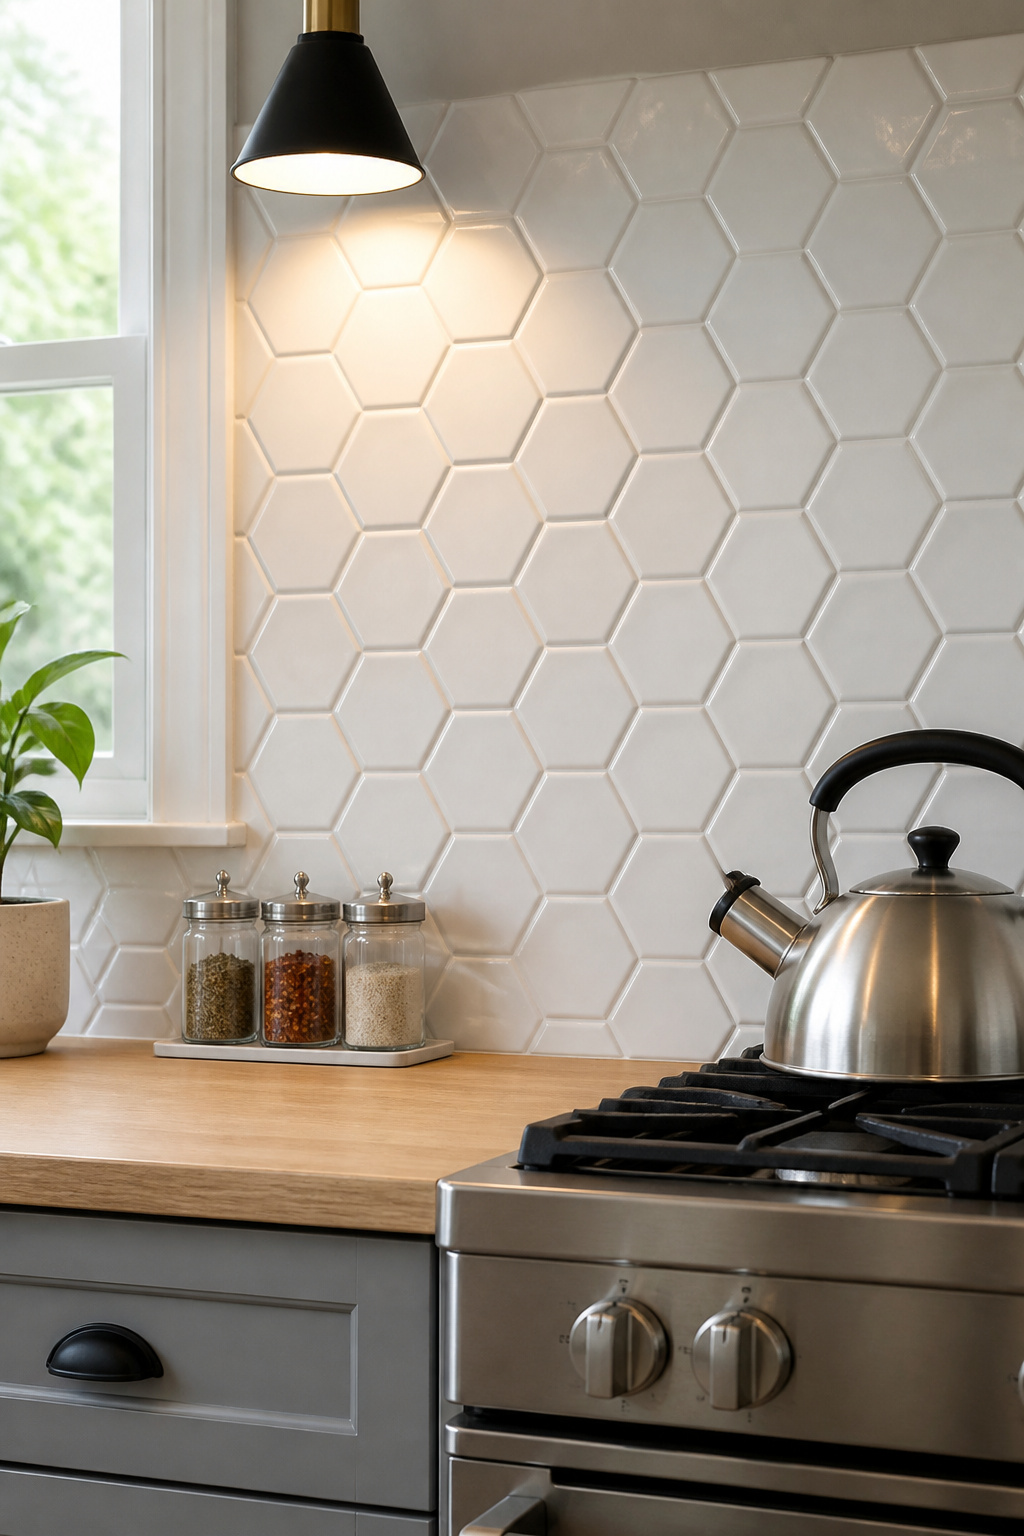
3. Peel-and-Stick Backsplash Tile for a Budget Kitchen Remodel
For a long time, peel-and-stick backsplash tile was mainly a rental workaround — tolerable from a distance, unconvincing up close. That’s changed. Today’s better brands use thick vinyl or gel construction with genuine texture. They catch light the way ceramic does, and the adhesive systems last 5–10 years with proper installation.
Surface prep determines everything. An isopropyl alcohol wipe-down before application is non-negotiable. Any residual grease film breaks the adhesive bond, and kitchen walls have grease film whether or not you can see it. The surface must also be smooth. For example, existing painted drywall and smooth ceramic tile work well. Textured surfaces, bare concrete, and wallpaper don’t. Avoid installing directly behind an active gas range where surface temperatures exceed 90°F — adhesive softens at sustained heat.
Stickwoll is currently the top-rated brand for adhesion and longevity — their tiles performed well in humidity testing with no edge lifting after 12 months. TrafficMaster (Home Depot, around $3/sq ft) has among the strongest adhesive in the category. Both brands offer subway tile and geometric patterns that genuinely read as real tile in photos and from normal conversational distance — which is more than most people expect.
After installation, run a credit card edge along every seam to press out air pockets. Then apply a thin bead of clear tile caulk along all perimeter edges. This seals moisture out and dramatically extends the installation’s life. Another advantage nobody mentions: peel-and-stick tile removes cleanly. Warmed with a hair dryer, each tile lifts without damaging the wall beneath. That makes it genuinely renter-friendly and easy to update whenever you’re ready for something new.
4. New Cabinet Hardware: The $50 Transformation
Cabinet hardware is the jewelry of a kitchen. The right finish at the right scale changes the entire outfit. Replacing builder-grade polished chrome pulls with matte black bar handles or brushed brass knobs takes about an hour, requires only a screwdriver, and costs $60–$300 depending on kitchen size and quality tier. For a kitchen remodel on a budget that needs immediate visual impact, hardware is the highest-leverage purchase per dollar spent.
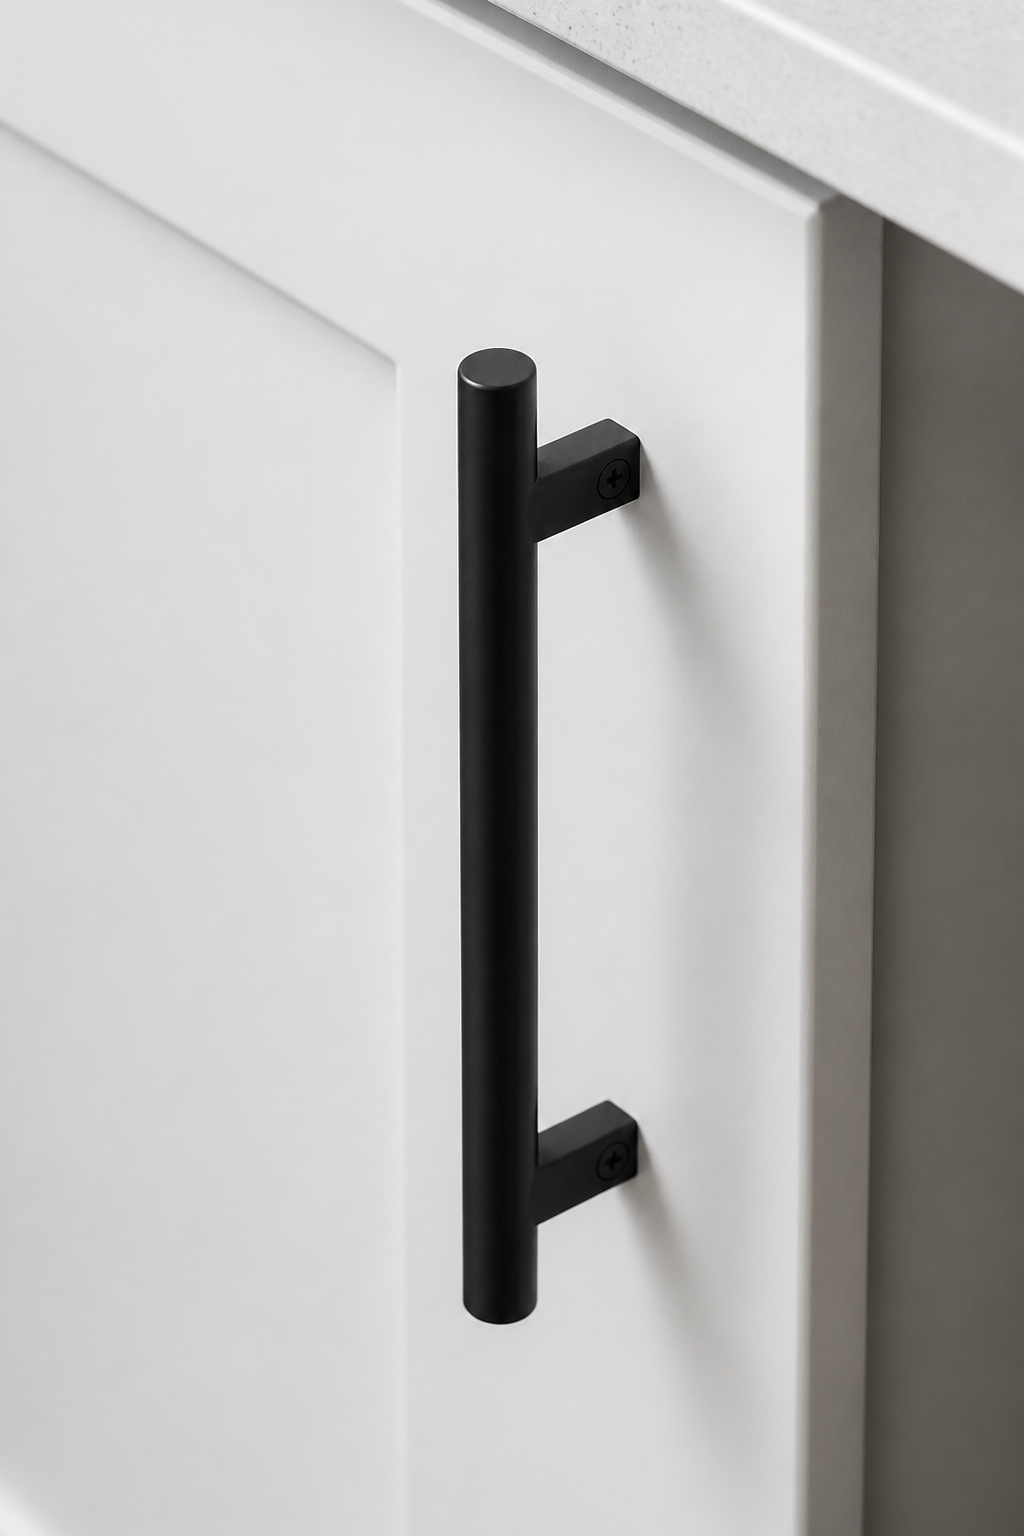
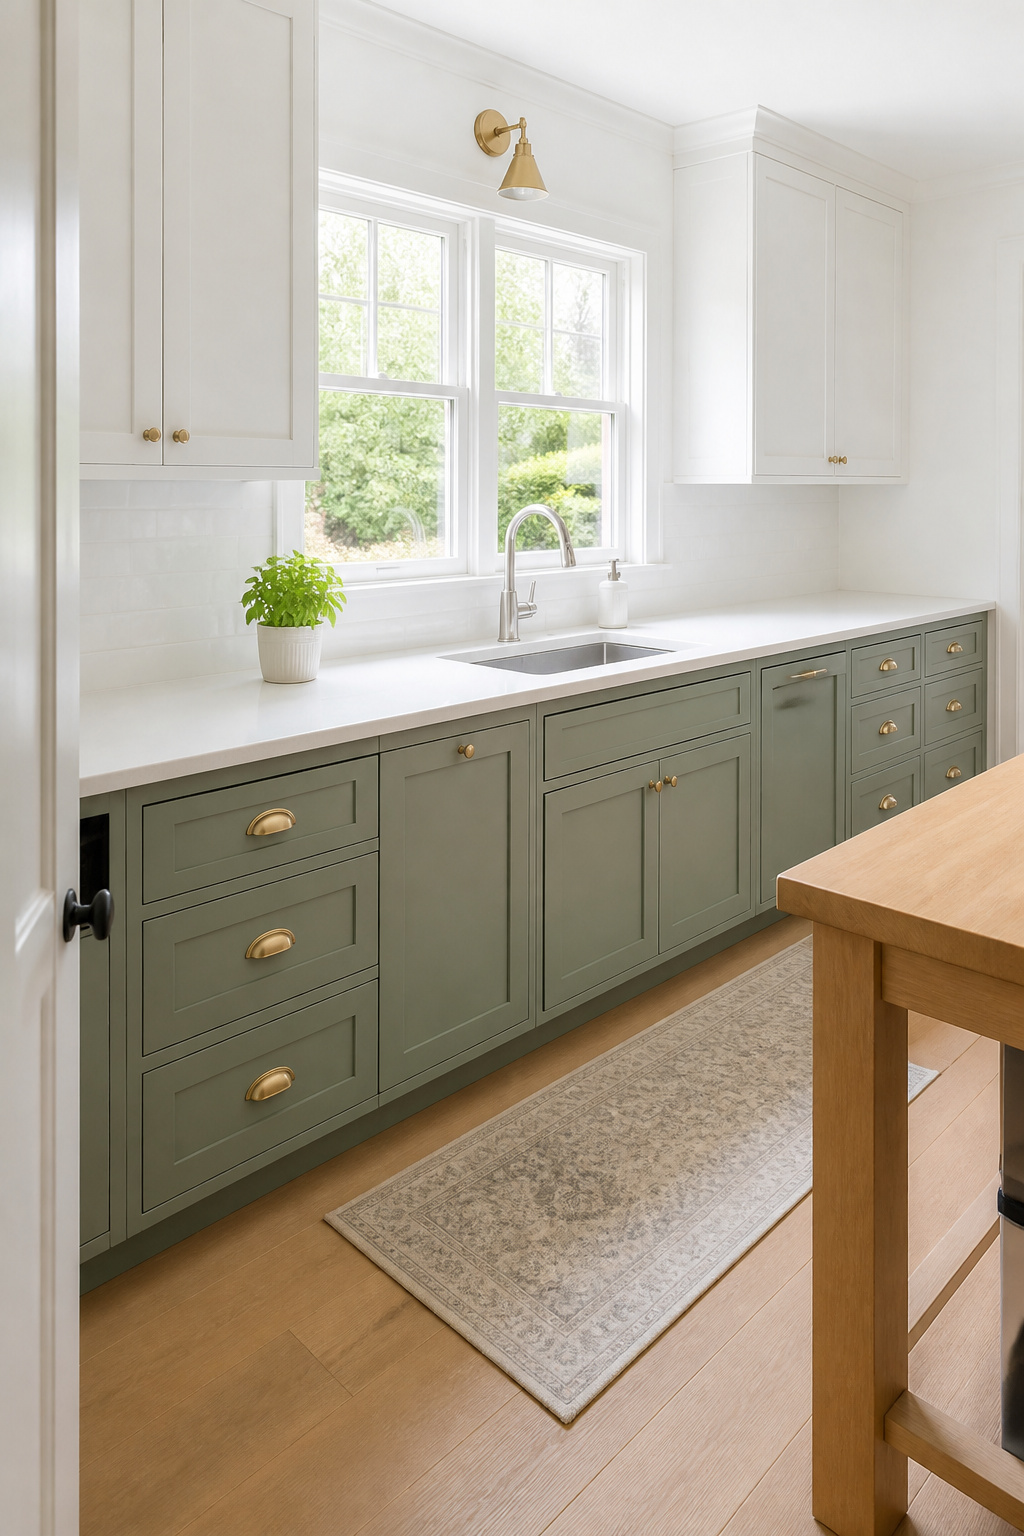
Finish is the key variable. Matte black has held its trend position for five-plus years and shows no signs of leaving. It’s fingerprint-resistant, works with both light and dark cabinets, and photographs well. Also, brushed brass is trending strongly in 2025–2026, particularly with white and sage green cabinets. Brushed nickel remains the neutral choice for resale. However, one principle holds regardless of finish: stick to two metal finishes maximum across hardware, faucets, and light fixtures. More than two feels unresolved.
Mixing knobs and pulls has become mainstream — 40% of hardware orders that include pulls also include knobs, according to data from hardware brand Hapny Home. Specifically, pulls on drawers where a horizontal grip makes ergonomic sense, and knobs on cabinet doors. If you’re on a strict budget, knobs cost less per piece and install with a single screw.
Before ordering anything though, measure the existing hole spacing on your current pulls — the center-to-center distance between the two mounting holes. Most pulls are drilled at 3, 3.75, or 5 inches on center. Ordering without this measurement means drilling new holes or patching old ones. Amazon’s Cosmas brand ($2–$5/piece) and IKEA’s ENKÖPING line ($3–$8/piece) offer the best budget options without sacrificing the look. For a kitchen with 25 cabinets at the Cosmas price, the entire hardware swap costs under $100.
5. Budget Countertop Options That Don’t Look Like Compromises
Countertops are where budget remodels often lose nerve and settle for whatever was already there. That’s understandable — the full range of surfaces starts at $75/sq ft and runs well past $200. But the actual budget tier, approached with intention, can produce a kitchen that reads as deliberately designed rather than financially constrained.
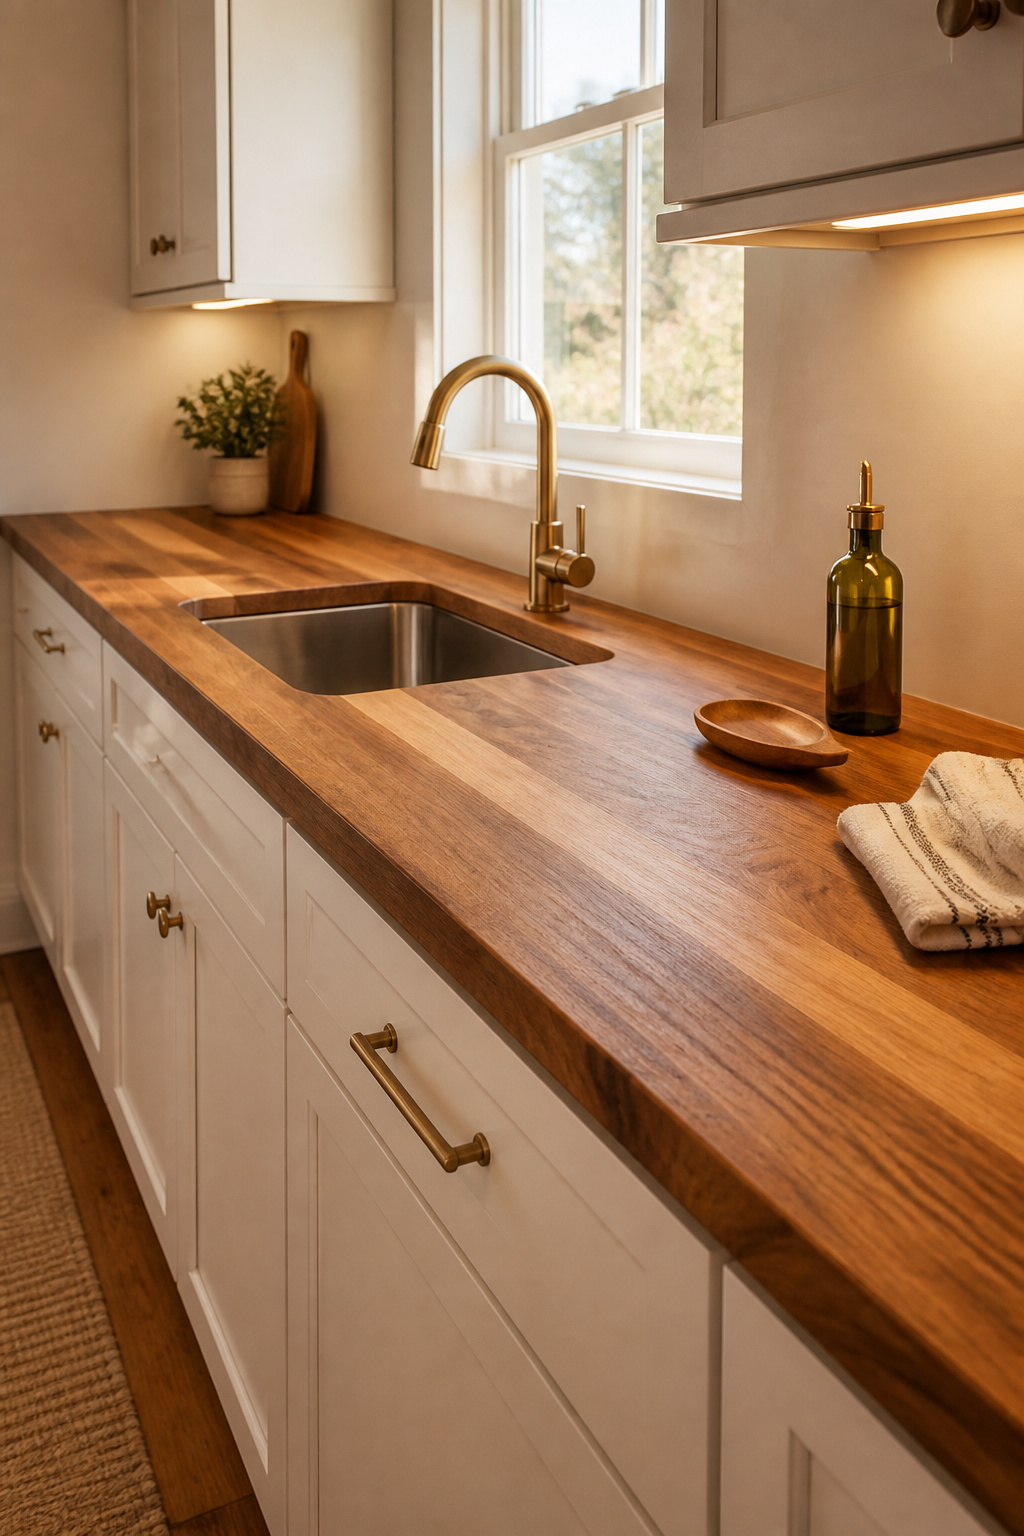
Butcher block is the warmest option at $50–$100/sq ft for standard hardwoods. It’s DIY-friendly for straight runs, looks genuinely beautiful, and gets better with age when you maintain it. That maintenance requirement is real, though: food-safe mineral oil or Waterlox applied every 6–12 months keeps it from drying, cracking, and harboring bacteria. Keep it away from the sink where standing water is constant — butcher block near a wet sink that doesn’t get dried regularly will warp. You can look through kitchen countertop ideas worth considering before making a material commitment.
Modern laminate ($20–$50/sq ft installed) has quietly closed the aesthetic gap with stone. Formica’s 180fx series uses high-resolution photographic laminate that mimics granite, concrete, and marble convincingly. However, where it falls short is the edge profile — a waterfall edge, beveled, or full bullnose treatment elevates laminate considerably. The old-school self-edge look is what dates it. Both Wilsonart and Formica offer matte-finish options that read as significantly more premium than the glossy versions from ten years ago.
What to Know Before You Commit
Still, concrete overlays deserve more attention in the budget conversation. Ardex and Quikrete Countertop Mix kits ($100–$300 in materials) allow you to resurface existing laminate — the existing countertop becomes the substrate. Results depend heavily on prep and application technique. However, a well-executed concrete overlay transforms a kitchen’s entire material character for less than most backsplash projects.
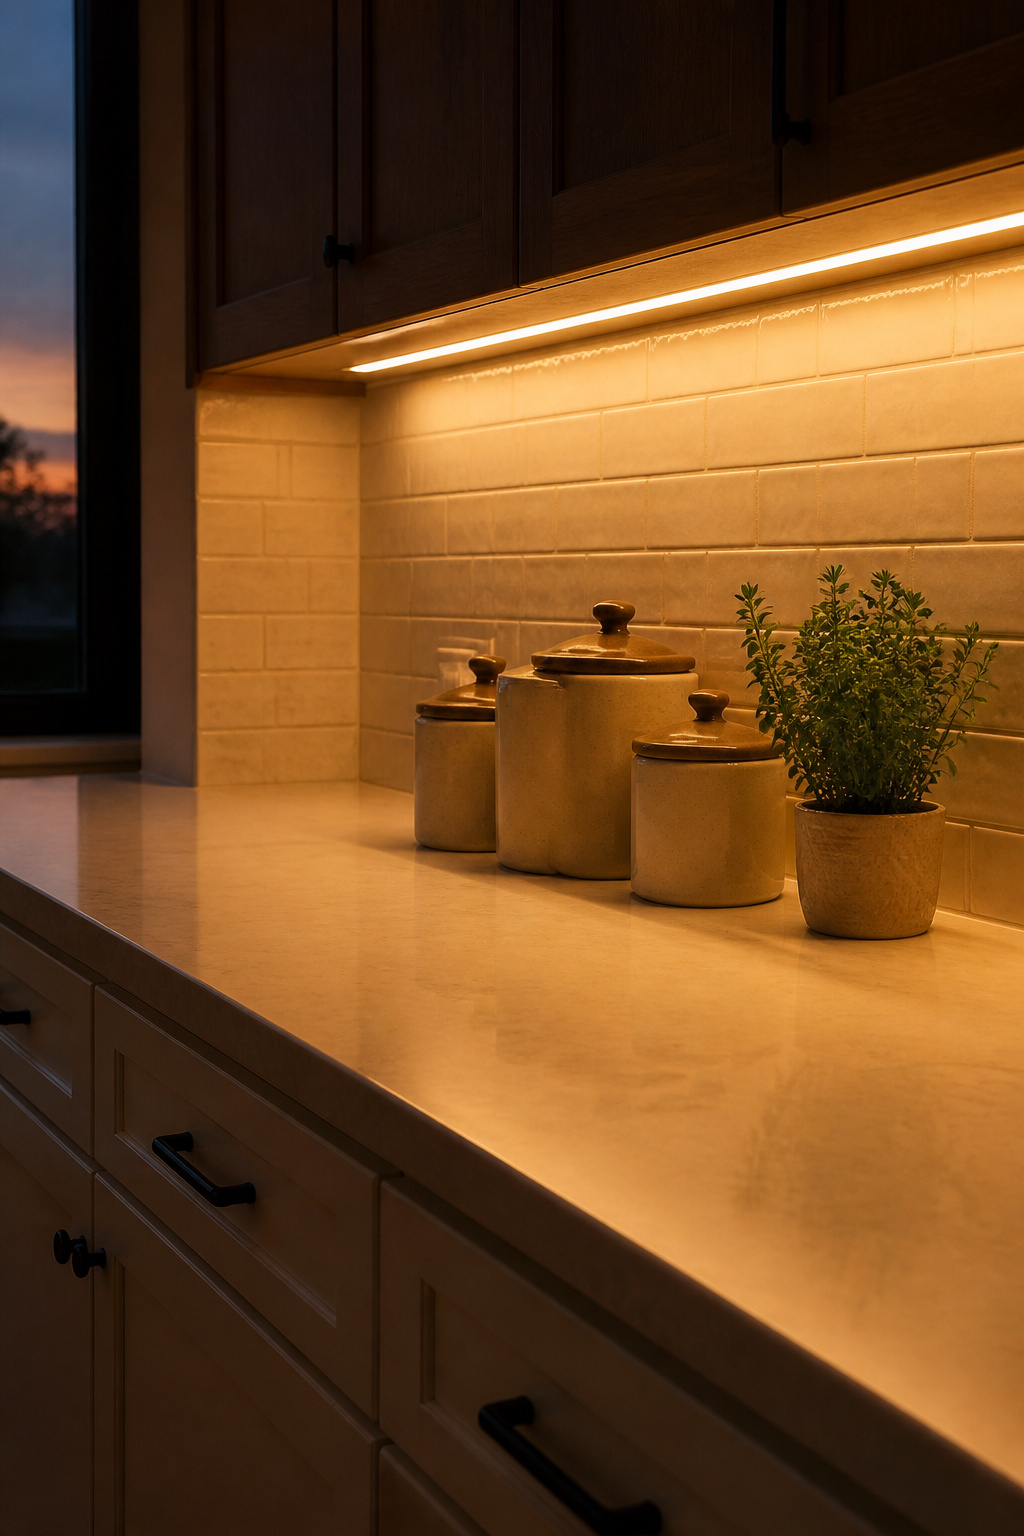
6. Under-Cabinet LED Lighting: A Must in Any Budget Kitchen Remodel
Here’s something worth understanding about kitchen lighting: the overhead fixture throws light downward. The upper cabinets block most of it, and the result is shadow on the countertop where you actually work. Under-cabinet lighting eliminates that shadow entirely. It doesn’t sound transformative until you see it. Then it’s the single budget kitchen remodel change that makes the kitchen feel cleaner, brighter, and more expensive than anything else you spent money on.
Plug-in LED strips cost $20–$80 and install in under 20 minutes with included mounting clips. The visible cord is the one trade-off — route it inside the cabinet and run it to an outlet, and it disappears. Hardwired fixtures ($100–$250 plus electrician labor) eliminate the cord entirely and look truly built-in. Still, that’s a significant price step for a cosmetic benefit. A practical middle path: many plug-in fixtures convert to hardwired by cutting the plug and connecting to a junction box inside the cabinet.
Color temperature is the decision most people get wrong. For most residential kitchens, 2700K (warm white, matches incandescent) or 3000K (slightly crisper, the most popular modern kitchen choice) is the right range. Instead, avoid 4000K and above — in a home kitchen, those temperatures feel clinical, like a strip of fluorescent light appeared under your cabinets. 6000K is for commercial prep kitchens, not living spaces.
Finally, two installation details matter more than people expect. First, position the strip toward the back of the cabinet’s underside, not the front — light projects further onto the counter from the back position. Second, confirm the units are dimmable if you want them to serve as ambient light at night. Many budget plug-in options are not dimmable, and that’s a disappointment worth avoiding before purchasing.
7. A Kitchen Remodel on a Budget Starts With Decluttered Counters
This one costs nothing. That’s probably why it’s the most consistently underrated change a kitchen can make. It doesn’t come in a box and there’s no before-and-after product photo to share. But a kitchen with clear countertops reads as designed, regardless of what else is happening in the space. The same dated cabinets, the same tired flooring, the same existing appliances — with clear counters, they all look like choices instead of defaults.
Studies measuring perceived kitchen size show that clear countertops increase the sense of space by 20–30% compared to countertops with scattered items. Every object on a counter competes visually and dilutes any sense of intentional design. The rule is simple: anything used less than daily goes inside a cabinet. Coffee maker stays. Toaster, stand mixer, food processor — inside a cabinet between uses. This applies even to heavy appliances. Heavy doesn’t mean it earns a counter address.
A System That Keeps It That Way
The system that makes decluttering permanent is creating actual storage homes for the things being moved off the counter. For example, appliance garages (upper cabinet sections with roll-up tambour doors) keep toasters and mixers accessible but invisible. Magnetic knife strips free the knife block from the counter. Wall-mounted spice racks near the range put spices within reach without staging them on the counter. You can find more small kitchen organization ideas that actually work if you’re working with limited cabinet space and need to get creative about where things go.
For the counters you do keep occupied, follow three rules: group items by material and color, keep coverage to 20% maximum, and include one living element. A small herb plant or a single pothos cutting works well. So a kitchen styled at 20% counter coverage reads as designed. At 60%, the design disappears regardless of how much was spent on the kitchen remodel on a budget or otherwise.
8. Vinyl Plank Flooring: The Smart Choice for Budget Kitchen Floors
Flooring is where kitchen budgets frequently go wrong. People install laminate because it looks like hardwood and costs less, then discover the first dishwasher leak ruins it permanently. Laminate has a wood-fiber core. Wood fiber swells when wet. In a kitchen, laminate is the wrong choice regardless of how good it looks in the store. Leaks happen, spills happen, and moisture is constant.
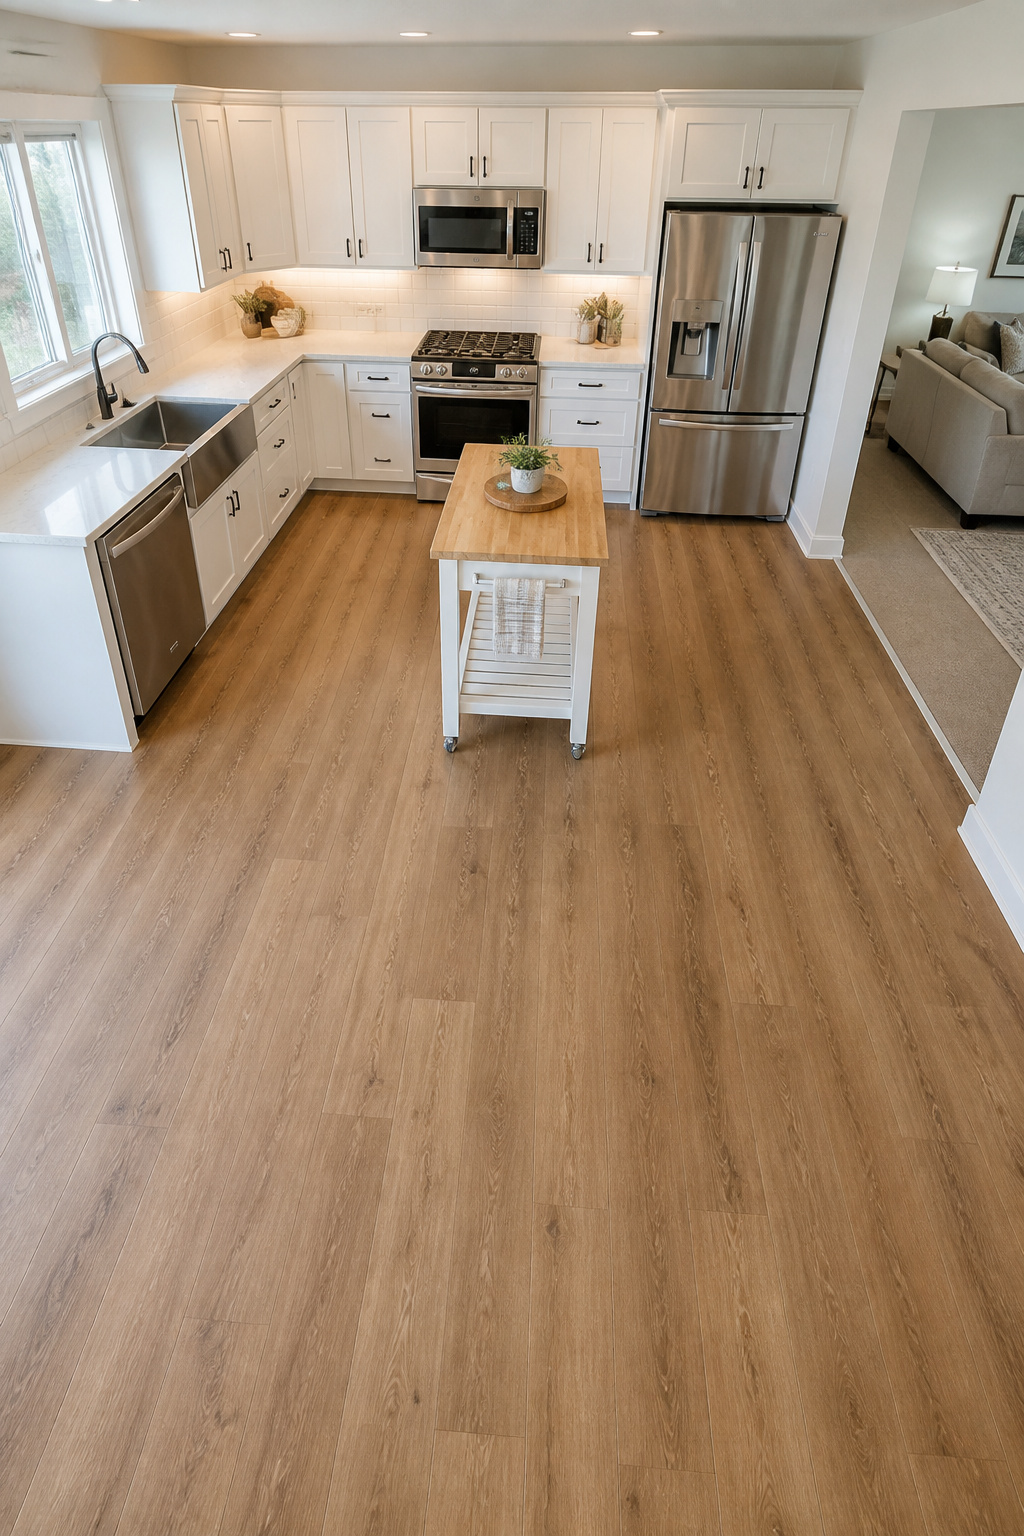
Luxury vinyl plank (LVP) is waterproof. Not water-resistant, waterproof — a sustained puddle won’t harm the material. It’s also significantly more comfortable underfoot than ceramic tile and handles real kitchen drop-impact well, which makes it practical as well as affordable. At $2–$5/sq ft in materials and $3.50–$9/sq ft installed, it’s accessible across a range of budgets. For example, a 150 sq ft kitchen comes in at $300–$750 in materials alone.
What to Look for in Budget LVP
Lifeproof (Home Depot exclusive, $3–$4/sq ft) is the most-reviewed budget LVP in the US and earns the reputation. It’s genuinely waterproof, scratch-resistant, and available in enough colors to fit most kitchen styles. Shaw Floorté and MSI are solid mid-range options at $3–$6/sq ft with a wider selection. The wear layer thickness determines long-term durability: 6-mil for standard residential use, 12-mil for high-traffic kitchens with pets or kids.
In fact, DIY installation is genuinely feasible with click-lock floating systems — no glue, no nails, planks just click together and float over the existing floor. The critical prep step: the subfloor must be flat within 3/16 of an inch per 10 feet. However, any high spots create a fulcrum that causes planks to flex and eventually unlock. Level the subfloor first, and the installation for a 150 sq ft kitchen takes a motivated DIYer 4–8 hours. For a budget kitchen remodel, that’s one of the better single-day investments available.
9. Painting a Feature Wall: A Budget Kitchen Renovation Move
A single painted wall costs $30–$80 in materials and a Saturday afternoon. For that investment, you can shift the entire personality of a kitchen — not just its color, but its sense of architectural intention. In fact, a deliberate accent wall signals that someone made a design decision here, and that communicates more about a kitchen’s quality than it has any right to.
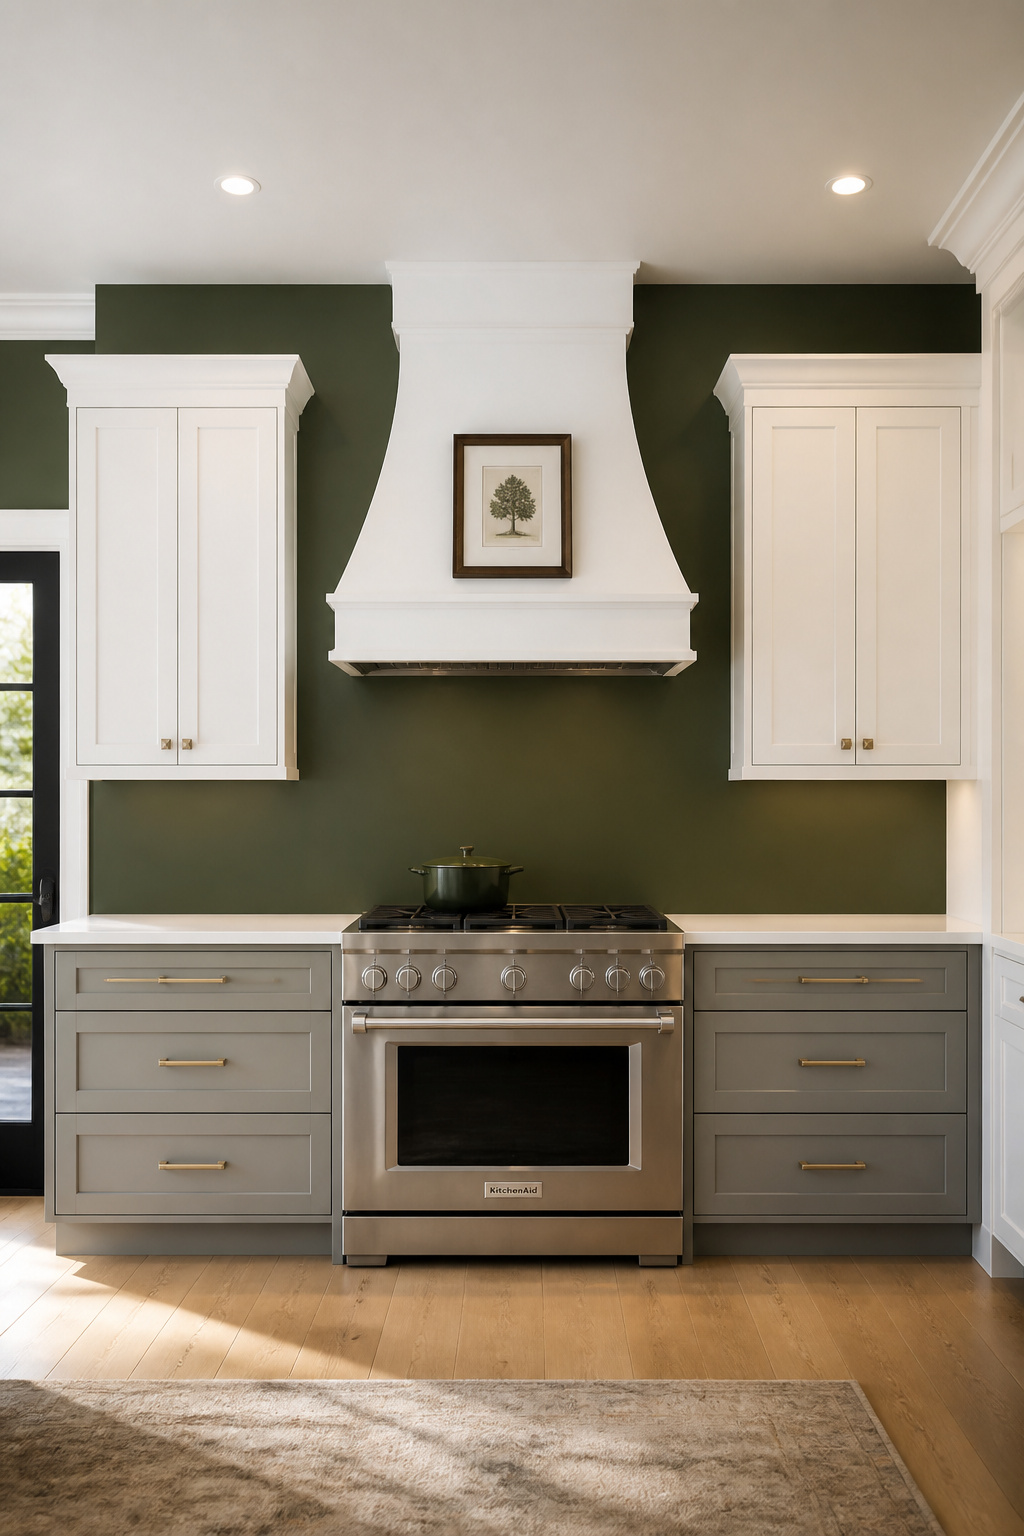
The best accent wall location in most kitchens is the wall behind the range. It’s where the eye goes when you walk in, it frames the primary cooking activity, and any material put there reads as intentional. Second choice: the wall opposite the kitchen entry, which visitors see first. One consistent mistake is choosing the refrigerator wall as the accent — the appliance interrupts the wall plane and fragments the design. The range wall, the preparation wall, and the sink wall all work better.
Color and Finish Choices
For color in 2025–2026, the direction is moodier and more grounded than the bright sages that peaked recently. Specifically, earthy and forest tones are leading. Sherwin-Williams Pewter Green reads as a muted sage-forest that holds across different lighting conditions. Benjamin Moore Rosemary is a deeper olive-green with warmth. SW Grounded (2025 Color of the Year) is an earthy tone that pairs well with warm wood and warm metals.
Finish selection matters as much as color. So, satin finish (25–35% sheen) is the practical choice for most kitchen walls — wipeable, handles moisture, hides imperfections better than semi-gloss. However, within 8 feet of the stove, use semi-gloss: grease aerosolizes during cooking and only semi-gloss withstands repeated degreaser scrubbing without breaking down. The hybrid that works well: satin on upper walls, semi-gloss below cabinet height near the range.
10. Freestanding Islands as a No-Demo Budget Kitchen Addition
A built-in island changes a kitchen permanently and costs several thousand dollars in materials and labor. A freestanding island cart changes it this weekend for $150–$600 and can move to another room if you change your mind. For a kitchen remodel on a budget, the freestanding route offers meaningful functional and visual upgrade with none of the commitment.
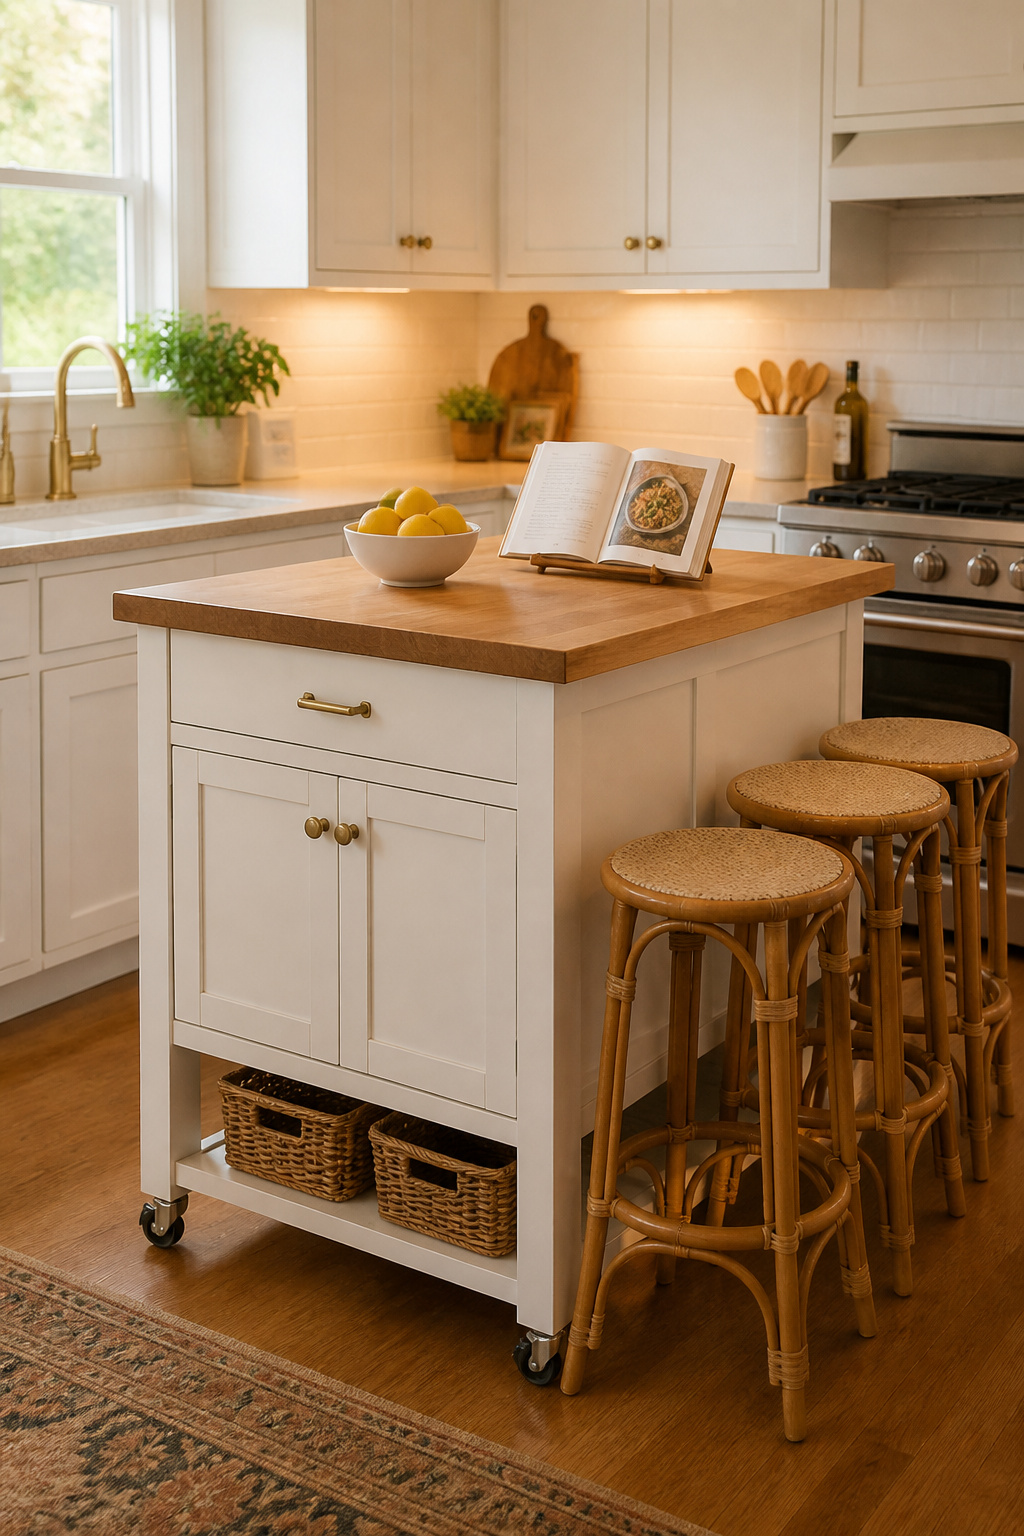
The sizing constraint is what most people overlook. The National Kitchen and Bath Association recommends 42 inches of clear space on all working sides of an island — 36 inches as the absolute minimum. A kitchen that doesn’t provide this clearance becomes harder to use with an island than without one. Also, the island shouldn’t exceed 10% of the kitchen’s total floor area. A 150 sq ft kitchen caps at roughly a 15 sq ft island.
Getting the Sizing Right
So get these numbers wrong, and what was meant to add function becomes an obstacle course. Work them out right, and the kitchen gains prep space, storage, and potential seating from a single piece of furniture. The Crosley Furniture Seaside Kitchen Cart ($189–$229) is the most-recommended entry-level option. It has a solid hardwood butcher block top at standard 36-inch counter height, a drawer, a cabinet below, and all-locking casters. John Boos Metro carts ($300–$600) step up to professional-grade maple butcher block and stainless steel.
Finally, styling determines whether the island looks planned or provisional. For example, match one element to the existing kitchen — a butcher block cart in a kitchen with any wood accents reads as intentional. Replace the cart’s stock hardware with the same pulls used on the cabinets. That’s a $10–$20 change that creates instant visual continuity. Keep the lower shelf consistently styled rather than empty or randomly stacked. An empty lower shelf signals temporary. A styled one signals it belongs.
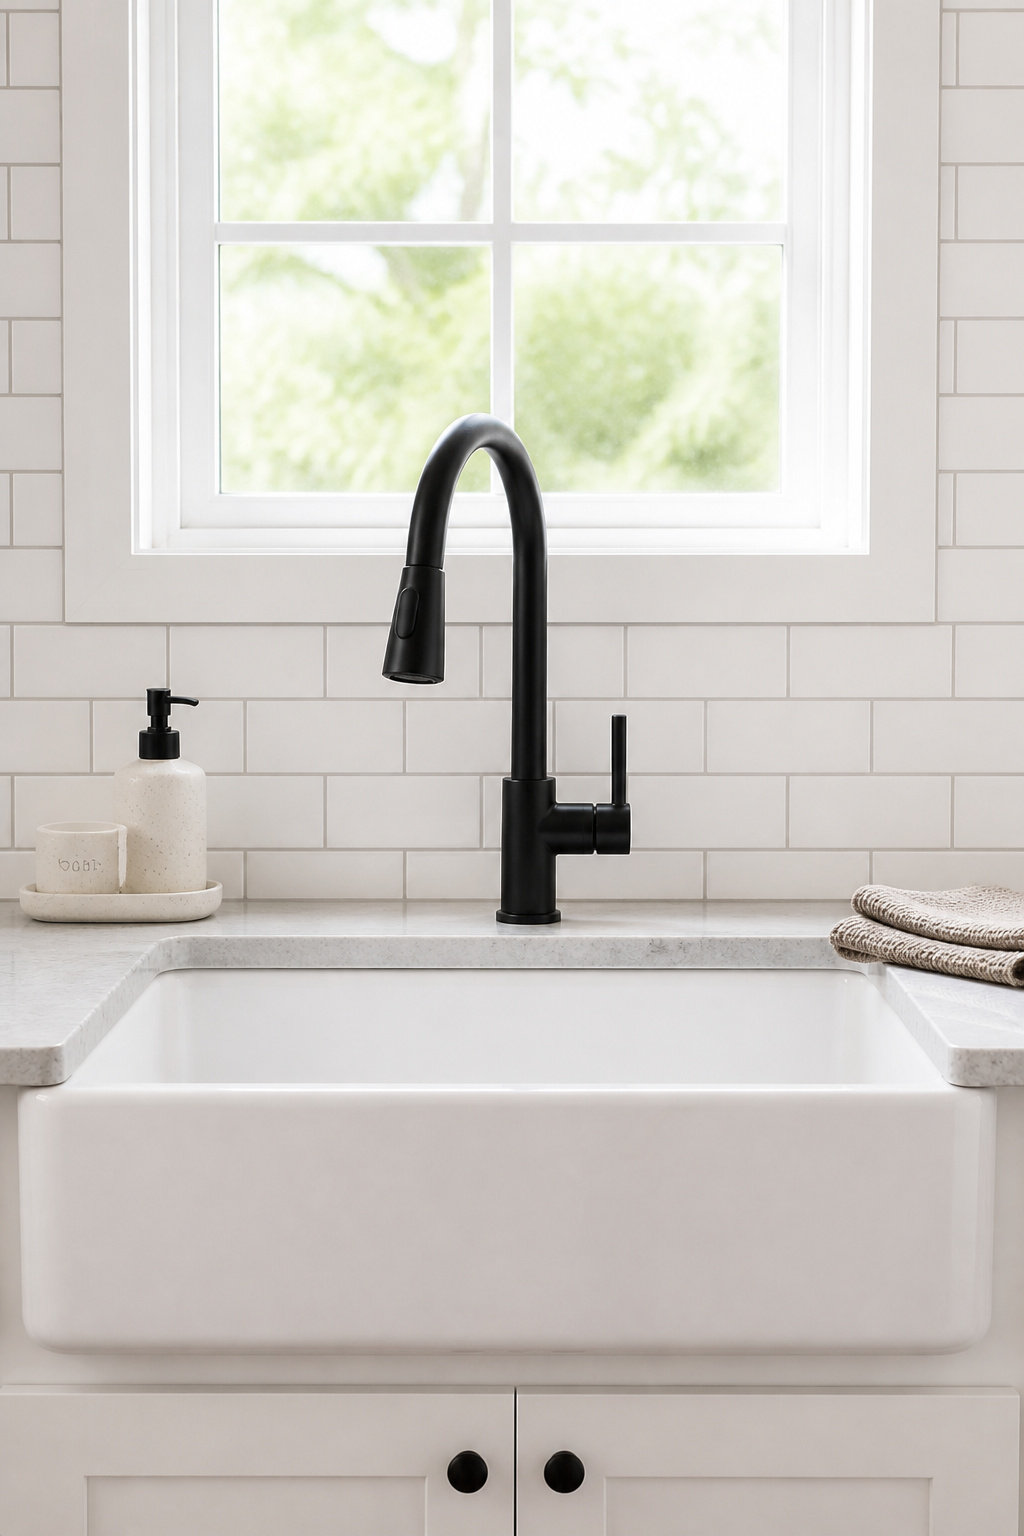
11. Sink and Faucet Swaps That Make a Surprising Difference
A faucet upgrade is not a glamorous project. It also consistently surprises people with how much it changes the sink area. That’s the part of the kitchen you’re looking at for a significant portion of every day. A pull-down sprayer replacing a dated two-handle faucet, or a matte black finish replacing polished chrome, reads as a design decision. Cost: $100–$400 for the fixture plus about an hour of your time.
So DIY feasibility depends on one variable: whether you’re replacing like-for-like. Same number of holes, same hole spacing, same supply line positions — that’s an afternoon project. You’ll need an adjustable wrench, a basin wrench for reaching under-sink mounting nuts (available for $15), a bucket, and plumber’s tape. Mismatching the hole configuration means drilling new holes or calling a plumber. Most homeowners installing a replacement faucet in an existing location are in the like-for-like category, saving $260–$480 in labor.
When shopping, check a few specifications beyond appearance. Look for solid brass or stainless construction (zinc alloy corrodes faster), ceramic disc cartridges (they outlast ball and cartridge mechanisms significantly), and a lifetime warranty. Moen, Delta, and Kohler all offer lifetime warranties. By contrast, off-brand faucets typically offer one year. For a faucet that sees heavy daily use, those specifications determine whether “affordable” stays affordable long-term.
For sinks, drop-in designs remain the most budget-friendly and DIY-accessible at $100–$400. Undermount sinks create a cleaner look but require a solid-surface countertop — they can’t be installed on laminate without professional support. Farmhouse apron sinks are a statement worth the investment, but they’re not a weekend swap. The front panel of the sink base cabinet needs to be modified, which means planning this alongside a larger project.
12. Affordable Kitchen Remodel: New Pendant Lighting Over the Island
Overhead can lighting floods a kitchen but leaves the island in functional shadow. Two or three pendants hung at the right height change that completely — and they do something else: they define the space. In an open-plan kitchen, pendants above the island create a visual zone that architecturally separates the kitchen from the living or dining area without any walls.
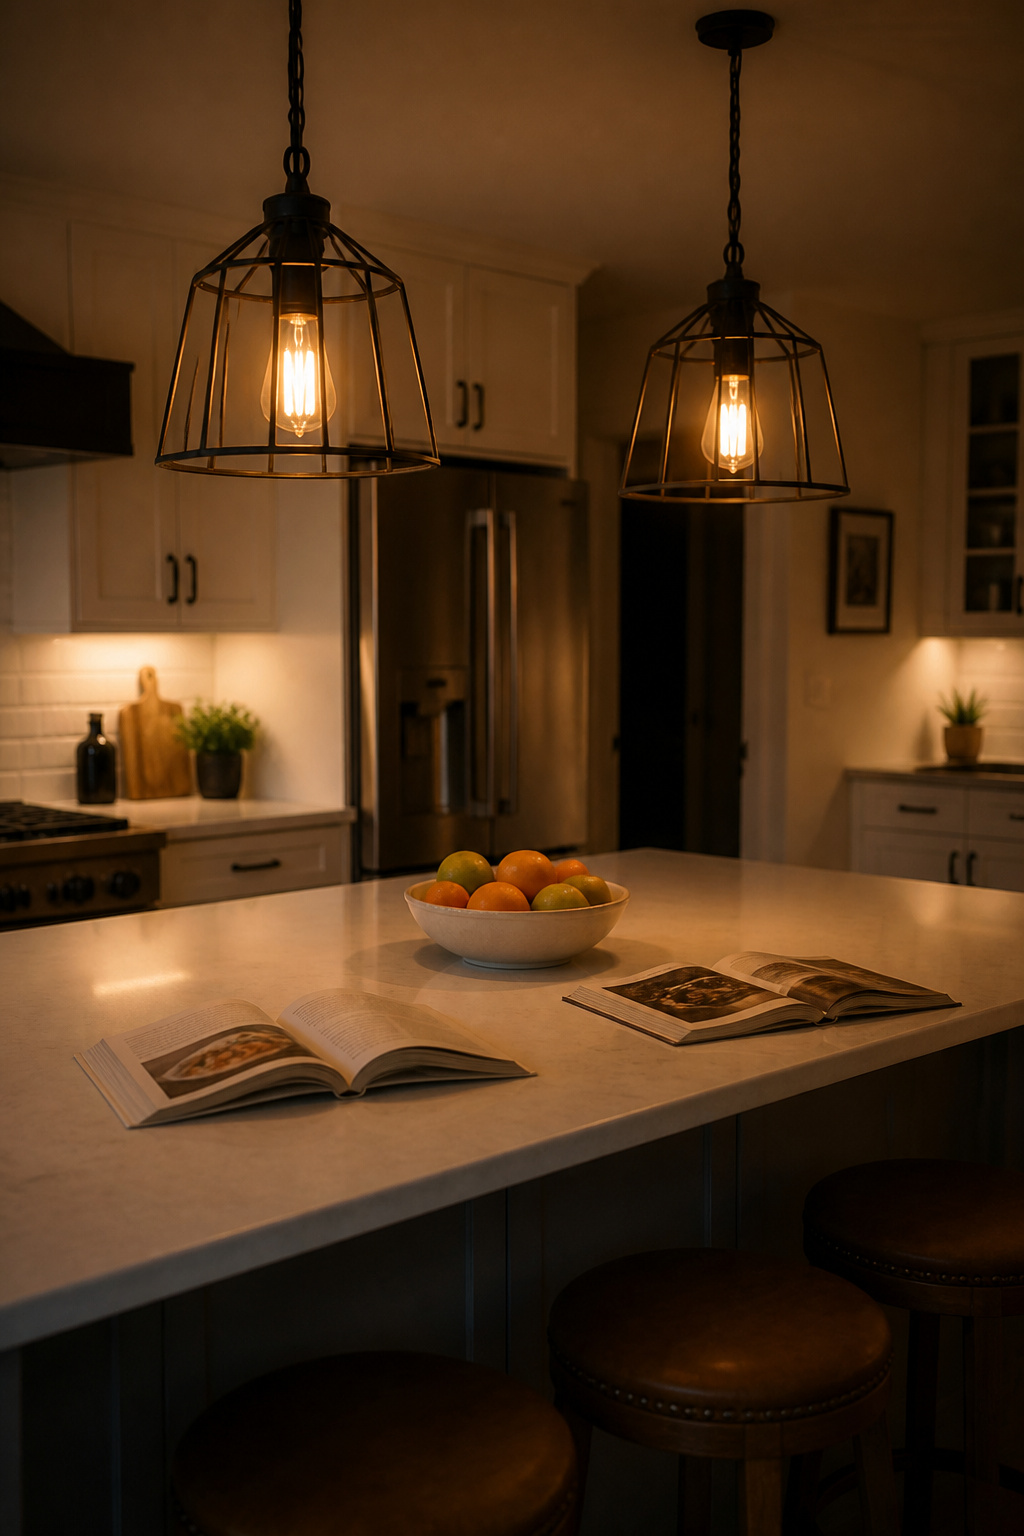
First, the hanging height rule: 30–36 inches above the countertop surface. Higher than 36 inches and the pendants lose task function — they float too far above to illuminate the surface. Lower than 30 inches and they interrupt sightlines. Cord length is adjusted at installation, so measure carefully before the final hang.
For sizing and quantity: each pendant should be roughly 1/3 to 1/2 the width of the island. On a 48-inch island, two pendants with 10–14 inch diameters spaced 24 inches apart is the standard. On a 72-inch island, use three smaller pendants or two larger ones. Leave 6–8 inches of clearance at each end. Budget sources worth checking: Amazon’s Stone & Beam line ($40–$80 per pendant) consistently earns good reviews for quality at price. World Market carries rattan and woven pendants ($30–$70) that work well in farmhouse and coastal kitchens. If you want more kitchen lighting ideas over the table and island to narrow down a direction before purchasing, there’s a wide range of approaches worth understanding.
For bulbs, Edison-style LED filament at 2200–2700K in a cage or glass pendant is the current go-to. Warm, photographically flattering, and energy-efficient while looking decidedly the opposite.
13. Refinishing Existing Surfaces Instead of Replacing Them
Not everything needs replacing to stop looking the way it looks. Refinishing — applied to cabinets, countertops, and tile — has improved significantly in the last decade. The products are better, results are more predictable, and the cost difference versus full replacement remains substantial — often 80–90% less. For anyone planning a kitchen remodel on a budget using existing surfaces that are structurally sound, refinishing is often the correct call.
For cabinets specifically, the distinction between refinishing and painting matters practically. Refinishing uses a chemical deglossing agent before any paint or topcoat. The chemical removes the tooth of the existing finish and creates a bonded interface, rather than just a mechanical one. Rust-Oleum Cabinet Transformations ($80–$120) includes deglosser, paint, and glaze in an integrated system designed for DIY. Alternatively, General Finishes Milk Paint with a clear topcoat is the enthusiast choice — more prep steps, but a harder, smoother final surface.
Countertop refinishing is where expectations matter most. Rust-Oleum Countertop Transformations ($80–$110) and Giani Countertop Paint ($70–$90) were designed for laminate — not tile or natural stone. On laminate, however, a well-applied coat lasts 3–7 years before showing edge wear. The catch: any existing chips or bubbles in the laminate telegraph through. For countertops in good structural shape but outdated in color, these kits are genuinely worthwhile.
Tile painting gets less attention than it deserves. Rust-Oleum Tile Transformations ($70/kit) etches and coats ceramic and porcelain — not glass or natural stone. The etching step is mandatory. On backsplash tile, expect 3–5 years of durability. On floor tile, 2–3 years. Color options have expanded well beyond white-and-beige. Gray, navy, and sage green are now available, which opens backsplash painting as a genuine design option rather than a last resort.
14. Cabinet Organization Systems That Make the Kitchen Work Better
The functional quality of a kitchen is almost entirely determined by what happens inside the cabinets, not outside them. The average American kitchen has 20–30% of cabinet space that is practically inaccessible. That includes the back of deep base cabinets, the dead zone in blind corner cabinets, and the second pantry tier blocked by whatever’s in front. Organization systems recover that space, and recovered space changes how the kitchen works every single day.
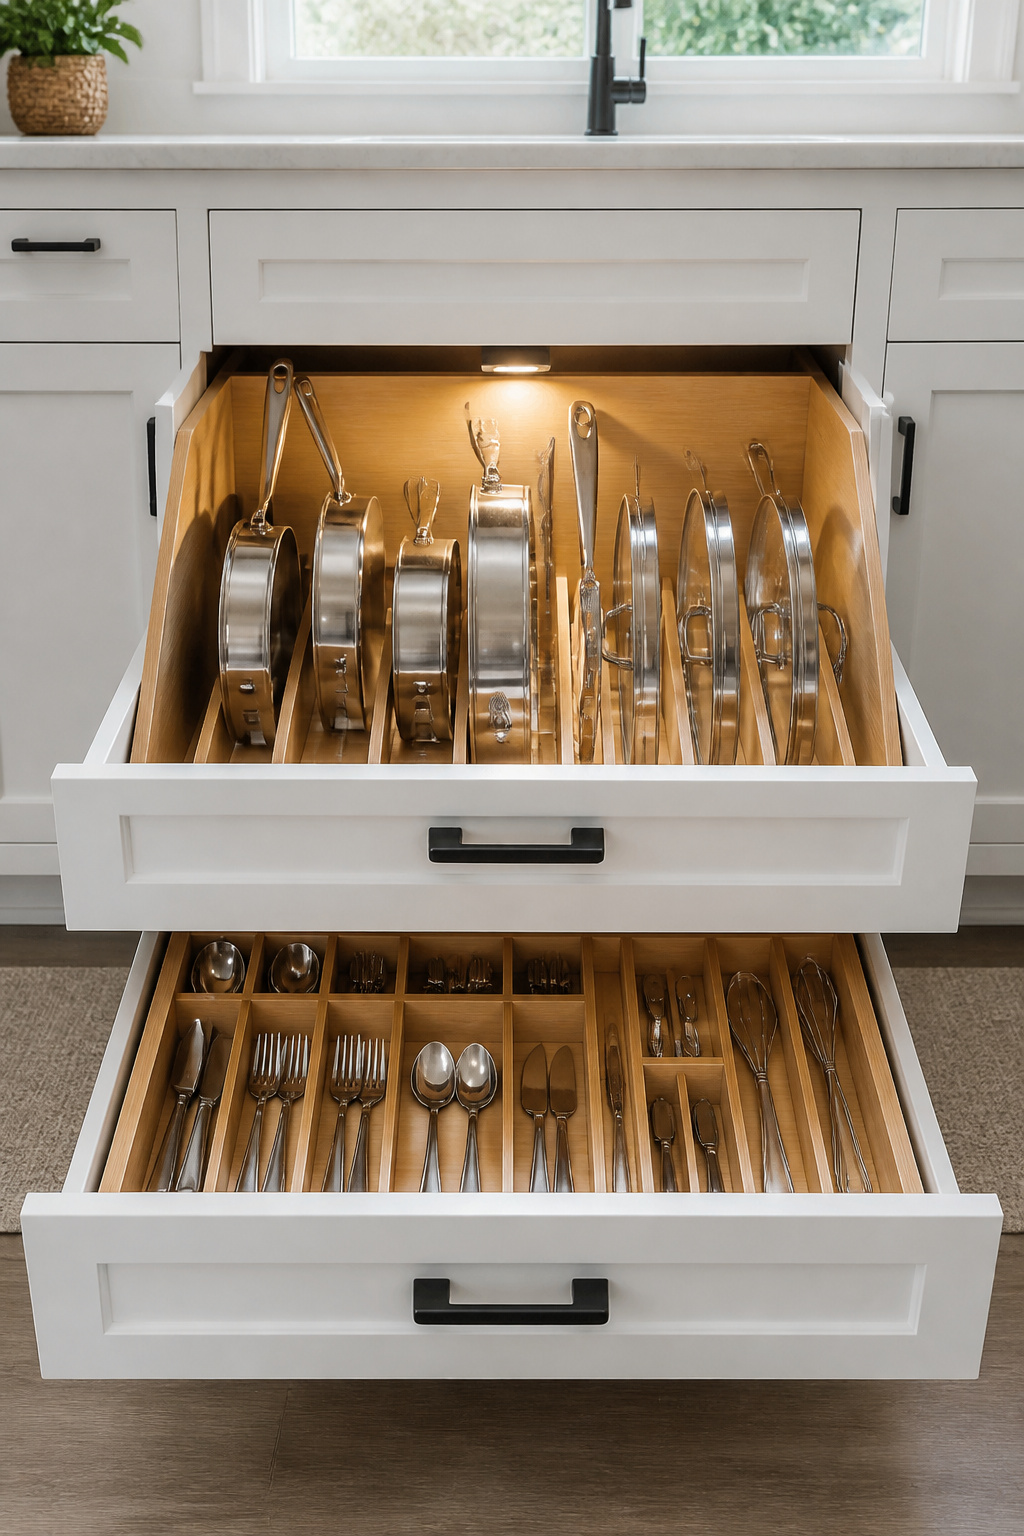
So, drawer inserts are the most immediately impactful upgrade. Bamboo drawer dividers ($15–$30) take 20 minutes to install and transform a utensil drawer from a chaotic pile into a system that stays organized without ongoing effort. The Rev-A-Shelf two-tier cookware organizer (~$100 on Amazon) solves the stacked-pans problem permanently — independently operating shelves that accommodate any combination of cookware sizes. Also, pull-out trash and recycling units ($50–$150) are the one upgrade that makes a kitchen feel most like it was professionally designed. For more options across every price range, a resource like kitchen cabinet organizers that actually work is useful before committing to any system.
Solving Corner and Pantry Problems
Corner cabinets deserve their own strategy. Traditional lazy susans are better than nothing. However, blind corner pull-out shelves (Rev-A-Shelf 5-Series, $150–$250) are the significant upgrade — the entire contents pull fully out of the cabinet and into view. The IKEA UTRUSTA corner pull-out ($140–$200) fits standard cabinets and provides the same function at a lower price, with somewhat less smooth operation as the trade-off.
For pantry organization, the system that holds over time has two elements: clear airtight containers (OXO Pop containers, $5–$15 each) and defined zones. Baking zone, snack zone, canned goods zone. When everything for a purpose lives together, putting away groceries becomes automatic and finding things stops being a project.
15. Window Treatments That Give a Kitchen a Finished Feel
An untreated window reads as an oversight. Sometimes bare windows are deliberate and work — but in most kitchens they communicate “not quite finished,” which undermines every other improvement made in the room. Window treatments close the loop. For anyone doing a kitchen remodel on a budget, this is often the final visual detail that makes everything else look intentional.
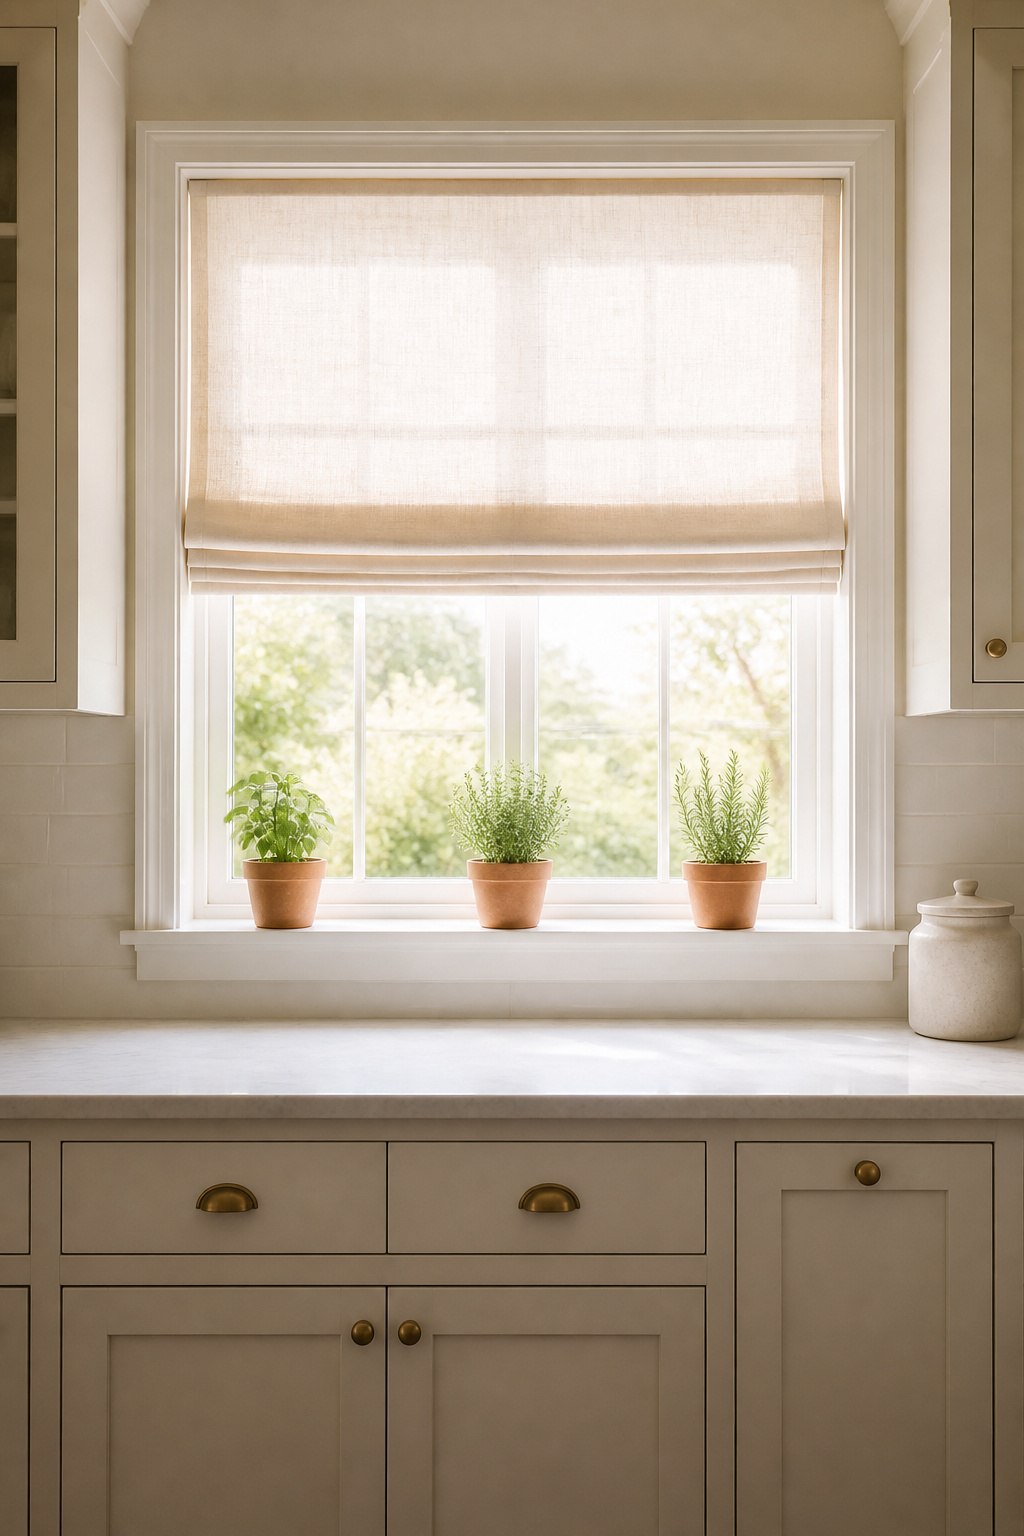
Café curtains cover only the lower half of the window. They maintain natural light through the upper section and provide privacy where it matters — at eye level from the street. A café curtain on a tension rod inside the lower window frame is a 15-minute installation costing $15–$60 for the pair. They’re washable, they’re traditional in kitchen environments, and they work alongside most design styles from farmhouse to transitional to eclectic. In other words, they’re the safe choice that still looks considered.
Alternatively, Roman shades are the more tailored option — a flat fabric panel that folds into neat horizontal pleats when raised. Installed outside the window frame, they make narrow windows appear wider. Fabric matters here: polyester-linen blends resist the grease and moisture that cotton absorbs over time. For windows within 8 feet of the stove, avoid cotton and natural linen, which absorb cooking odors and eventually hold them.
A simple roller blind ($20–$80) is the maintenance-minimum solution — wipes clean, operates with a chain, lasts years without attention. It’s not the most design-forward choice, but it’s consistent with a kitchen where practicality is the priority. The one treatment to avoid in most kitchens: floor-length curtains. In a space where grease is airborne and the floor is regularly mopped, fabric dragging on it creates a hygiene issue that defeats the decorative purpose entirely.
16. Tile and Shiplap Accent Walls: A Budget Kitchen Remodel Finishing Touch
An accent wall doesn’t cost $4,000. Applied to the right location in the right material, it adds architectural character the kitchen didn’t have before — for between $80 and $400. The difference between “adds character” and “looks like a project” comes down to location and material choice.
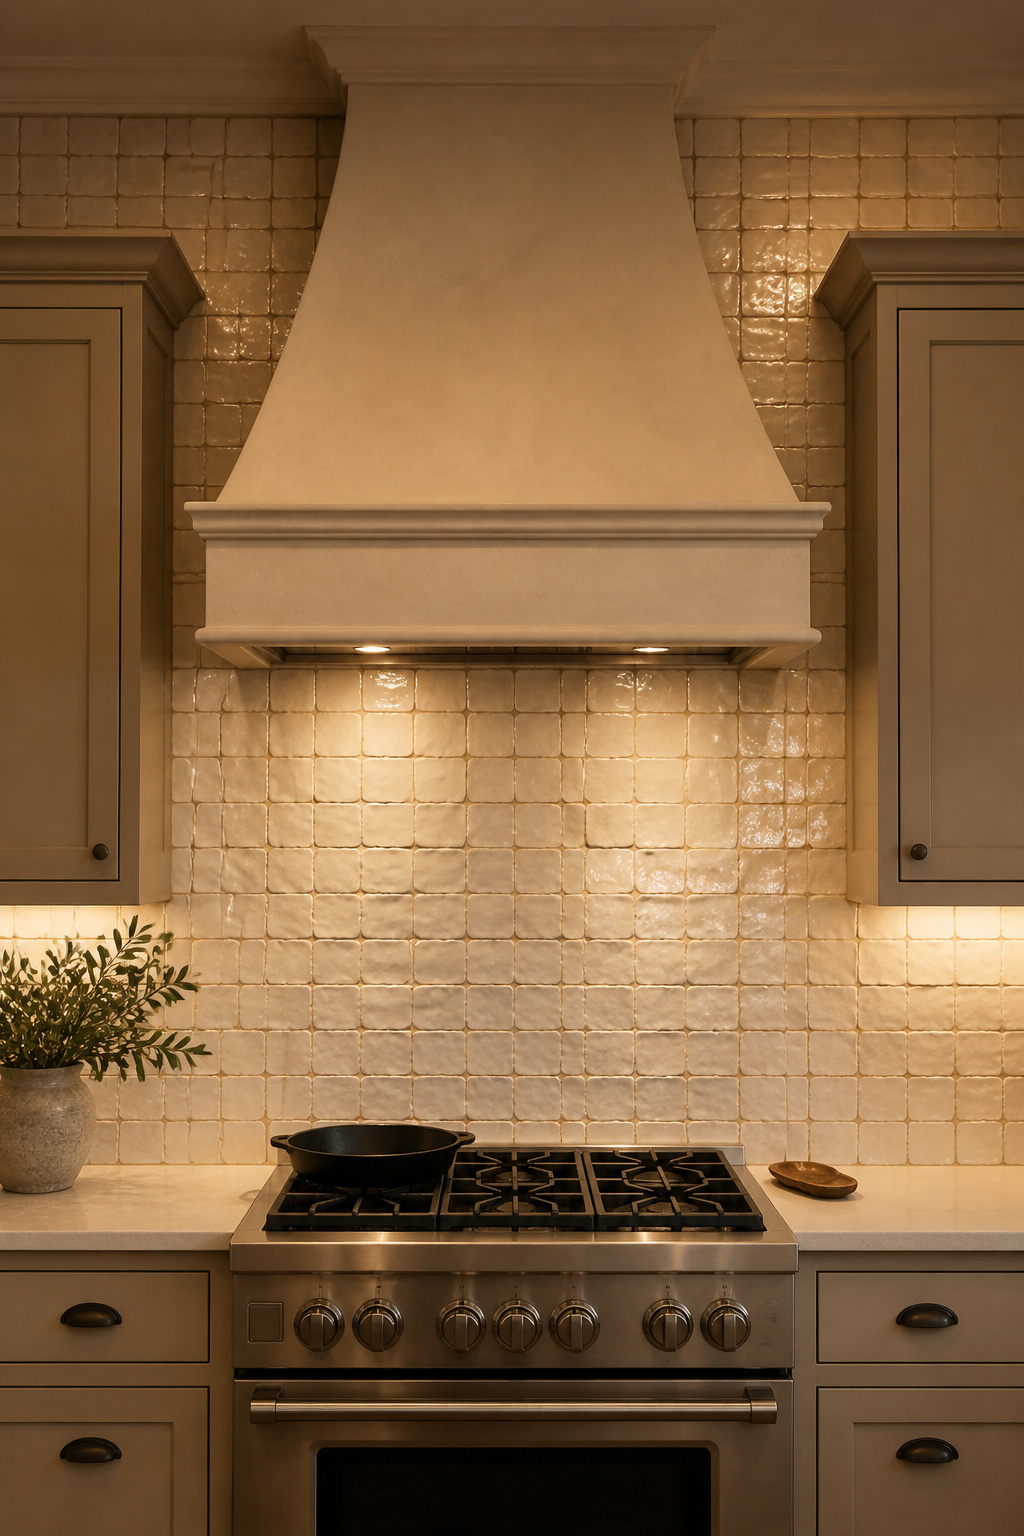
First, location. The wall behind the range is the strongest accent wall position in most kitchens. It’s where the eye goes, it frames the primary cooking activity, and any material put there reads as intentional. Second choice: the wall opposite the kitchen entry, which visitors see first. Avoid the refrigerator wall, which fragments the design. A band of shiplap above the upper cabinets on an existing soffit is a lower-effort option that adds architectural detail without requiring a full wall.
Material Selection by Location
For shiplap, Stikwood peel-and-stick planks ($8–$12/sq ft) use real wood veneer on an adhesive backing. They install in an afternoon without tools and look authentic in photographs and from normal conversational distance. Real shiplap boards ($2–$7/sq ft in materials, $15–$30/sq ft installed) provide actual depth and shadow lines. That said, neither should go directly behind an active gas range where surface heat is significant. The range surround is where tile belongs.
For the stove surround specifically, tile is the correct and durable choice. The 2025–2026 direction is away from mass-produced uniform subway tile. Instead, handcrafted-look ceramics with intentional irregularity are leading — surfaces that reflect light unevenly and shift in appearance as daylight changes. Budget approach that works well: tile the range surround (a small area, maximum visual impact) for $100–$200 in materials, then paint an adjacent wall a complementary color. Two changes, under $300, and the stove area looks like you redesigned the entire kitchen.
How to Plan Your Kitchen Remodel on a Budget (and Where to Start)
The mistake most budget kitchen remodels make is randomness — picking the change that feels most urgent today without a sequence that allows each step to build on the last. In practice, that means new hardware sitting beside dingy cabinets, or freshly painted walls immediately scratched by the flooring installation.
The sequence that works: paint first (ceilings, then walls, then cabinets). Install under-cabinet lighting before painting walls so you’re not patching around fixtures later. Then hardware, after the cabinet paint has fully cured (48–72 hours for alkyd-based paints), and flooring last. After all, flooring gets scratched by everything that happens above it — it’s always the final installation in any remodel sequence.
Budget allocation across a full kitchen remodel on a budget: roughly 40% on cabinet work (paint or refinishing). The remaining 60% splits three ways — hardware and lighting, organization systems, and finishing touches like the accent wall, window treatments, and accessories. This distribution reflects where the visual return is highest.
The multiplier principle ties everything together: cabinet paint alone is good. Cabinet paint plus new hardware plus under-cabinet lighting crosses into “did you renovate?” territory. So the changes compound — they begin reading as a renovation rather than a list of updates. That’s the goal. A kitchen remodel on a budget done in this sequence, in these proportions, and in this order gets there without the gut renovation price tag.