Here’s the myth most bathroom renovation guides quietly perpetuate: that a meaningful transformation requires gutting the room. Tear out the tile, replace the vanity, hire a plumber, spend $8,000. The reality is different. A budget bathroom remodel is almost never about replacement — it’s about substitution and material literacy. Knowing which surfaces carry the most visual weight, which finishes read as intentional versus inherited, and which swaps deliver the highest return per dollar spent changes how you approach the entire project. These 15 ideas cover the full spectrum, from a $12 tube of caulk that eliminates the most obvious sign of neglect to a prefab shower surround that solves the grout problem permanently. Each one is grounded in how materials actually behave, not just how they photograph on someone else’s renovated bathroom reveal.
1. Peel-and-Stick Vinyl Tile Over Existing Flooring
The material science here is simpler than it sounds. Luxury vinyl plank tile uses a non-breathable vinyl face layer that prevents steam and humidity from working beneath it — unlike some porous adhesive systems that fail in wet zones within a year. The result, when installed correctly, holds in powder rooms and low-moisture bathroom floor areas for five to seven years before replacement is worth considering. At $40-80 to cover a standard bathroom floor, it’s consistently one of the most cost-effective changes in a budget bathroom remodel, and it’s one that most guests assume is permanent ceramic.
Product matters more than most guides admit. FloorPops, Art3d, and Achim Tivoli II are the most consistently reviewed budget brands; FloorPops Medina in particular balances pattern quality, adhesion strength, and edge stability. Tiles thinner than 1.5mm tend to curl at seams within 12-18 months; anything 2mm or thicker behaves differently — the additional density keeps edges flat under the foot traffic and temperature cycling that characterize bathroom floors. If you want to layer this with bathroom tile designs that complement vinyl on the walls, the combination of LVP floors and ceramic wall tile creates a high-contrast material story that reads well above its price point.
The install is almost entirely a prep story. Flatten the substrate first — any height variation over 3/16 of an inch per ten feet becomes a visible seam lift within weeks. Degrease the surface with a TSP substitute before laying a single tile. Start from the center of the room and work outward, press each tile from the middle outward with a rubber roller, and keep the tile well away from the inside of the shower stall where standing water will eventually find an edge.
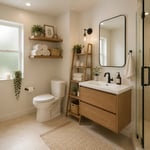
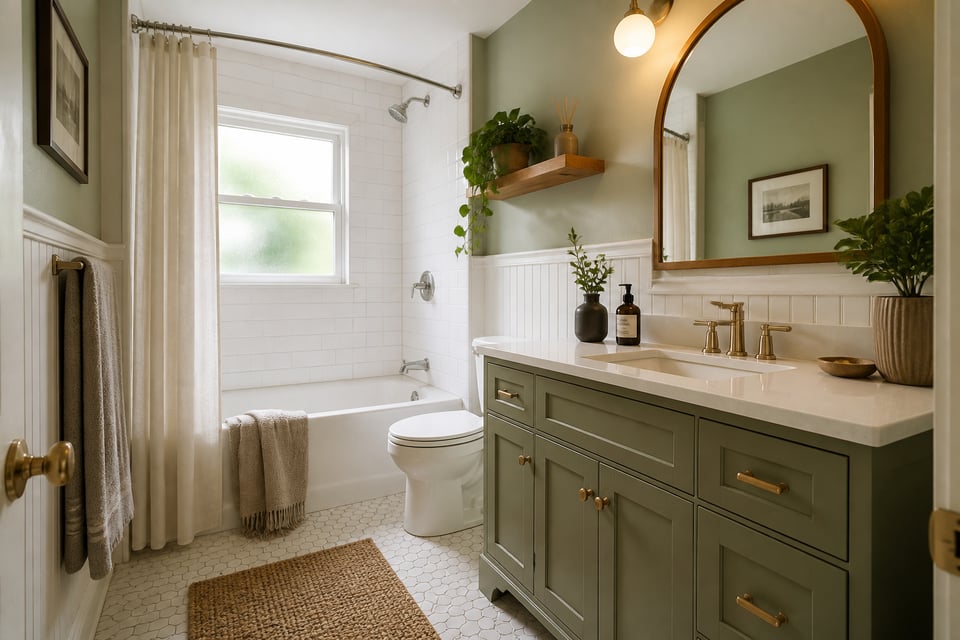
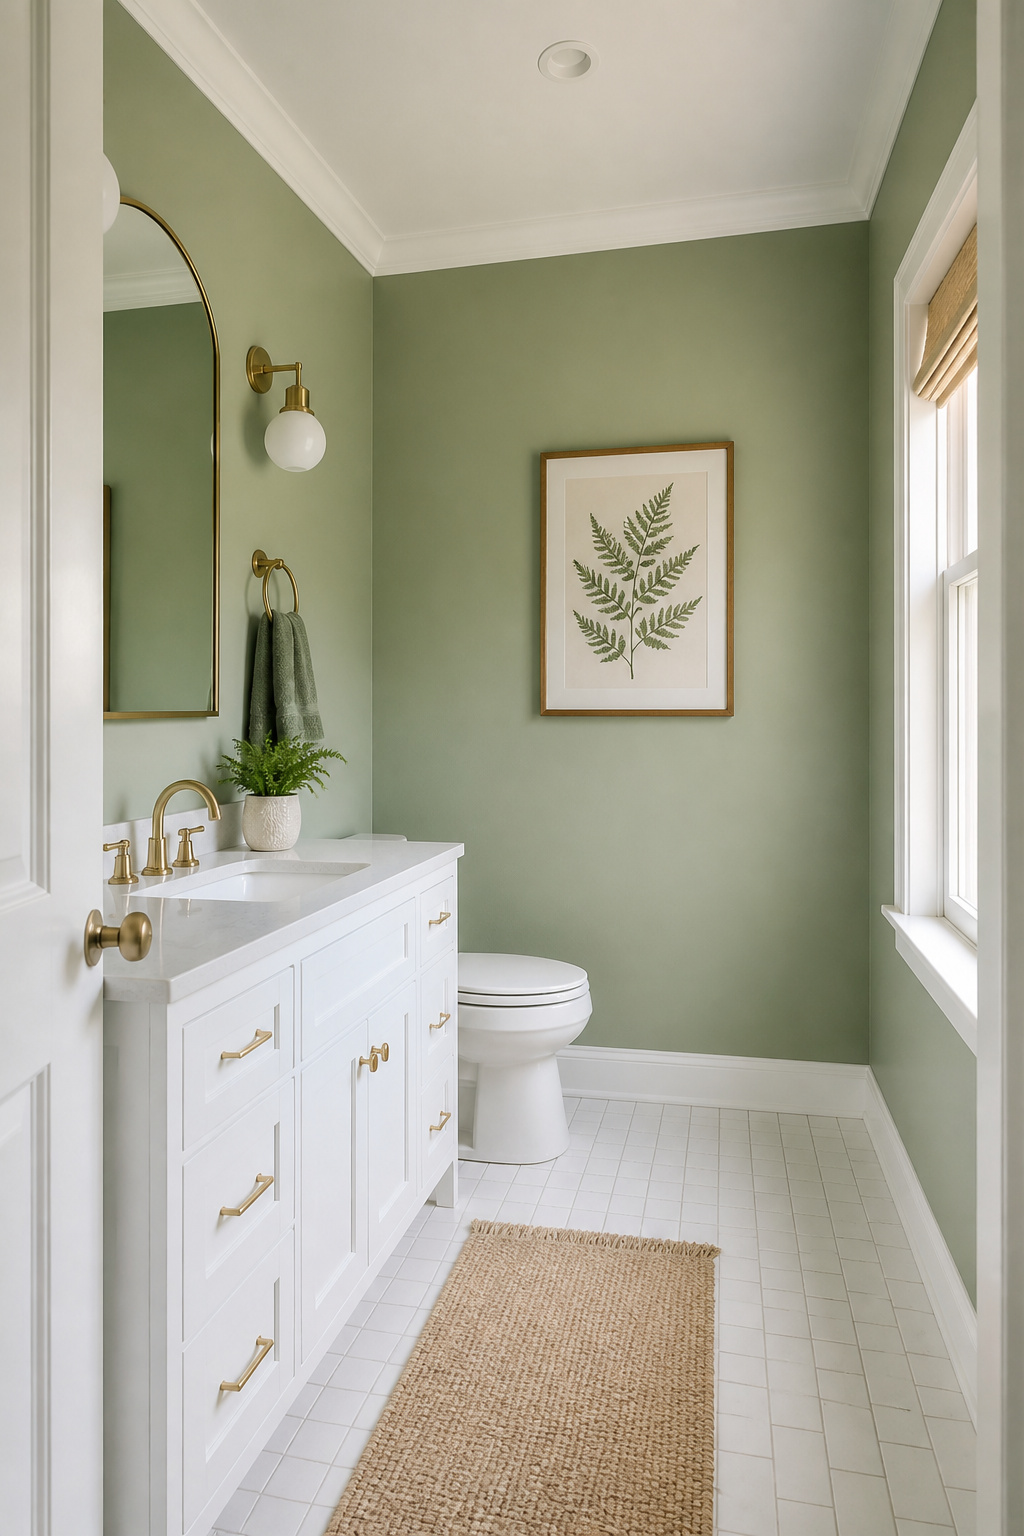
2. Painted Vanity Cabinets With Swapped Hardware
The transformation works because painted cabinets in the right finish change the most furniture-like object in the bathroom. But the finish only holds if the primer is right — and this is where most DIY painted vanity projects fail within six months. Standard latex primer doesn’t create a mechanical bond with laminate or thermofoil surfaces, the two most common vanity materials. Zinsser Bulls Eye 1-2-3 or Stix by Benjamin Moore create the bond that regular primer can’t, and they make the difference between a surface that chips at every door edge after three weeks and one that holds for years. This paint-and-hardware combination is among the highest-return moves in any budget bathroom remodel — the vanity changes character completely without touching a single pipe.
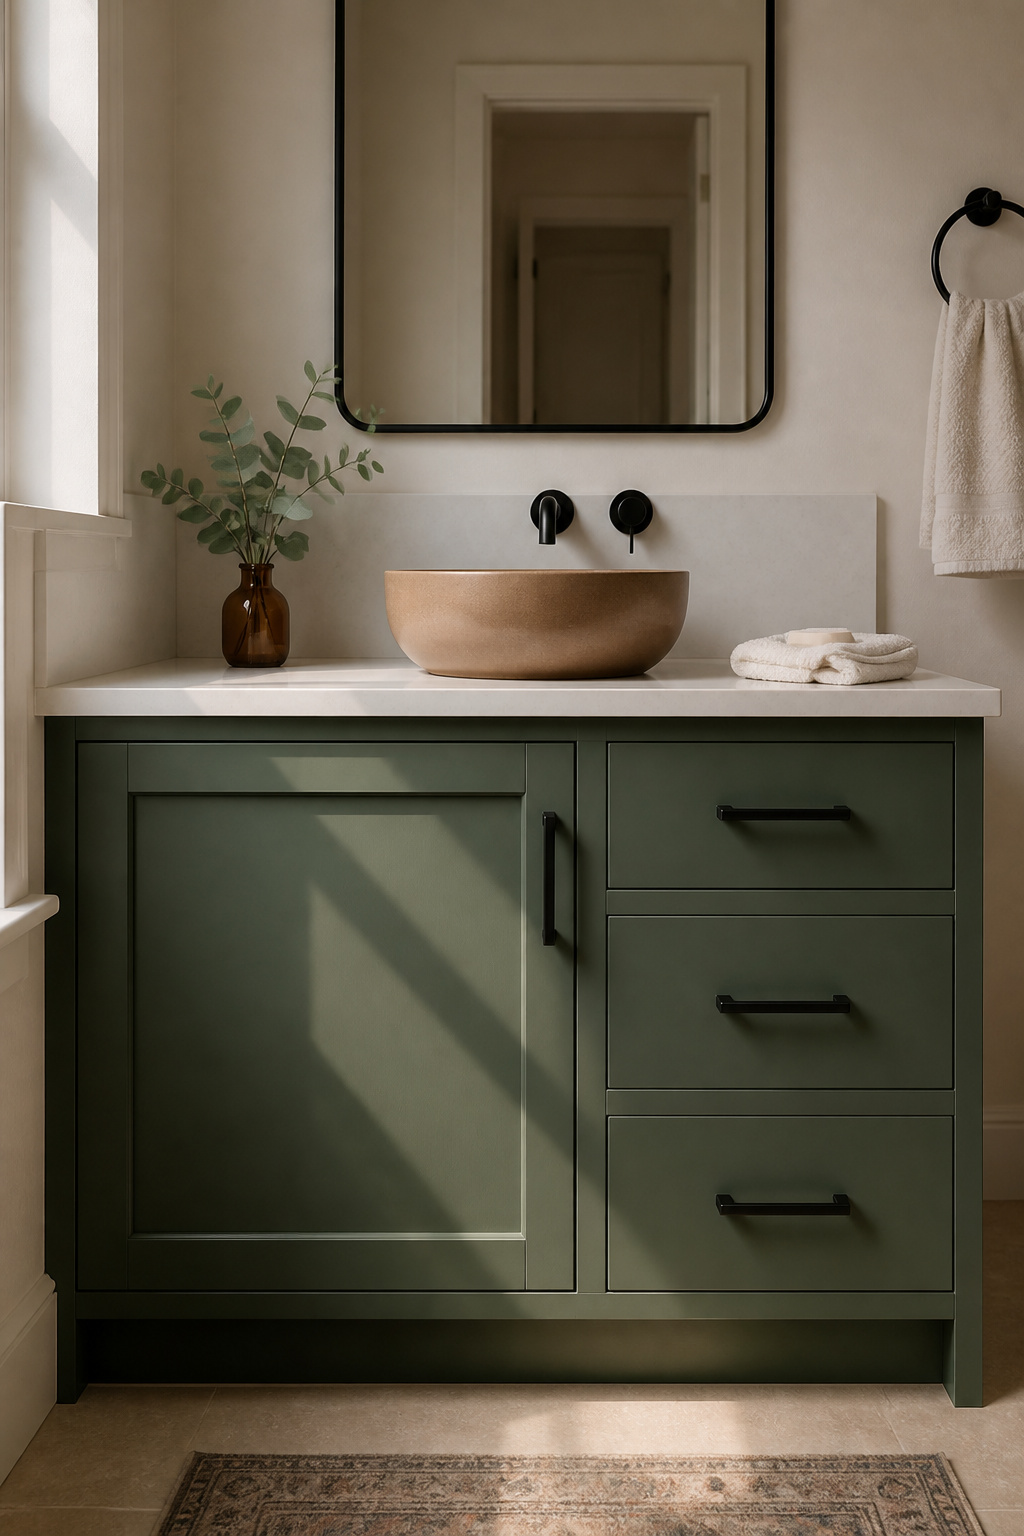
After priming, paint choice matters almost as much. Benjamin Moore Advance and Sherwin-Williams Emerald Urethane are alkyd-based hybrids that cure to a harder film than standard interior latex — critical in a bathroom where the cabinet doors get wiped with damp cloths repeatedly. Apply in thin coats with a foam roller on flat surfaces (brush marks show dramatically under bathroom vanity lighting), and let the cabinet cure for two to three days before reattaching doors. Hardware itself is often overlooked in the math: replacing six pulls and two knobs on a standard vanity runs $25-60 total. Match the finish to at least one other metal in the room — the faucet, the towel bar, the light fixture — and the room reads as coordinated rather than accumulated.
3. A Statement Mirror to Replace the Builder-Grade Default
Plate glass mirrors — the standard builder installation — recede. There’s nothing for the eye to anchor on, so the mirror reads as a functional object rather than a designed element, which subtly undermines everything else in the room. A frame changes this completely. Even a simple black metal or natural wood frame creates a boundary that functions as wall art, elevating the vanity area without touching the plumbing or spending more than $100.
Sizing is the most ignored variable. The mirror width should be 70-90% of the vanity width — never wider than the cabinet itself. For a 36-inch vanity, target a 26-32 inch mirror. Going wider than the vanity creates an unanchored, floating quality that makes both pieces look smaller. Height typically falls between 28-36 inches, with the bottom of the mirror sitting 5-10 inches above the backsplash. For sourcing, Target’s Threshold line offers arched and rectangular framed mirrors in black metal or natural wood between $60-100. Wayfair’s Birch Lane and Latitude Run collections regularly carry well-reviewed options under $120. Umbra and Latitude Run pieces on Amazon photograph like Pottery Barn designs at about 30% of the cost.
4. Affordable Bathroom Renovation: Open Shelving Instead of a Medicine Cabinet
Medicine cabinets create a visual dead zone. Recessed models disappear into the wall and reflect back whatever is in front of them. Surface-mounted models add visual bulk. In either case, the result is a wall element that contributes nothing to the room’s design language. A floating shelf in teak or sealed bamboo, styled with a few considered accessories, creates the impression of a designed space rather than a functional room — and it does this at roughly the same cost as a mid-range replacement cabinet. For the small bathroom organization strategies that make open shelving genuinely practical rather than purely aesthetic, that system thinking starts before the shelf goes up.
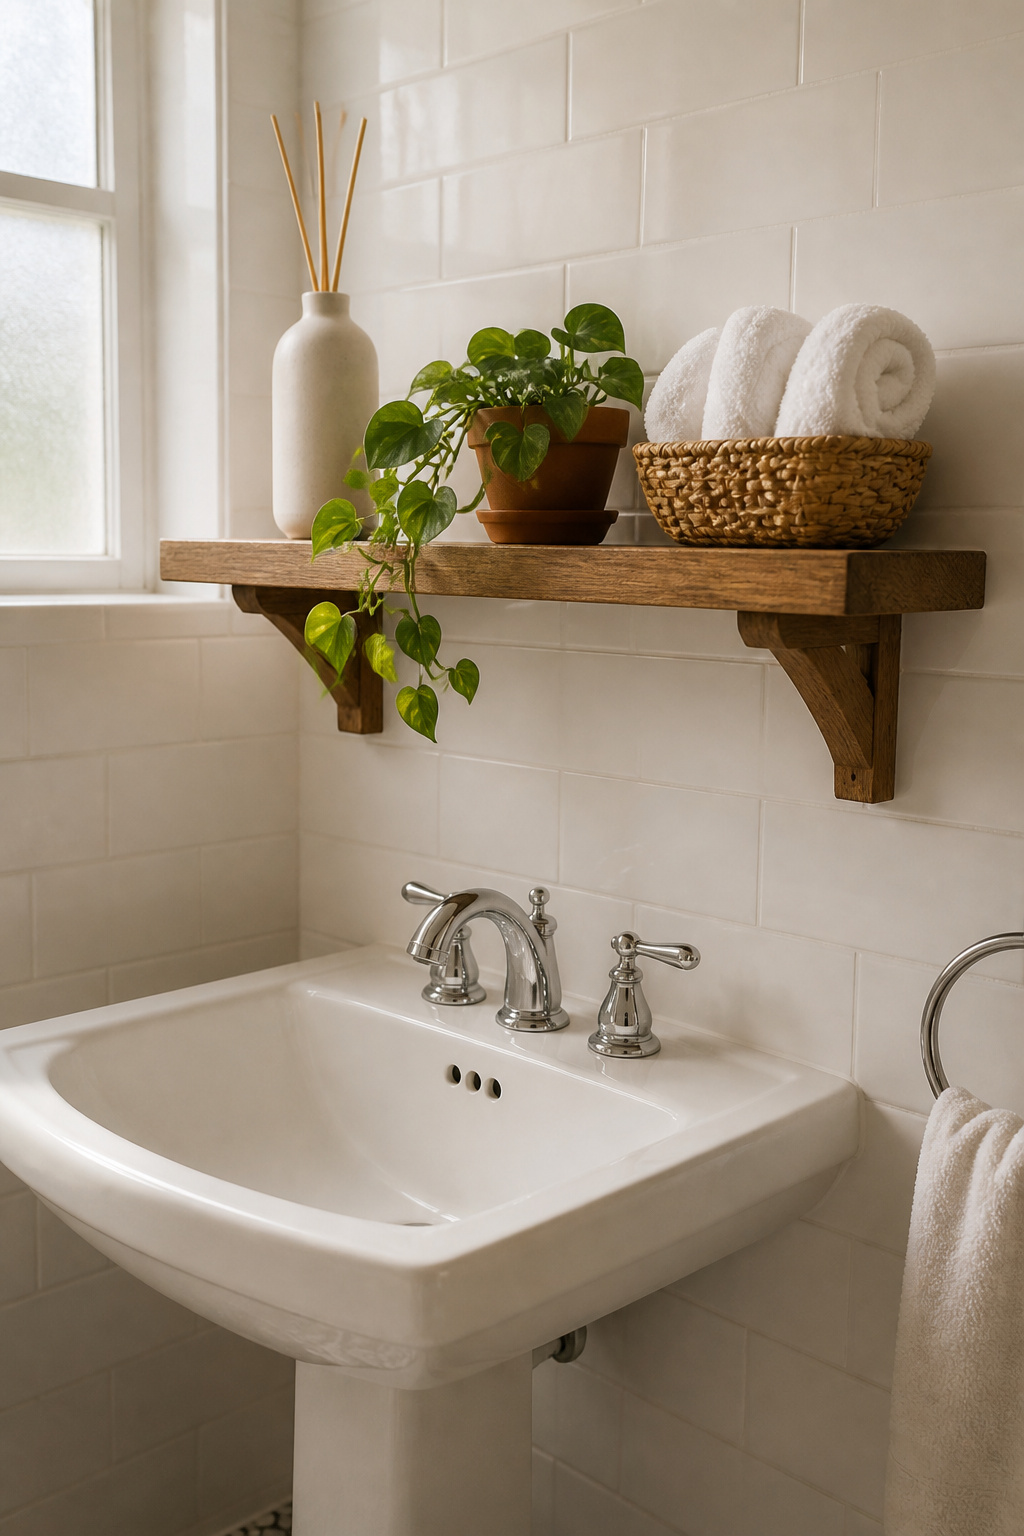
Choosing the Right Material for Humidity
Material choice is non-negotiable in a bathroom. Teak is naturally waterproof due to its high oil content and dense structure; it handles the humidity fluctuation of a daily shower without warping or cracking, and requires no sealing for the first two or three years. Bamboo is nearly as resilient — its tight grain and natural silica content resist moisture, though it benefits from an annual wipe-down with teak oil. Pine and standard MDF absorb moisture and delaminate within six to twelve months near a shower, regardless of how many coats of paint sit on top.
Installing When the Studs Aren’t Where You Need Them
IKEA’s BERGSHULT shelf with GRANHULT bracket is rated to 33 lbs per bracket and ships as a complete system — one of the most cost-effective floating shelf solutions available. When studs aren’t where you need them, Toggler brand toggle bolts rated above 200 lbs handle heavy decorative items; hollow-wall anchors work for shelves that will carry under 25 lbs loaded. Style the shelf with odd-number groupings: a tall diffuser, a medium ceramic vessel, and a small succulent reads as curated. Four matching bottles reads as a pharmacy shelf.
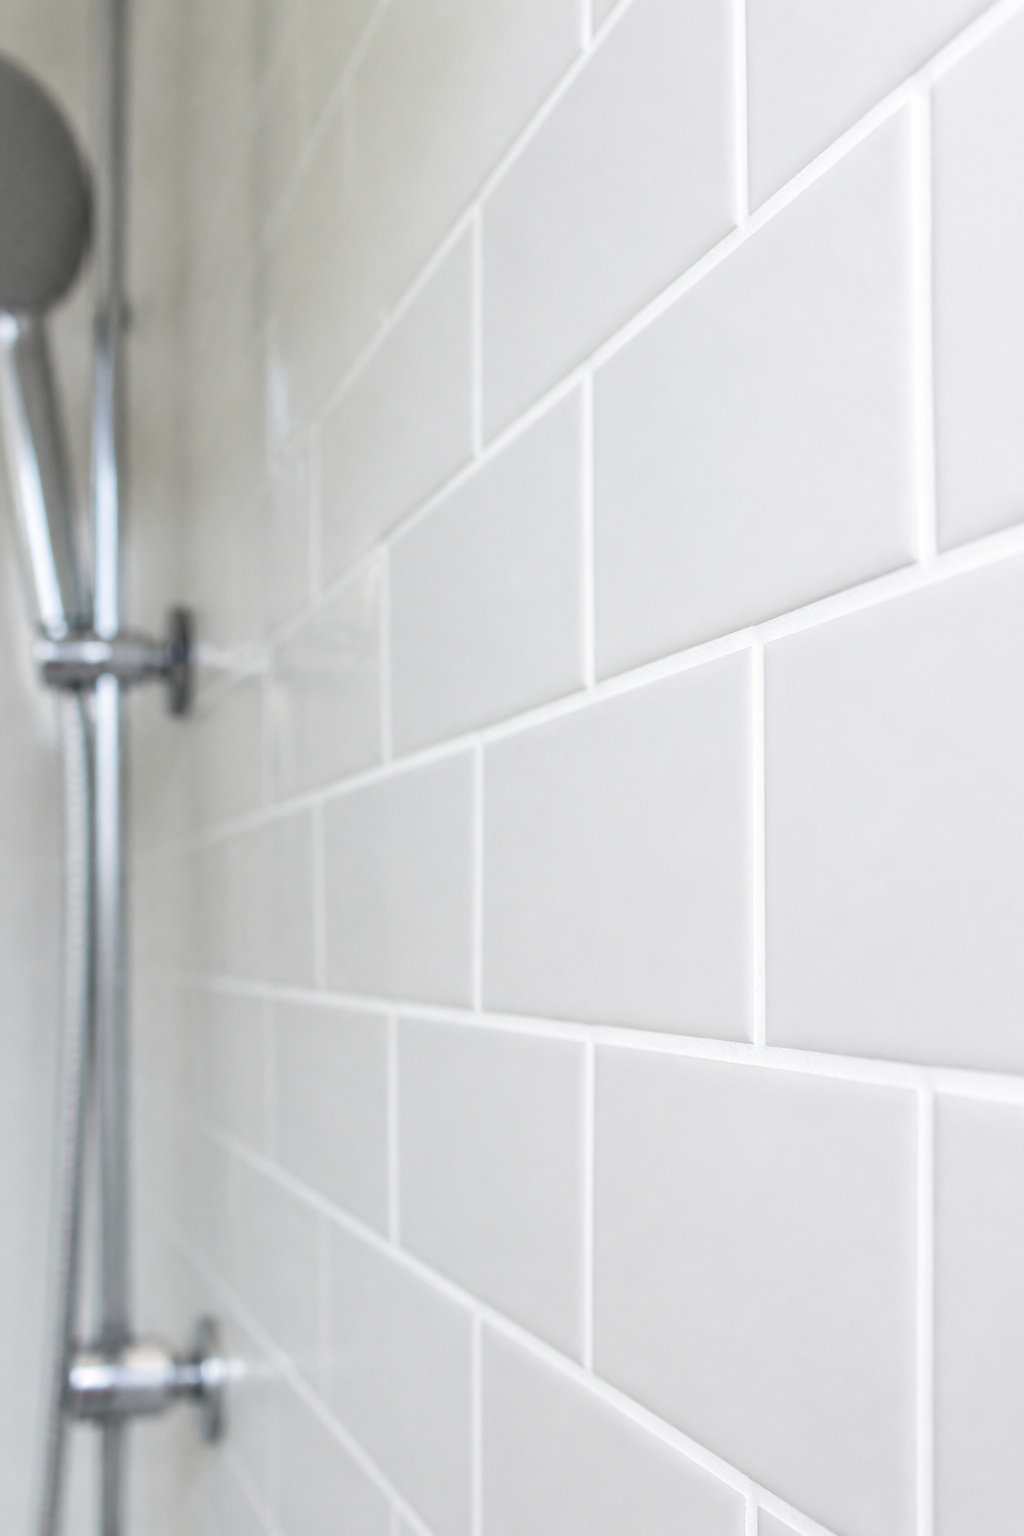
5. Regrout and Reseal Existing Tile Instead of Replacing It
Dirty grout does something optically that most homeowners don’t recognize until they see the result of a regrout: it makes the tile itself look dated. The ceramic may be perfectly sound, the glaze intact, the installation solid — but discolored grout from accumulated soap scum, mineral deposits, and mold shifts every tile in the room from serviceable to past its prime. Fresh grout in the same color as the original restores the room’s visual cleanliness; switching from the original light gray to a darker charcoal or slate modernizes even 1990s-era ceramic convincingly. As DIY bathroom remodel improvements go, regrouting delivers the highest visual return per hour of effort.
The Right Removal Tool for Your Joint Width
The material choice for new grout depends on joint width. Sanded grout handles joints wider than 1/8 inch; unsanded for narrower joints and polished stone surfaces that would be scratched by sand particles. In a wet zone like a shower surround, epoxy grout (Laticrete SpectraLOCK, Mapei Kerapoxy) is the professional-grade choice — it’s virtually impervious to staining and mold, doesn’t need sealing, and lasts 10-15 years without discoloration. Standard cement grout in a shower joint needs sealing every one to two years to maintain moisture resistance.
When Removal Isn’t Worth the Effort
If the grout is discolored but structurally intact, Polyblend Grout Renew by Custom Building Products is the fastest path to refresh — a penetrating colorant that re-pigments existing grout without removal, costs around $12, and delivers a result that reads as new grout to anyone not looking closely. Apply with a pointed artist’s brush, tape adjacent tile faces, and wipe any overage immediately. An oscillating multi-tool with a grout blade handles wide joints quickly for full removal; a manual carbide-tipped grout saw costs about $10 and works for jobs under 20 square feet without mechanical damage risk.
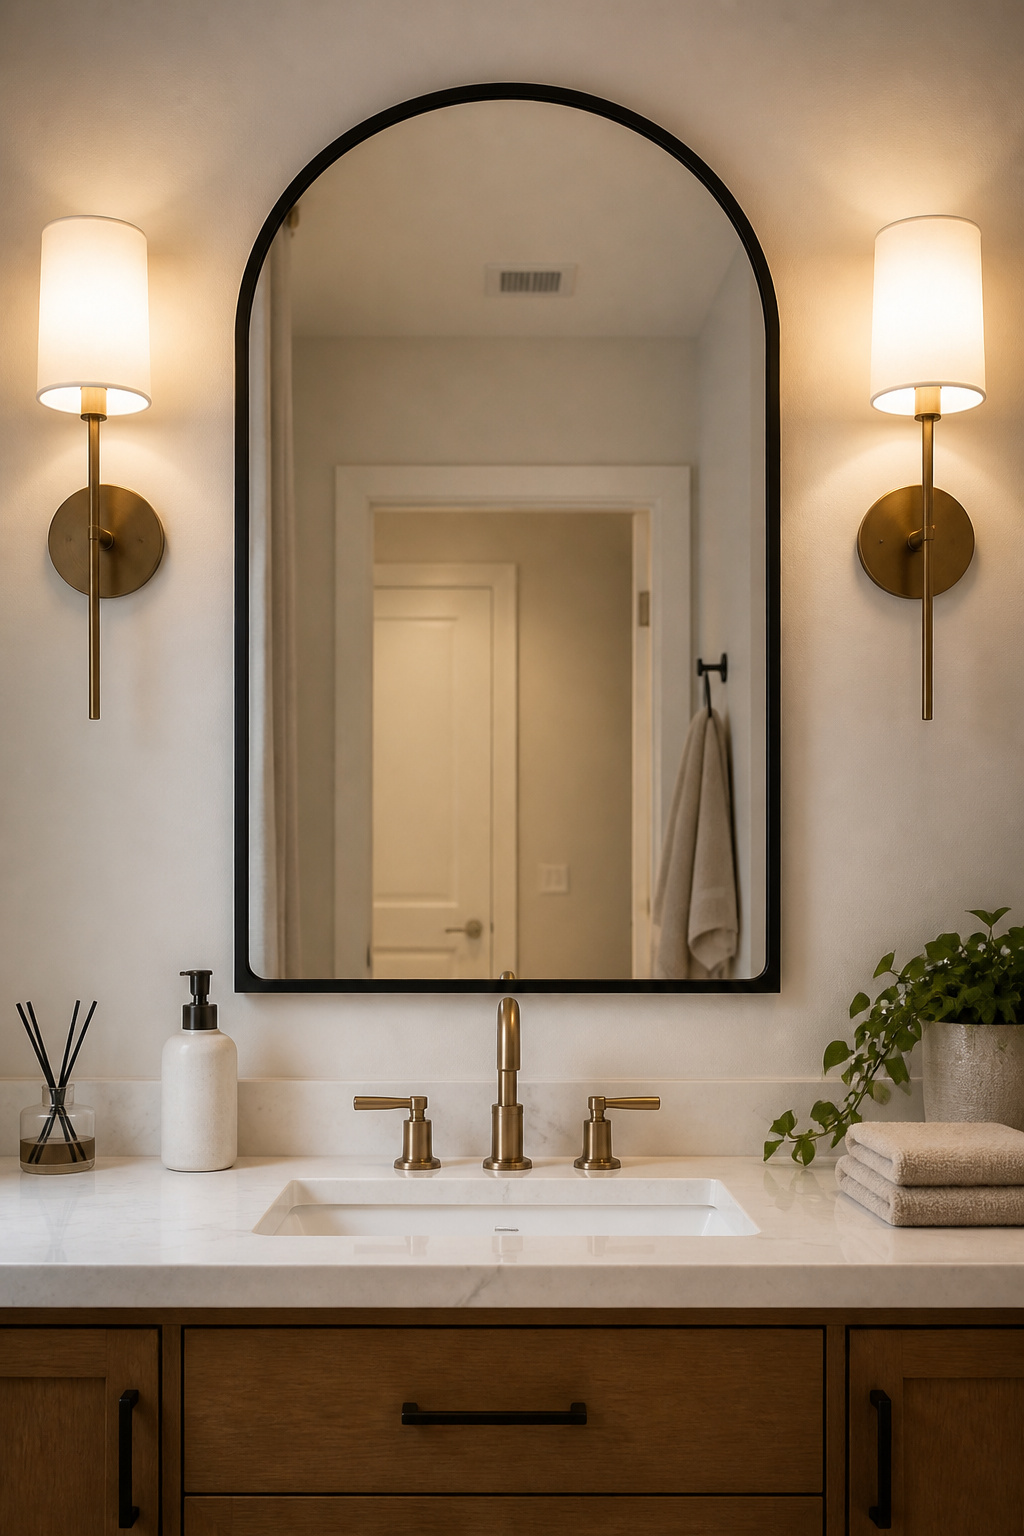
6. A New Faucet and Towel Bar Set That Elevates the Whole Room
Finish consistency across bathroom fixtures is the single most powerful design signal in a budget renovation, and also the most frequently missed. A chrome faucet paired with a brushed nickel towel bar and an oil-rubbed bronze light fixture reads exactly like what it is: three purchase decisions made at three different times, without a connecting thread. Replacing these pieces with a unified finish is the unifying hardware change that ties any budget bathroom remodel together, and it costs $100-150 for faucet and towel bar combined.
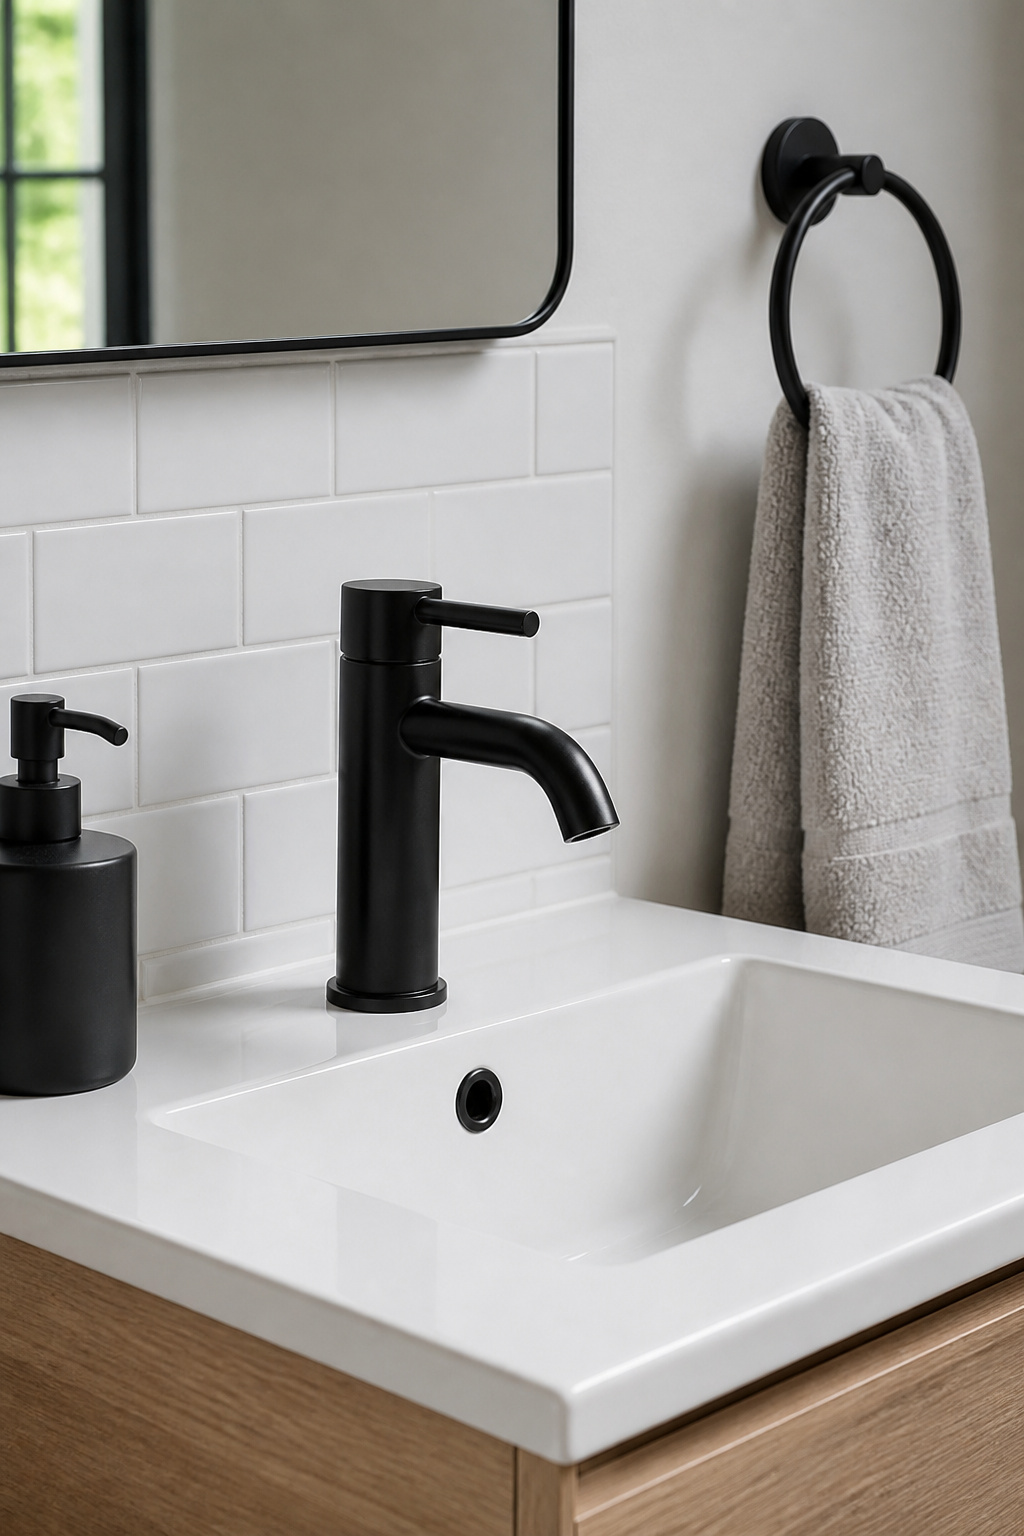
Matte black is the most forgiving finish for a budget remodel. It hides water spots and fingerprints better than chrome or brushed nickel, photographs well under a range of lighting conditions, and pairs with virtually any cabinet color. For sub-$100 faucets that read as premium, the Delta Foundations single-handle in matte black consistently earns the highest quality-to-price ratio — ceramic disc valve, lifetime limited warranty, and a silhouette that doesn’t telegraph its price point. The Moen Adler and Pfister Deckard round out the reliable picks at $65-95. One installation note: plumber’s putty goes between the faucet base and the deck on ceramic or porcelain sinks; silicone caulk replaces it on cultured marble or granite, where putty would leave oil stains over time.
7. Peel-and-Stick Wallpaper on a Feature Wall
Removable wallpaper in a bathroom polarizes people who haven’t seen a well-executed version. The concern is humidity, which is legitimate — but the failure mode is almost always at seams and edges, not across the face of the paper. Vinyl-backed removable wallpaper is non-breathable; steam cannot work through the face. What fails is adhesion at the perimeter, which is why wall prep and seam treatment are the entire job. Done correctly, this is one of the quickest visual transformations in a budget bathroom remodel — a single wall takes two to three hours and $40-80 in material.
Tempaper and Chasing Paper are the two most consistently cited brands for bathroom use. Chasing Paper’s poly-woven material holds well on properly prepared walls and removes cleanly without tearing paint or leaving adhesive residue. For seams in a humid bathroom, a thin bead of removable wallpaper paste along each joint prevents edge lifting without compromising removability. In bathrooms under 40 square feet, use a large-repeat pattern rather than a small all-over print — large patterns give the eye fewer decision points per square foot, which makes tight spaces feel less busy rather than more. And run the exhaust fan during and for 15 minutes after every shower. That one habit extends the paper’s life more than any material or installation choice.
8. Budget Bathroom Remodel With LED Vanity Lighting
Of all the materials in a bathroom, light is the one that affects everything else — and the wrong color temperature makes every other upgrade look worse. A 5000K daylight fixture creates a clinical blue cast that makes skin tones look gray and makes warm-toned tile look cold. At 2700K warm white, the same room reads completely differently. Getting the lighting right in any budget bathroom remodel means understanding two specifications: color temperature and CRI.
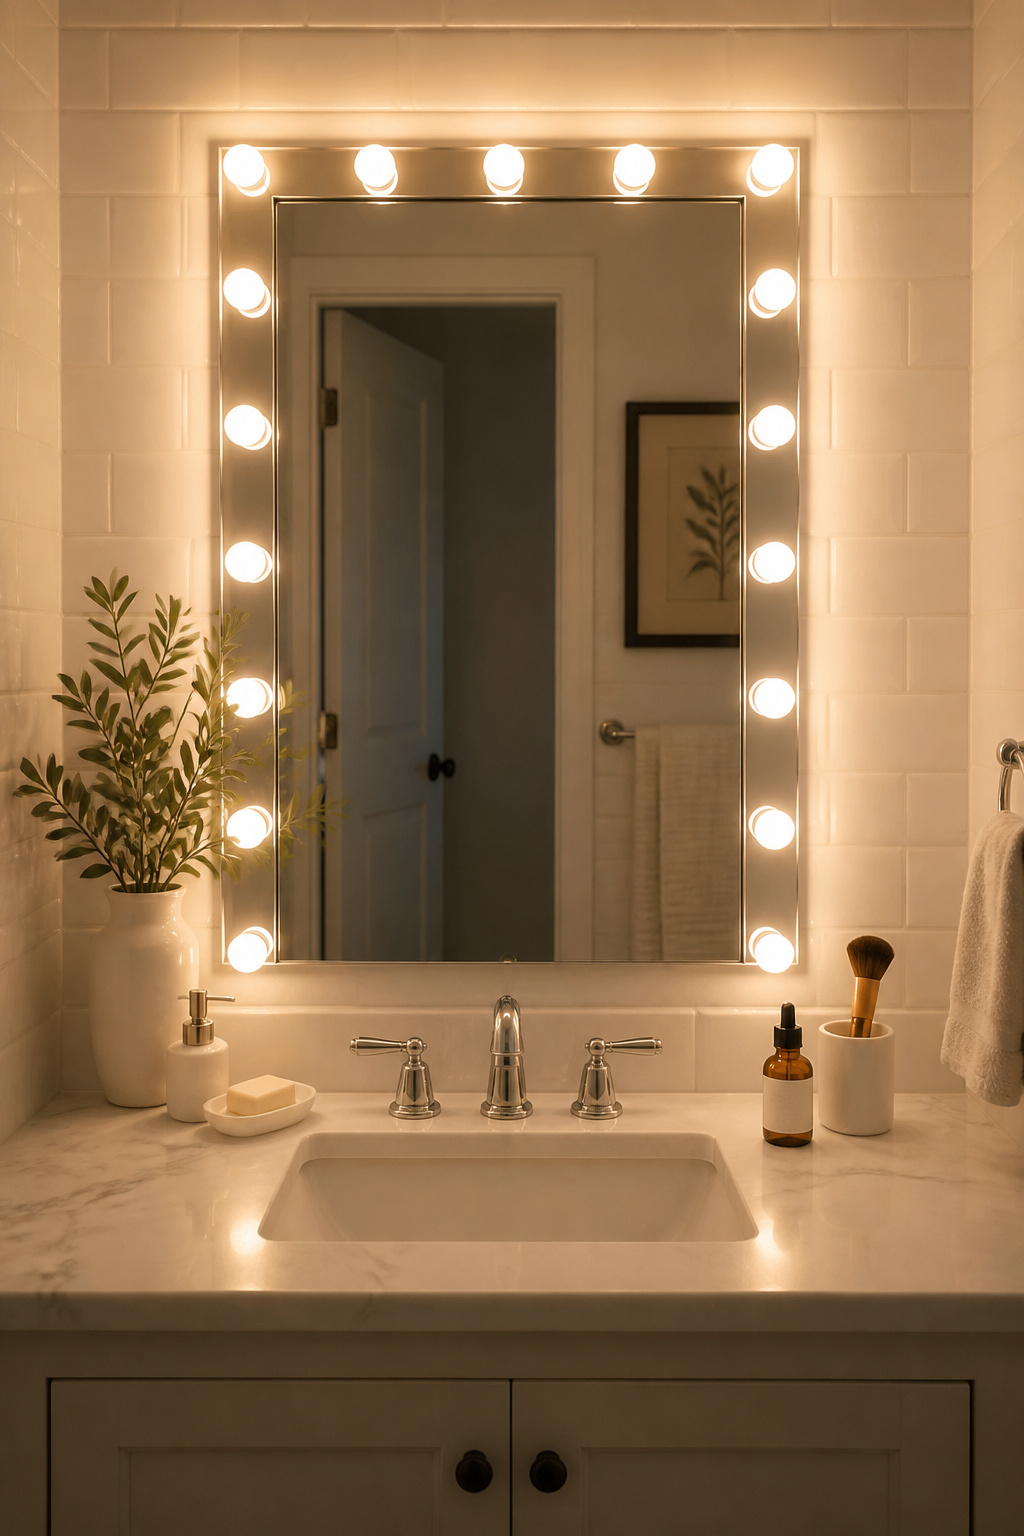
CRI — Color Rendering Index — measures how accurately a light source renders color compared to natural daylight. A CRI above 90 means reds, pinks, and warm tones are rendered accurately; below 80 CRI, skin tones look flat and tile colors are compressed. Globe Electric and SOLFART offer LED bar lights and Hollywood strips under $60 that hit both marks — 2700K, CRI 90+, LED-integrated (no bulb replacement needed), with standard junction box mounting hardware included.
Fixture shape affects light quality beyond raw lumens. A single bar light mounted directly above the mirror casts downward shadows under the eyes, nose, and chin — fine for ambient light but not for grooming. Hollywood strip lights or side-mounted sconces at eye height — approximately 60-65 inches from the floor — provide even facial illumination without directional shadow. For a full look at placement, fixture type, and the dimmer compatibility considerations that most product listings gloss over, bathroom vanity lighting tips covers the range in detail.
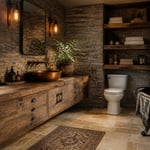
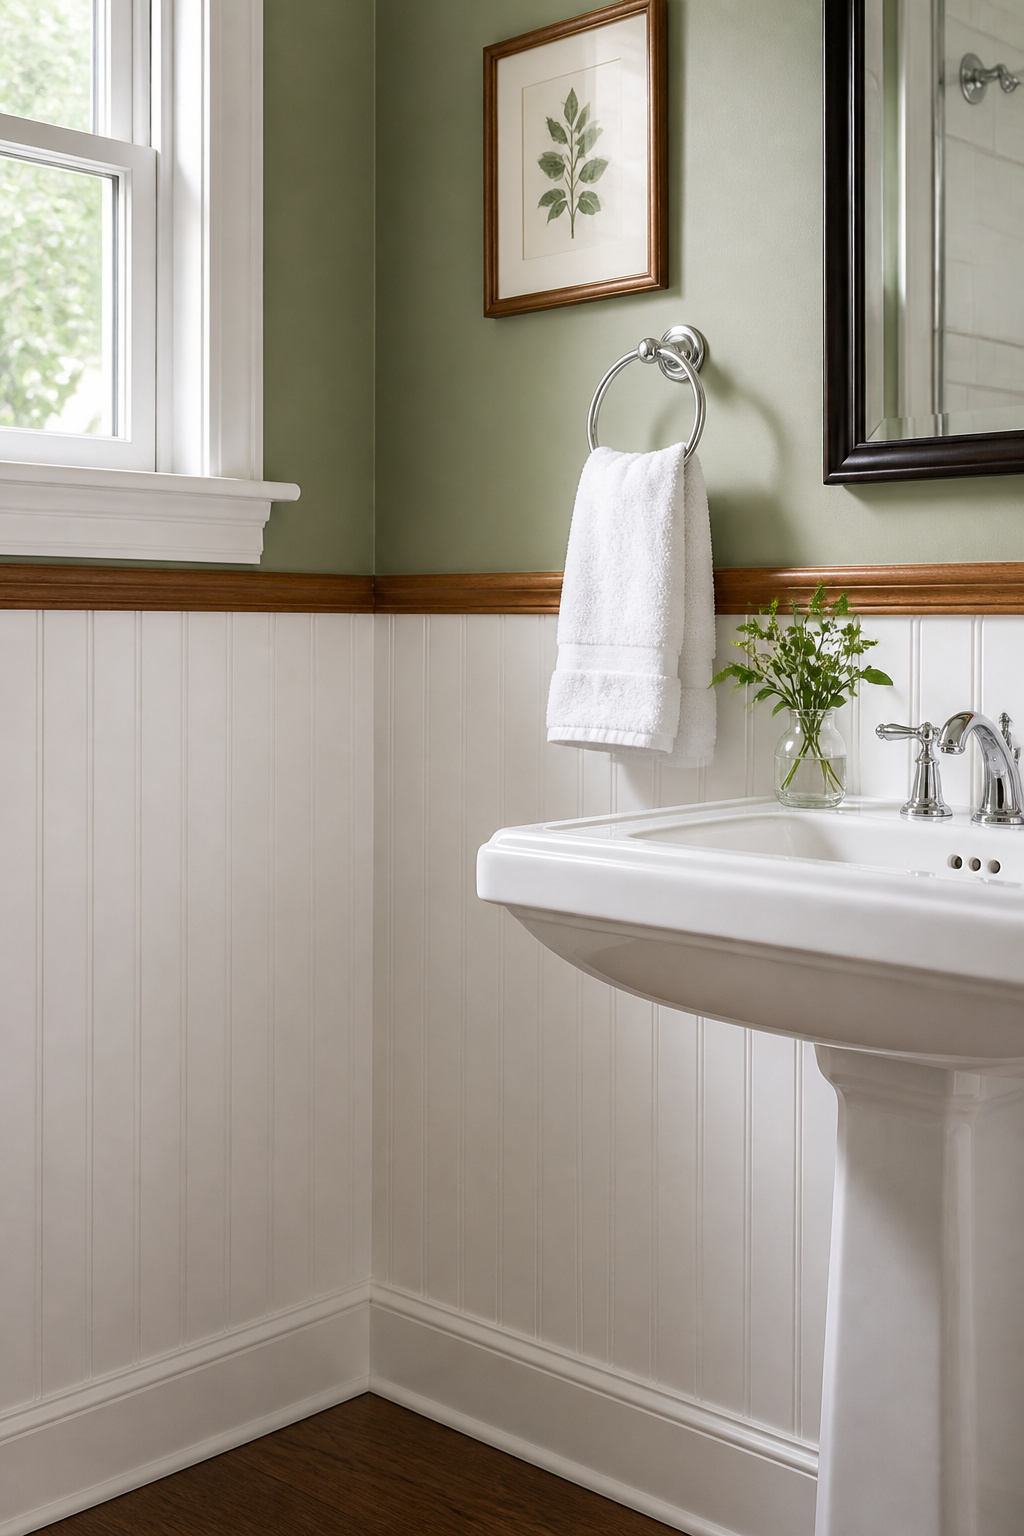
9. Beadboard Paneling Added Below the Chair Rail
Beadboard wainscoting does something that paint alone can’t: it gives a plain bathroom architectural character that reads as original to the house, even when installed recently. The grooved panels add texture, create a visual anchor at lower wall height, and establish a two-tone color relationship between wall sections that makes the ceiling appear higher by contrast. It’s among the more permanent-feeling changes in a budget bathroom remodel, which matters for resale perception even when the cost is modest.
Material selection is the most important decision. PVC cellular vinyl beadboard is impervious to moisture — it cannot swell, warp, or delaminate, and it takes paint beautifully with a bonding primer. AZEK at Home Depot and comparable panels at Lowe’s run approximately $18-22 per 4×8 sheet. MDF beadboard, the most widely available alternative, absorbs moisture at every cut edge; in a bathroom, every cut edge must be sealed with exterior wood primer before installation — and even then, it’s a concession rather than a solution.
Standard wainscoting height is one-third of the wall height: 32-36 inches for an 8-foot ceiling. Bathrooms with pedestal sinks look better at 40-42 inches, where panel coverage gets above the plumbing connections and creates a cleaner relationship between paneling and fixtures. The most time-tested paint approach: warm white beadboard (Benjamin Moore White Dove, Sherwin-Williams Alabaster) with a slightly deeper shade on the upper wall, and the chair rail cap painted to match the beadboard rather than the upper wall — a defined architectural line between the two zones that reads as original millwork.
10. Fresh Caulk and Grout Paint for a Low-Cost Bathroom Makeover
Old, failing caulk is the most universally noticed sign of a neglected bathroom, and also the cheapest fix in any low-cost bathroom makeover. The joint where the bathtub meets the tile wall is under constant mechanical stress — the tub flexes slightly with weight, pulling the caulk away from both surfaces over time. Black mold visible through cracked caulk means water has been infiltrating for weeks or longer. Treat it with a diluted bleach solution and allow complete drying before recaulking, or the new caulk will fail on the same timeline as the old.

Removal is the whole job. Score one edge of the old caulk with a plastic scraper — never metal on acrylic or fiberglass tubs, which scratch permanently — and apply a caulk remover (DAP Caulk-Be-Gone, Krud Kutter) for 5-20 minutes of dwell time. The material then peels away in strips rather than requiring aggressive scraping. Wipe residue with isopropyl alcohol before applying anything new; soap scum or oil residue prevents silicone from bonding regardless of how cleanly the old material was removed.
For the new application, 100% silicone caulk (DAP Silicone Max, GE Advanced) is the correct material in a wet zone — it won’t crack, won’t shrink, and resists mold for 15-20 years with a properly prepared substrate. Tape both sides of the joint with painter’s tape, apply in a single pass, tool smooth with a wet finger, remove the tape before the silicone skins, and leave the joint undisturbed for 24 hours before any water contact.
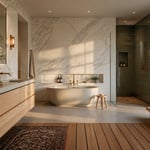
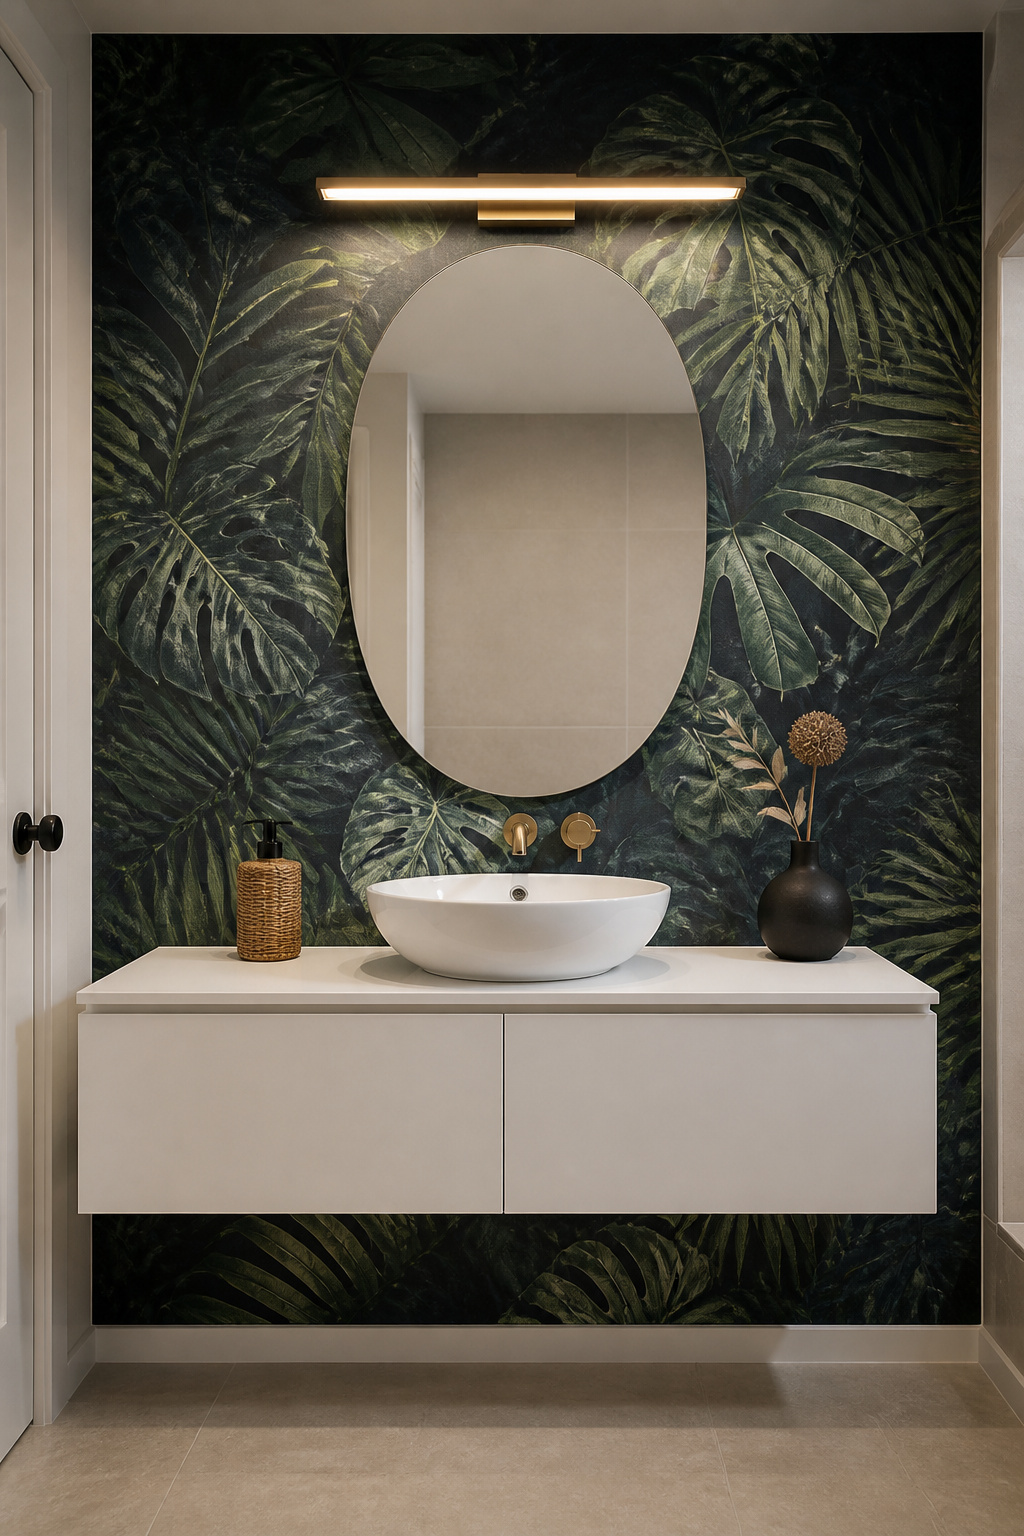
11. A Vessel Sink Replacement to Transform the Vanity Story
A vessel sink changes the visual hierarchy of the entire vanity by making the sink itself an object of interest rather than a functional depression in the counter. The counter recedes, the bowl becomes a focal point, and the whole area reads as furniture-like rather than built-in — a significant character shift for a surface that’s otherwise hard to change without full cabinet replacement. It’s also one of the more distinctive choices available in a budget bathroom renovation, given that a ceramic vessel sink costs $45-80 while a full vanity replacement runs $300-1,000+.
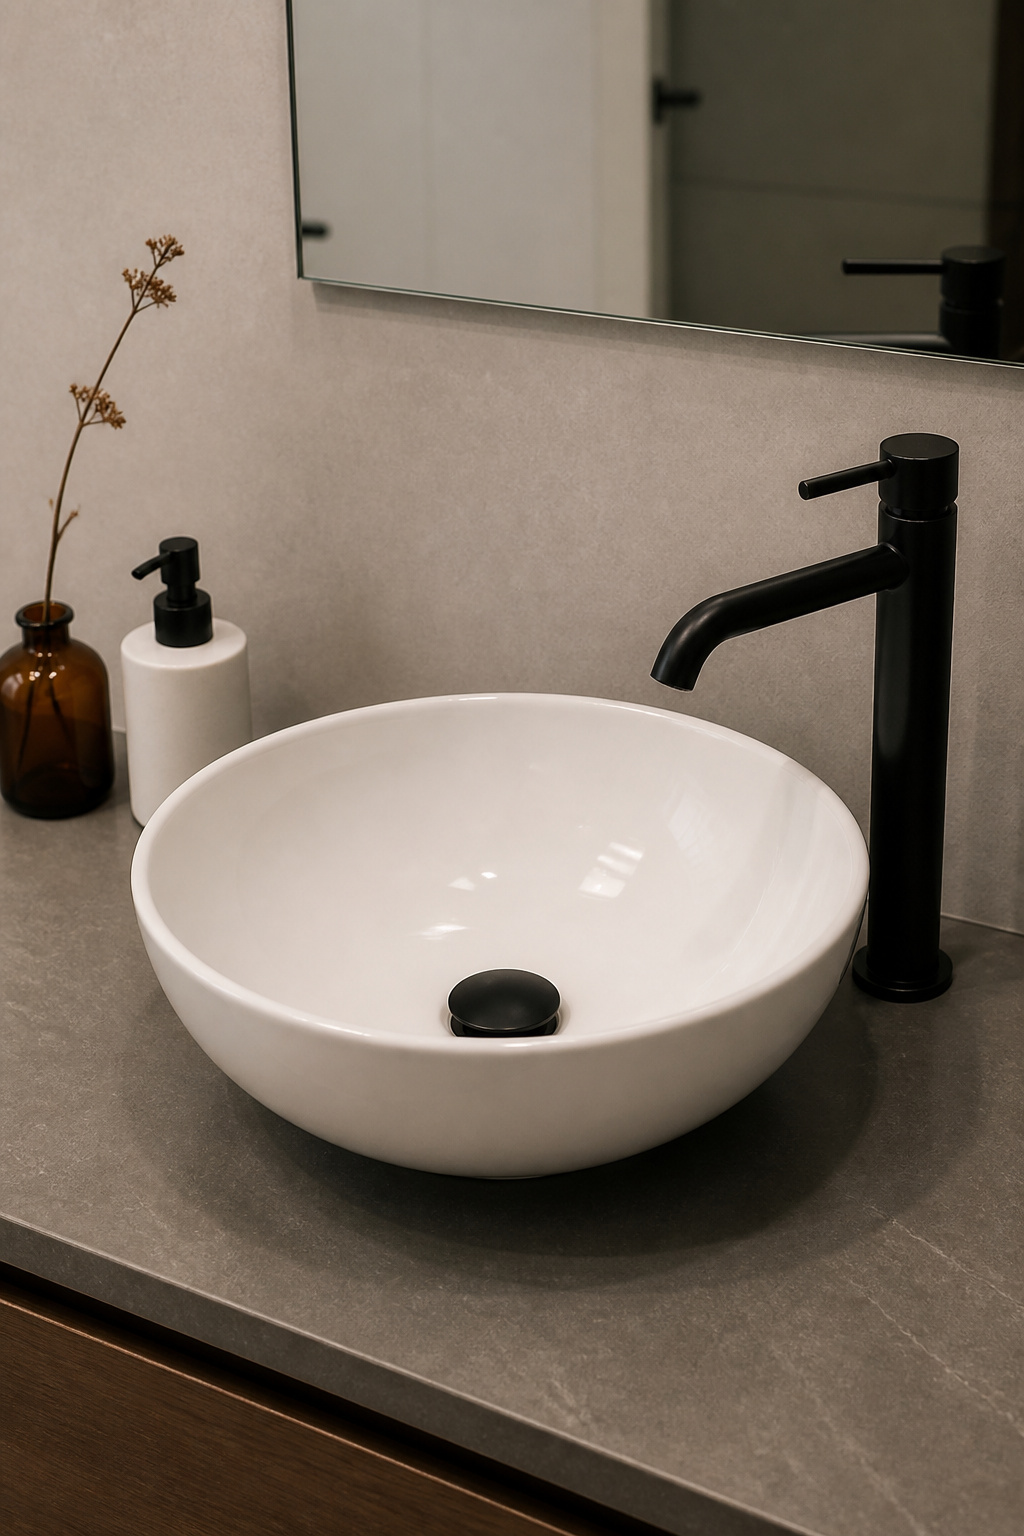
The pre-purchase measurement that matters most: vessel sinks require a 1-3/4 inch drain hole in the countertop. If the existing counter has a standard drop-in hole at that diameter, installation is straightforward. If the counter has a larger undermount cutout, a cover plate or different counter is needed. The p-trap depth may also require adjustment — vessel sinks sit higher than undermount sinks, which can change the waste line angle; a p-trap extender at $8-12 handles most situations without touching the rough plumbing.
Ceramic vessel sinks (VCCUCINE and KINGSMAN on Amazon) are the practical material choice — they resist chipping from normal use, clean easily, and are heavy enough to stay in position without adhesive. Stone resin sinks have a concrete-like matte finish that photographs beautifully but weigh 15-25 lbs and require solid countertop support. Glass vessel sinks chip at the rim with any tool contact — they work in low-traffic powder rooms but aren’t practical in a daily-use bathroom. For thinking about how the cabinet below relates to a new sink’s visual style, bathroom cabinet designs to suit your style covers the full range of vanity configurations.
12. Coordinated Accessories That Make Any Budget Bathroom Remodel Look Finished
The final five percent of a bathroom’s appearance carries disproportionate visual weight. Accessories are what the eye processes at counter level — and a collection of unrelated objects in varied materials, heights, and finishes reads as accumulated rather than chosen, regardless of how much was spent on individual pieces. Four foundational pieces create the cohesion that signals an intentional budget bathroom remodel: a tray to corral counter items, a ceramic or glass soap dispenser in a coordinating finish, a small plant (pothos and snake plants tolerate bathroom humidity without direct sun), and a linen or waffle-weave hand towel.
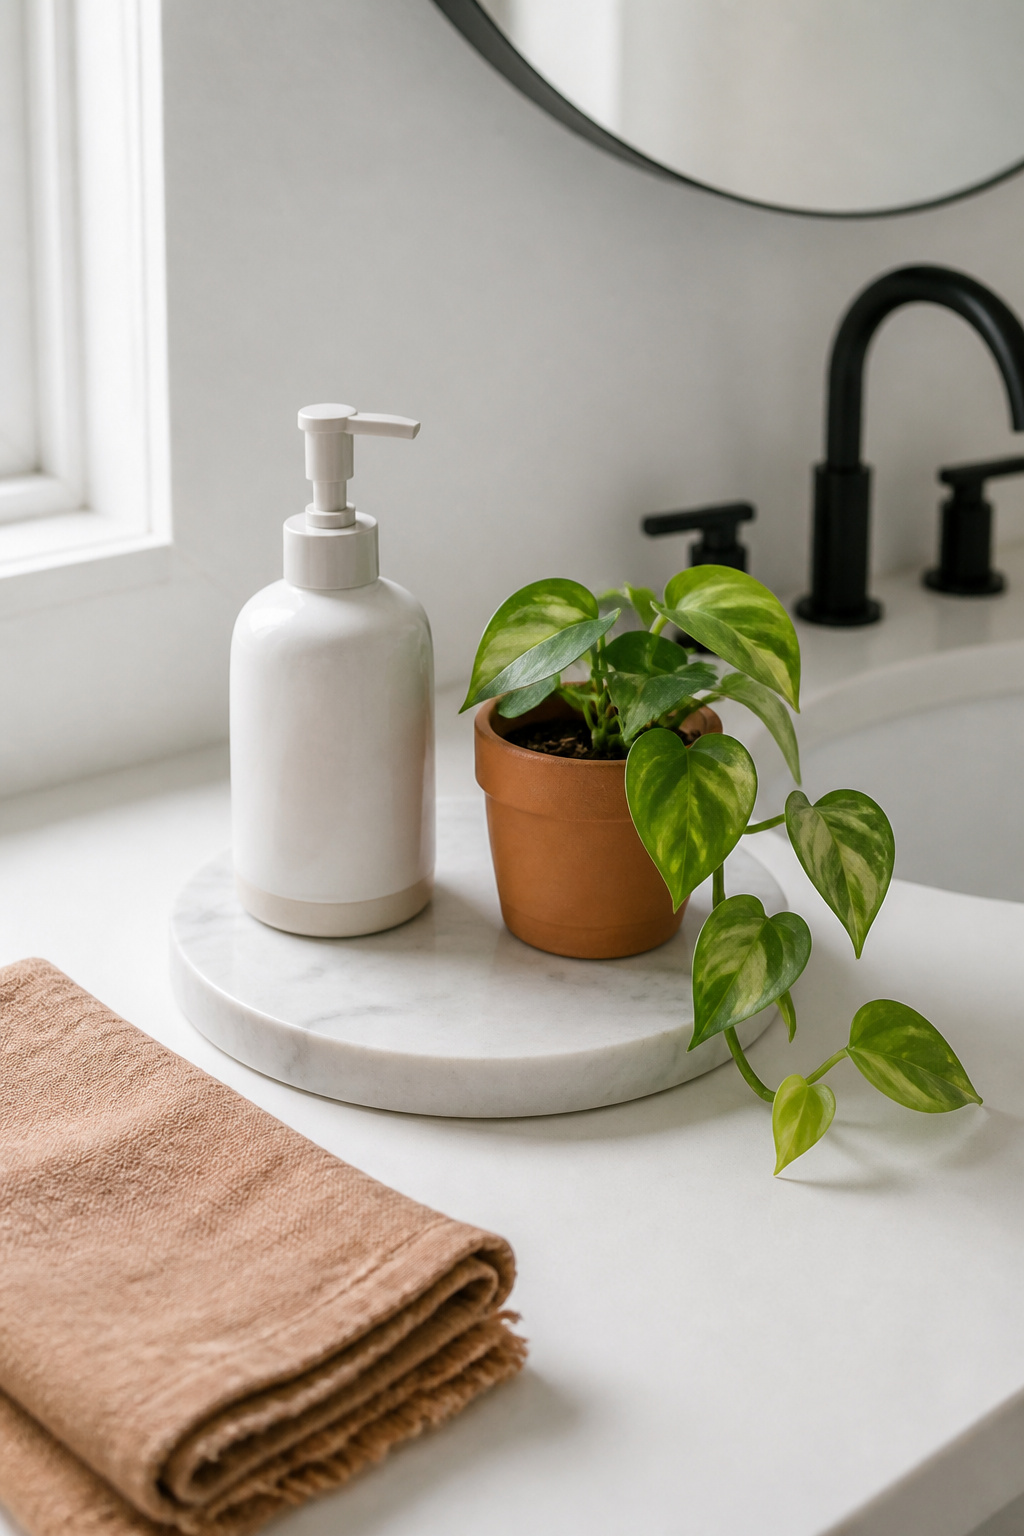
Each piece serves a different function. The tray creates order and boundary — without it, even well-chosen accessories spread across a counter in a way that reads as clutter. The dispenser introduces material interest and finish coordination. The plant adds life and color in a room that’s otherwise all hard surfaces. The textile adds softness and warmth. Metal finish consistency matters here as much as it does with fixtures: a matte black faucet with a brushed brass soap dispenser is an intentional combination. Three different finishes with no connection reads as three separate shopping trips.
For sourcing, TJ Maxx and HomeGoods consistently carry ceramic and stoneware bathroom accessories — soap dishes, small vases, cotton dispensers — that photograph like boutique finds at $4-18. Target’s Threshold and Studio McGee lines refresh quarterly; checking the clearance section within six to eight weeks of introduction yields pieces at 50-70% off. Etsy handmade soap dispensers and trays from small ceramic studios run $20-35 for a genuinely one-of-a-kind piece that gives a bathroom the collected, personal character that no mass-produced set achieves.
13. Prefab Shower Surround Panels as a Tile Alternative
Solid surface shower surround panels eliminate the one maintenance cost that makes tiled showers expensive over time: grout. No grout means no grout sealing, no regrouting every five to ten years, and no mold accumulating in tile joints. The installation timeline is one to two days versus the one to two weeks required for a proper tiled shower. For a DIY bathroom remodel on a budget where time is also a resource, that difference matters considerably.
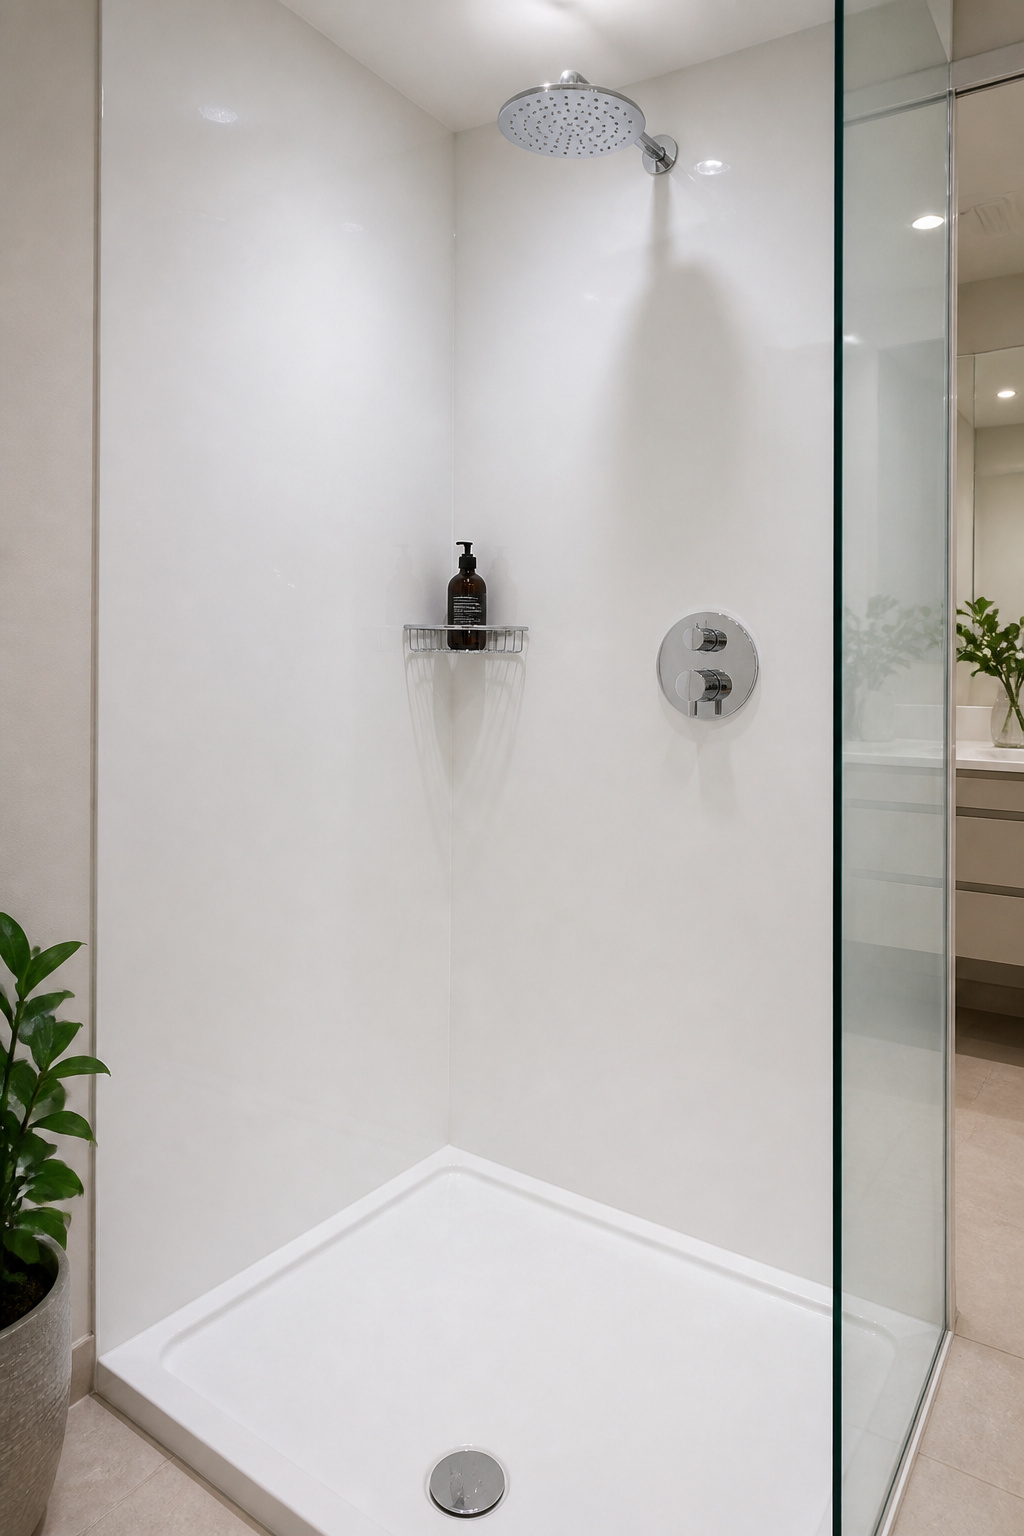
Material cost sits between tile and the labor to tile. A standard 60×32 inch acrylic surround kit costs $200-600; equivalent tile materials for the same area run $150-400, but require $300-800 in professional labor to install correctly. SwanStone is the most reliably reviewed brand in this category — the wall surface must be flat, clean, and fully cured drywall or cement board before panel adhesion. Never apply panels over existing tile with significant texture variation — any lippage or grout joint texture transfers through the panel face and creates visible undulation on the finished surface.
Cut panels with an 80-tooth or higher saw blade designed for plastics; standard wood blades cause chipping at the cut edge. Caulk vertical seams with 100% silicone in a color matching the panel, not white bathroom caulk, and the result reads as a unified material rather than assembled pieces. Measure the shower at three heights — top, middle, and bottom — before cutting anything, since walls are rarely perfectly plumb.
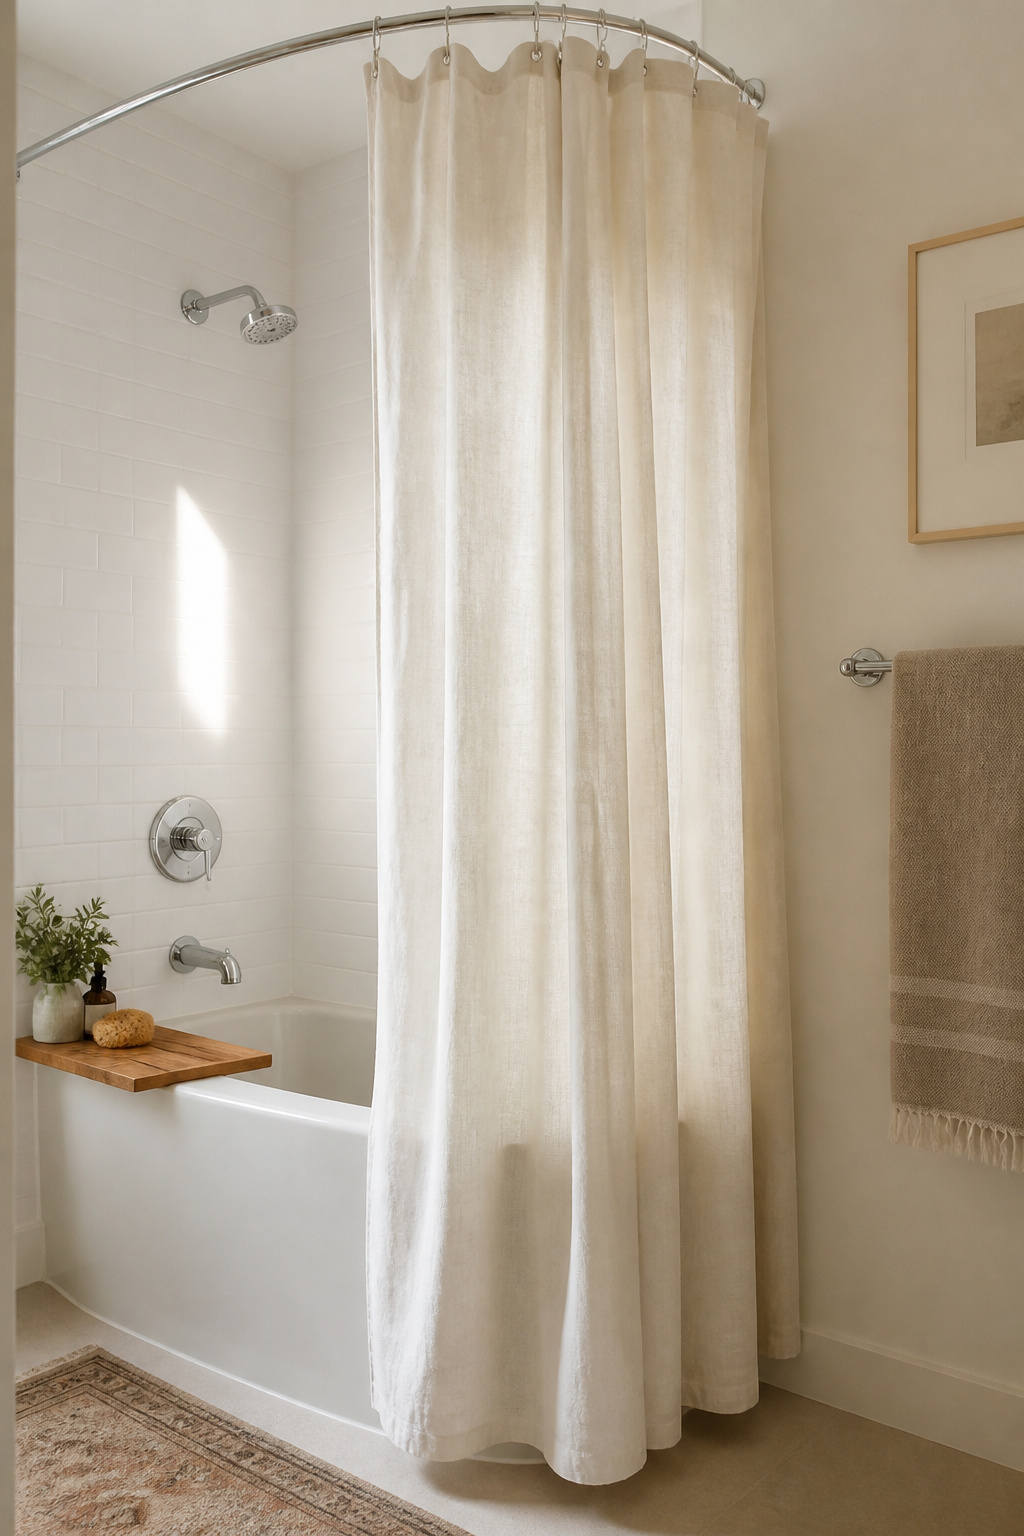
14. A Shower Curtain and Rod Upgrade for an Instant Spa Look
The curved shower rod is one of the best-concealed value propositions in any bathroom upgrade. It’s a $30-50 tension-mount swap that adds up to 6.5 inches of shoulder room in the shower and changes the visual shape of the curtain from a flat vertical plane to a soft arc. That arc is what makes hotel bathroom shower areas feel enclosed and spa-like rather than clinical and contractor-installed. The Zenna Home 35644BN is the most widely reviewed no-drill option — it adjusts 50-72 inches and installs in ten minutes.
Choosing the Right Curtain Fabric
Linen-look curtains (linen-cotton blend or 100% linen weave) hang with natural weight and fold organically — the texture reads as quality even at $30-50 from H&M Home or VCNY Home, because linen is inherently associated with high-end bath and bedding. For bathroom organic ideas for a natural material palette, linen and natural fiber textiles are the most effective starting point. Pure cotton absorbs water and requires careful drying to prevent mildew; linen-cotton blends dry faster and resist mildew better in a standard bathroom without excellent ventilation.
The Double Rod Hotel Trick
The hotel double-curtain technique uses a double curved rod with two tracks: a waterproof PEVA liner on the inner track, a decorative linen curtain on the outer track. The liner stays tucked inside the tub; the outer curtain drapes in front and is never in contact with water. Curtain ring style closes the design loop — matte black rings with a ball-top or square profile read more intentional than standard chrome C-rings; brushed gold rings with a linen panel create a transitional-to-warm aesthetic at $12-18 for a set of 12. The outer curtain should be 72-84 inches wide on a standard 60-inch tub — enough fullness to drape without bunching or looking sparse.
15. Bathroom Remodel on a Budget: Paint as the Foundation of Everything
Everything else on this list looks better against fresh paint. It’s the one upgrade that affects every other surface in the room, and it’s also the one most often done wrong — which is why bathroom-specific paint formulas exist. Standard interior latex in a bathroom with normal shower use shows mold at the ceiling line and near the shower zone within 18-24 months. Bathroom-specific formulas incorporate mildewcide directly into the paint, not as an additive, which is the difference between a finish that holds for five to seven years and one that requires repainting before any other project is worth considering. Start here with any budget bathroom remodel, before anything else goes up.
Choosing a Color That Works With the Tile You’re Keeping
Color selection has a logic that connects directly to existing tile. Identify the undertone of whatever tile you’re keeping — most white and beige builder-grade tiles from the 1990s and 2000s have a pink, peach, or yellow undertone. Selecting a wall color in the same warm family (greige, warm cream, soft taupe) makes the tile read as deliberate. Cool grays applied over warm beige tile create an undertone clash that makes both surfaces look slightly off. For a look at how color, material, and surface treatment work together in a minimal palette, minimalistic bathroom design principles covers the underlying logic well.
Benjamin Moore Aura Bath & Spa achieves a matte finish with the moisture resistance normally associated with semi-gloss — no sheen variation in raking light that makes wall imperfections visible. Sherwin-Williams Emerald Interior Acrylic performs similarly. Behr Premium Plus with Mildew Resistant Enamel is the Home Depot budget version at approximately $35/gallon versus $80+ for Aura — not the same durability, but dramatically better than standard interior latex and a reasonable choice for a rental.
The Ceiling Trick That Adds Visual Height
Paint the ceiling the same color as the walls, or two values lighter in the same tone. Standard white ceilings create a visual lid effect that is most pronounced in compact bathrooms. A same-color ceiling makes the room feel enveloping rather than boxed — it’s a standard move in boutique hotel bathrooms, and it costs nothing extra. Use a satin sheen on the ceiling rather than flat: it reflects light slightly and wipes clean when moisture condensation leaves marks, particularly above the shower zone.
How to Prioritize Your Budget Bathroom Remodel for Maximum Impact
The sequencing logic for any budget bathroom remodel follows a simple principle: fix first, then finish. Fresh caulk and grout repair happen before the mirror goes up, because new accessories installed in a room with visible moisture failure read as decoration applied over a problem. Bathroom-specific paint happens before any fixture or accessory work, because painting around installed hardware is harder and because everything else reads better against fresh walls.
After the structural and surface repairs, lighting is the second highest-impact change in a budget bathroom remodel. It affects how every other element in the room is perceived — tile color, cabinet tone, mirror reflection — and it should come before accessory decisions, because accessories chosen under old lighting often look different under correctly color-temperatured fixtures.
From there, the right path depends on your bathroom’s specific problem. If it feels dated, paint, hardware, and a new mirror address the design language without touching a single fixture. If it feels dirty despite cleaning, fresh caulk and grout refresh eliminate the visual noise that makes a sound bathroom look past its life. And if it feels small, upgraded lighting, a curved shower rod, and a statement mirror address perceived scale without changing the footprint by a square foot. The most effective budget bathroom remodel is almost always three to five targeted changes — not all fifteen at once, but the ones that address the room’s actual problem.