There’s a specific moment when a modern kitchen island stops being a piece of furniture and starts being the room’s defining material statement. It happens when you choose the surface, the base finish, and the form with enough intention that everything else in the kitchen — the cabinetry, the lighting, the floor — organises itself around that single object. Get the island right and the kitchen reads as designed. Get it wrong and the most expensive renovation in the house looks assembled rather than considered.
The decisions that shape a modern kitchen island are, at their core, material decisions: which surfaces to bring together, how they contrast or harmonise, and what the intersection of stone and wood and metal communicates about the space. That’s the lens I bring to every island project — understanding what materials do in light, how they age, and whether they’re honest about what they’re asking of you in return.
These fifteen modern kitchen island ideas span the full range — from waterfall-edge stone statements to narrow galley solutions, integrated prep sinks to fluted panel textures. Each one is built around a material or structural principle that makes it genuinely modern, not just this season’s trend.
1. Waterfall Edge Island: A Modern Kitchen Island Statement
A waterfall edge is the island equivalent of a commitment. The countertop material wraps over both ends of the island and continues vertically to the floor, creating a surface that reads as monolithic — one unbroken plane rather than a top sitting on a box. The visual result is sculptural in a way no standard island can achieve, and the material you choose for it carries the full weight of the room.
Choosing the Right Material
Quartz engineered stone is the most practical specification for a waterfall. Its consistent patterning makes the book-matching at the miter joint straightforward — the veins align across the 45-degree cut because the pattern repeats predictably. Caesarstone Calacatta Nuvo and Silestone Ethereal Noctis are two of the more convincing options in circulation; they deliver the marble aesthetic without the porosity or acid sensitivity. If you want real stone, Calacatta marble with dramatic gold-to-grey veining can produce a waterfall panel of genuine visual power — but it requires a fabricator who understands that the miter cut along the vein must be precise to within fractions of a millimetre, or the mismatch is immediately obvious. If you’re researching the full range of luxurious kitchen countertop materials before committing to stone, it’s worth understanding what each material does at scale before you’re looking at a fabrication quote.
For budgeting: a single waterfall end adds $1,500–$2,500 to the project. Double waterfall doubles that. The colour-matched epoxy and invisible seam treatment at the miter corner costs an additional $200–$500 — don’t skip this line item, because a visible seam on a waterfall edge is exactly the detail that makes an expensive specification look cheap.
The strongest waterfall edges use stone with directional, consistent veining. Avoid slabs with chaotic, multi-directional pattern movement; book-matching is impossible and the result looks like two different stones were used.
2. Handleless Base Cabinets With Push-to-Open Drawers
Every pull or knob on a kitchen island introduces a vertical interruption — a repeated gesture that fragments the cabinet face into sections. In a modern kitchen where the design language depends on unbroken planes, hardware creates a restlessness that contradicts everything else the space is trying to say. Remove the hardware and the flat-front cabinet face reads as what it actually is: a considered material surface, not a functional assembly.
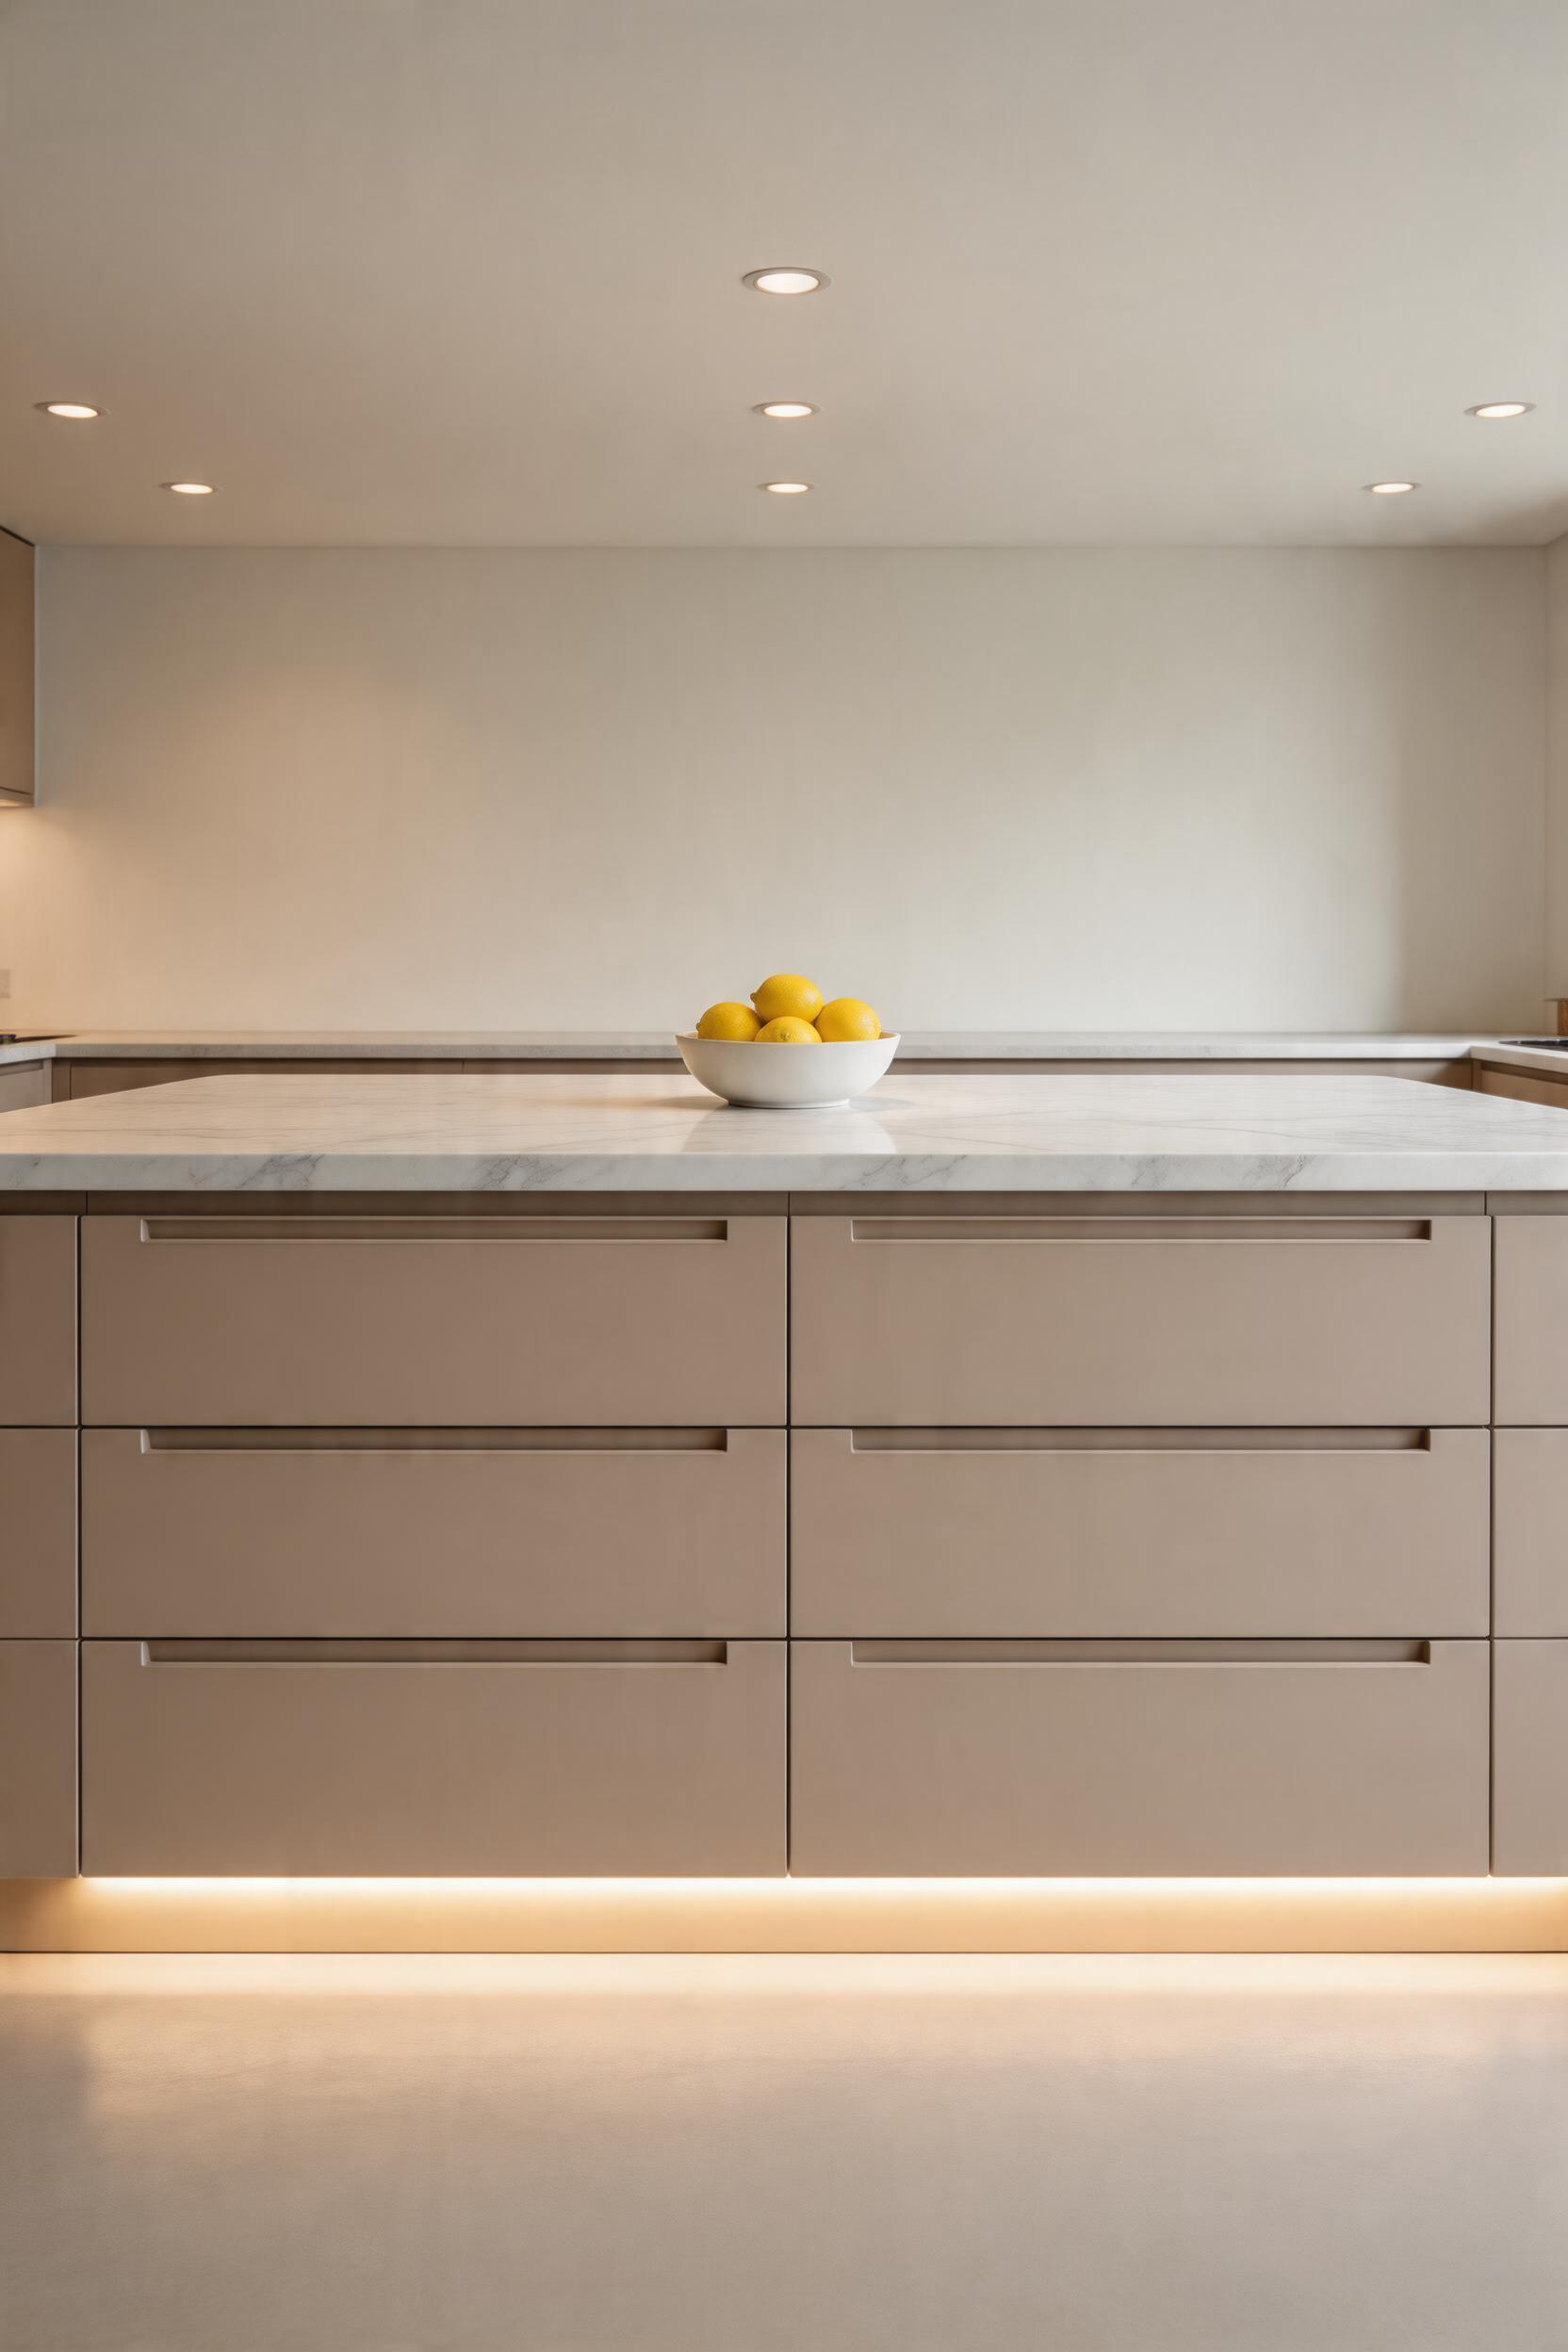
Blum Tip-On is the dominant mechanical push-to-open system. A light press activates a spring mechanism that pushes the door open 10–12mm — enough to grip and pull. The twist-adjustable piston offers fine depth control to within a millimetre, which matters on a large island where a misaligned door reads as a quality failure. It’s available in silk white, platinum grey, carbon black, and nickel-lacquered finishes so the mechanism colour matches the interior cabinet lining. The recessed J-pull — a channel routed along the top or bottom edge of the door for grip — is the alternative worth considering seriously. No mechanical parts means nothing to wear out over ten years of daily use. For more on matching kitchen island cabinet styles to your broader kitchen aesthetic, it helps to see the options together before the cabinetmaker quotes.
Flat-Front Door Finishes
For the flat-front face itself, material selection determines both aesthetics and longevity. High-gloss lacquer is the most refined finish but also the least forgiving — satin or matte lacquer manages fingerprints significantly better on a dark island without sacrificing the clean profile. High-pressure laminate (HPL) from Formica, Abet Laminati, or Egger offers the best balance of durability and cost, with finishes that convincingly replicate wood grain, concrete, and solid colour. For sprayed kitchen cabinetry, a two-component (2K) polyurethane topcoat provides the most durable finish regardless of sheen level.
3. Butcher Block Top With a Painted Steel Base
The material pairing that makes this island work is also the reason it looks the way it does: warm wood against cold metal. Neither material defaults to its cliché. The steel base doesn’t read industrial because the wood is too warm for that. The wood doesn’t read farmhouse because the steel is too precise and structured. The combination lands in a register that is genuinely contemporary — two materials pushed to their respective archetypes and placed in productive conversation.

Hard maple is the benchmark species for butcher block in a serious kitchen. Its Janka hardness of 1,450 lbf — harder than walnut, oak, or teak — means it resists dents from heavy pots and knives. Its close, light grain suits modern palettes where the wood reads as a material rather than a colour. Walnut (Janka 1,010 lbf) is the warmer, darker choice; its natural oils extend sealing intervals and reduce warping by roughly 50% compared to oak, which matters in a kitchen where temperature and humidity fluctuate daily. For islands with an integrated sink, teak is the correct specification — its internal silica content and natural oil composition give it moisture resistance that maple and walnut cannot match without constant sealing.
The Right Finish for Kitchen Wood
Resist polyurethane for a butcher block top. It creates a hard film that, once scratched or chipped, requires stripping the entire surface rather than spot treatment. Hardwax oil — Rubio Monocoat and Osmo Polyx are the two products professionals specify repeatedly — penetrates the wood like an oil but cures to a harder surface, resists water, and can be spot-repaired rather than fully refinished. The steel base should be powder-coated rather than painted. Powder coating creates a chemically bonded surface that withstands steam, grease splatter, and cleaning products better than any paint system. Specify matte or satin powder coating rather than gloss — gloss reflects light unevenly and makes surface scratches more visible.
4. Two-Tone Island Where the Base Contrasts the Perimeter Cabinets
Giving the island a different colour from the surrounding cabinetry is the single most effective way to define it as the kitchen’s focal point rather than an extension of the perimeter. A darker island creates visual ballast — it reads as grounded and anchored in an open-plan space where the island is visible from multiple angles. The contrast between island and perimeter reinforces what the island actually is: the functional centre of the room.
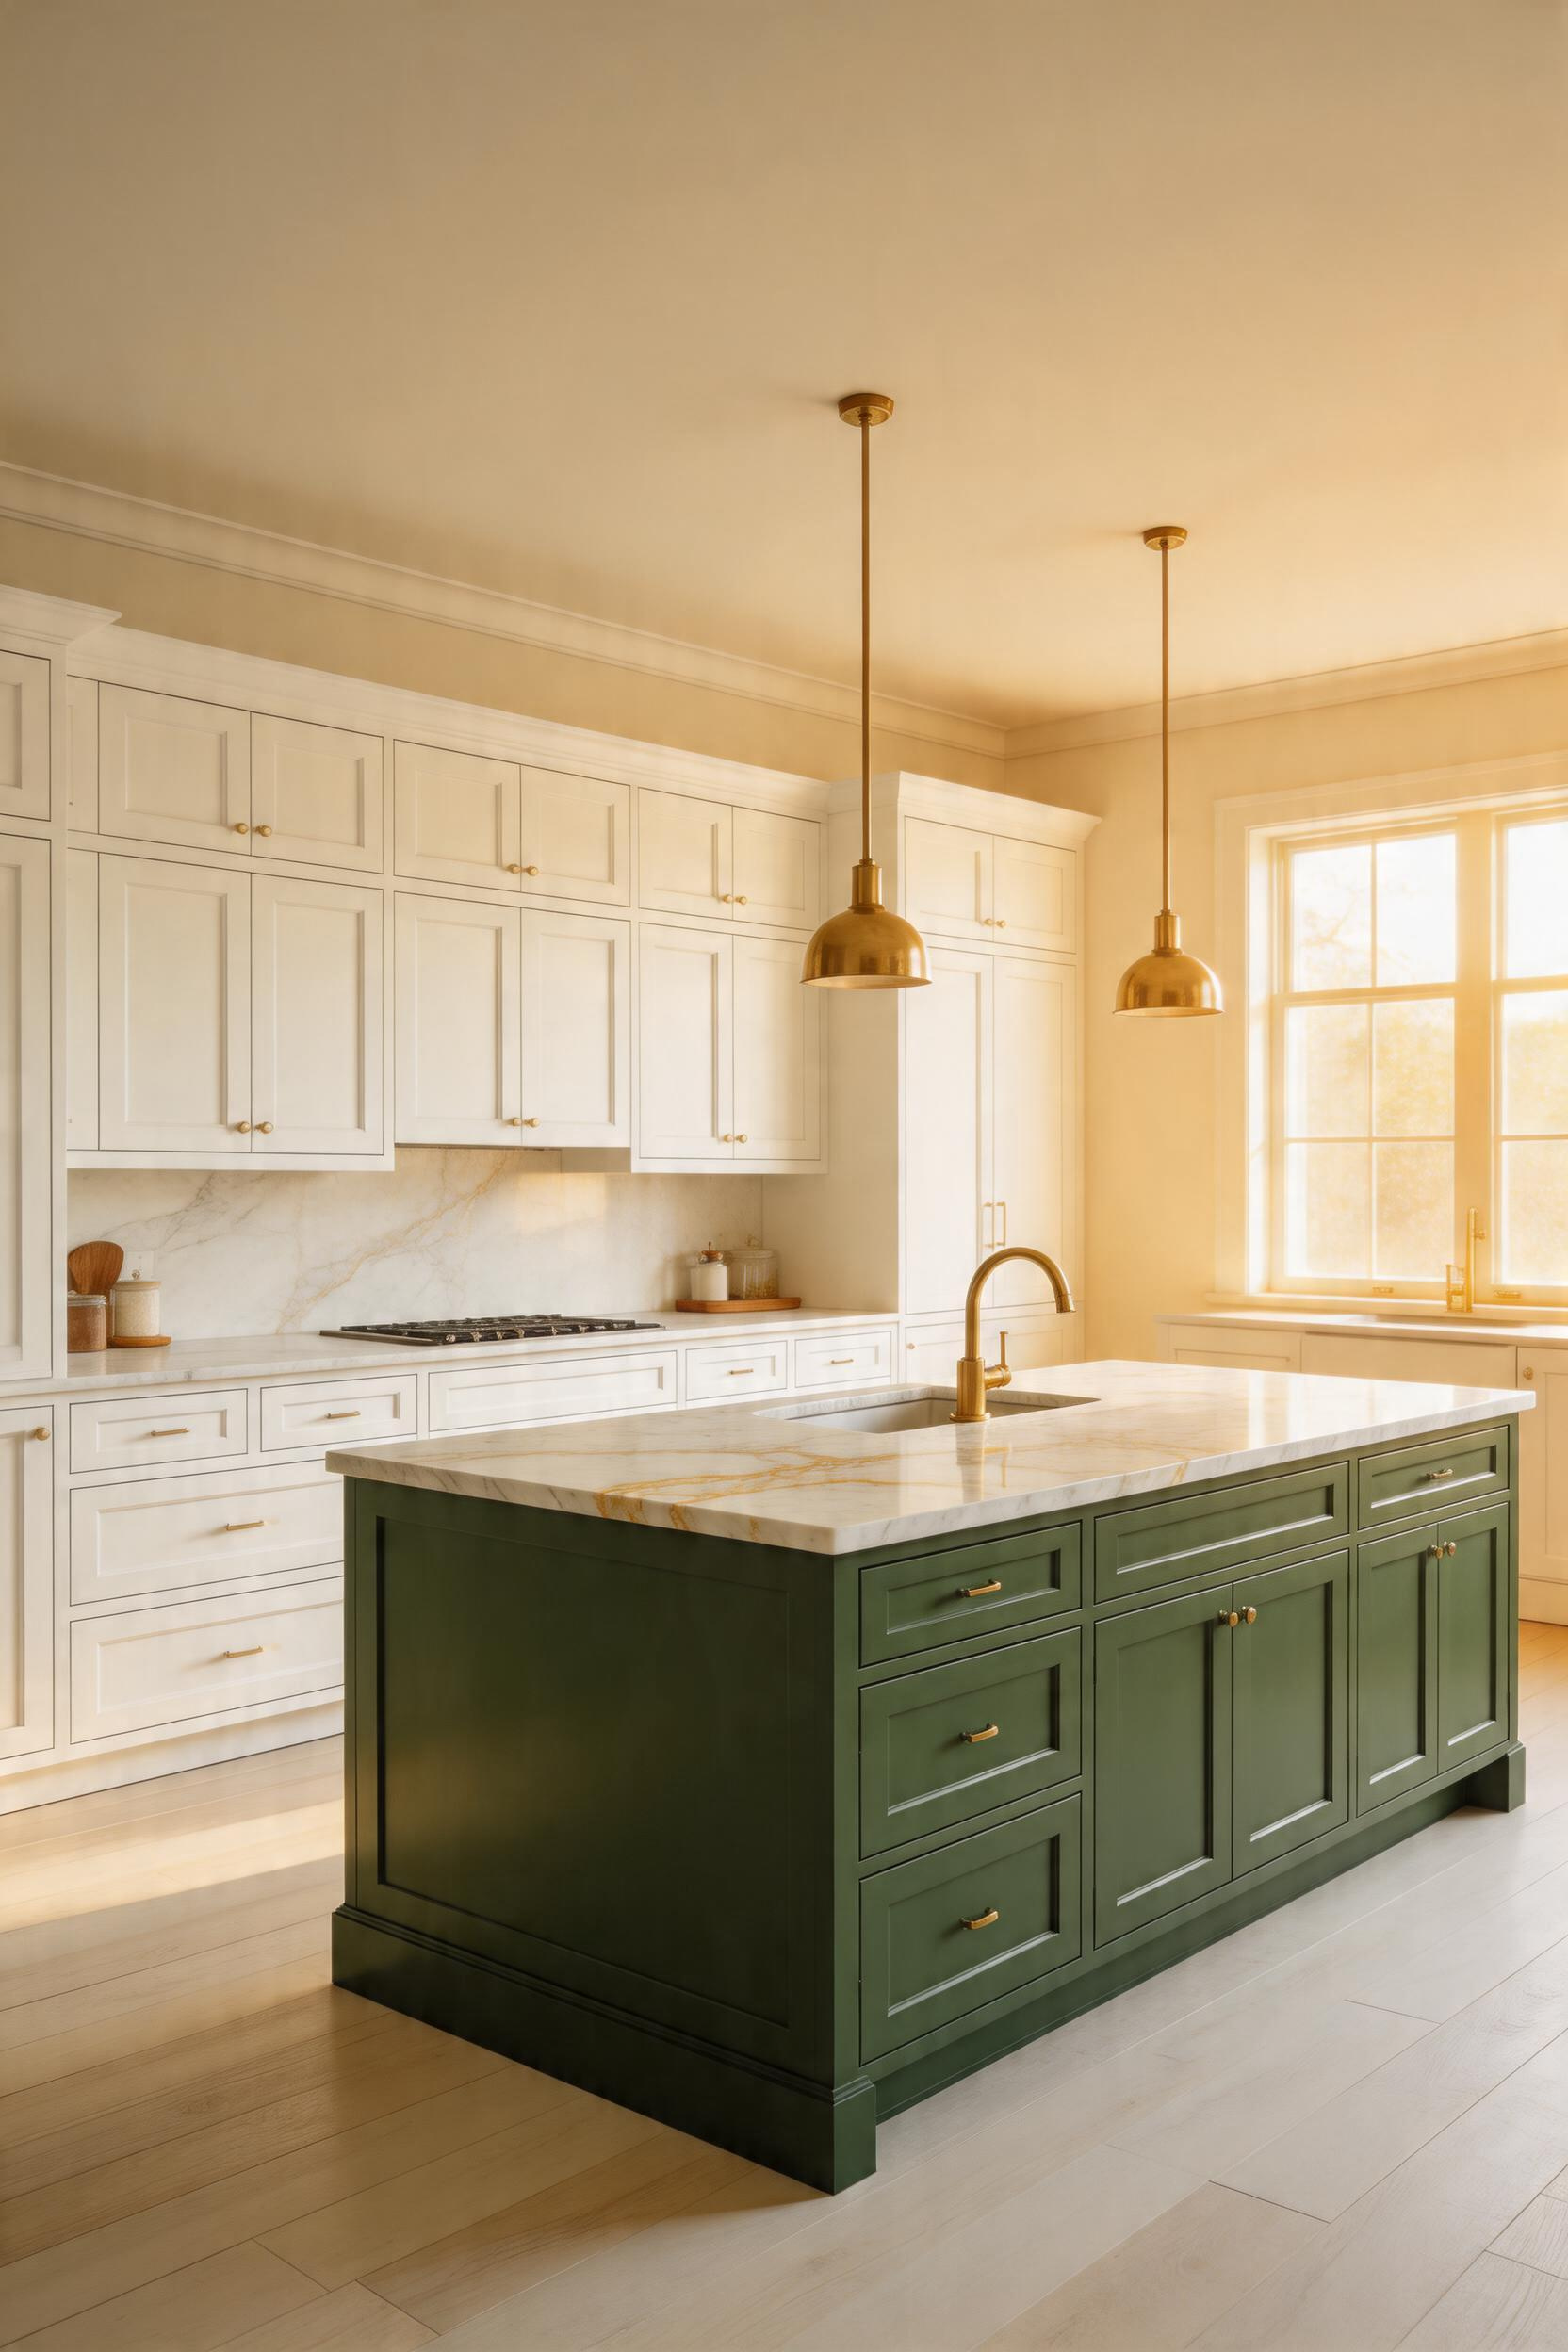
In 2026, the most compelling two-tone pairings lean warmer. The stark white-and-grey combinations of the previous decade have given way to more organic palettes: cream or taupe upper cabinets with a forest green island, warm greige perimeter with navy, or white oak lower cabinets alongside a muted olive island. Forest green with white oak is a pairing that works because both materials share warmth of undertone — the green doesn’t feel cold, and the oak prevents the combination from feeling heavy.
The Best Two-Tone Combinations
Navy island with white perimeter is the most searched two-tone combination and, when it works, it’s because the navy is deep enough to anchor the room without reading as dark blue. Pair it with brass hardware on the island, a Calacatta or warm white quartz top, and the combination stops being a trend and starts being a kitchen people remember. Black island with light grey or warm white perimeter delivers the highest visual contrast and reads as urban contemporary — the key is finishing the island in matte rather than gloss black, which turns the contrast into something you want to look at rather than away from. For the finish specification, satin (30–40° gloss) is the right call for a modern kitchen. It reads more refined than semi-gloss and hides fingerprints better on dark islands.
5. Concrete-Look Porcelain Top for a Modern Kitchen Island
Real poured concrete is a surface that asks a great deal of you. It is porous, must be sealed regularly, and when the sealer fails — which it will — coffee, wine, and cooking oil stain permanently. It cracks as the slab beneath it flexes. After all of that, its colour is uncontrolled: you get what the mix gives you, not what you specified.
Sintered stone gives you the concrete aesthetic without any of those negotiations. Dekton (Cosentino) and Neolith (TheSize) are fired at 1,200°C under 600 tonnes of pressure — the result is completely non-porous, requires no sealing, and sits at 7–8 on the Mohs hardness scale, harder than granite. A hot pan placed directly on the surface causes no thermal shock. Acidic liquids cause no etching.
Dekton’s concrete series includes Kreta (warm grey-beige, subtle aggregate texture), Laurent (cool industrial grey), and Keranium. Slabs come up to 320cm × 144cm, meaning a single piece can cover most island tops with no seams. Neolith’s equivalent line — Iron, Cement, and Phedra — runs at $60–$105 per square foot installed, compared to Dekton’s $75–$150. Both carry UV stability to work outdoors if the kitchen opens to an outdoor dining area.
The specification choice that most affects the result is thickness. At 8mm, sintered stone looks thin in person — the edge lacks the visual weight of a real stone countertop. At 12mm or 20mm, the edge reads as substantial. If a waterfall detail is planned, 12mm is the minimum; 20mm produces a profile that genuinely mimics the mass of natural stone.
6. Integrated Sink and Faucet for a Modern Kitchen Island Design
The prep sink on an island is one of those features that serious cooks insist on and everyone else initially dismisses as unnecessary — until they use a kitchen that has one. The workflow argument is straightforward: when one person is at the main sink loading the dishwasher, the island sink allows a second person to wash produce, fill pots, or drain pasta without interrupting the first. The kitchen stops being a single-lane road.
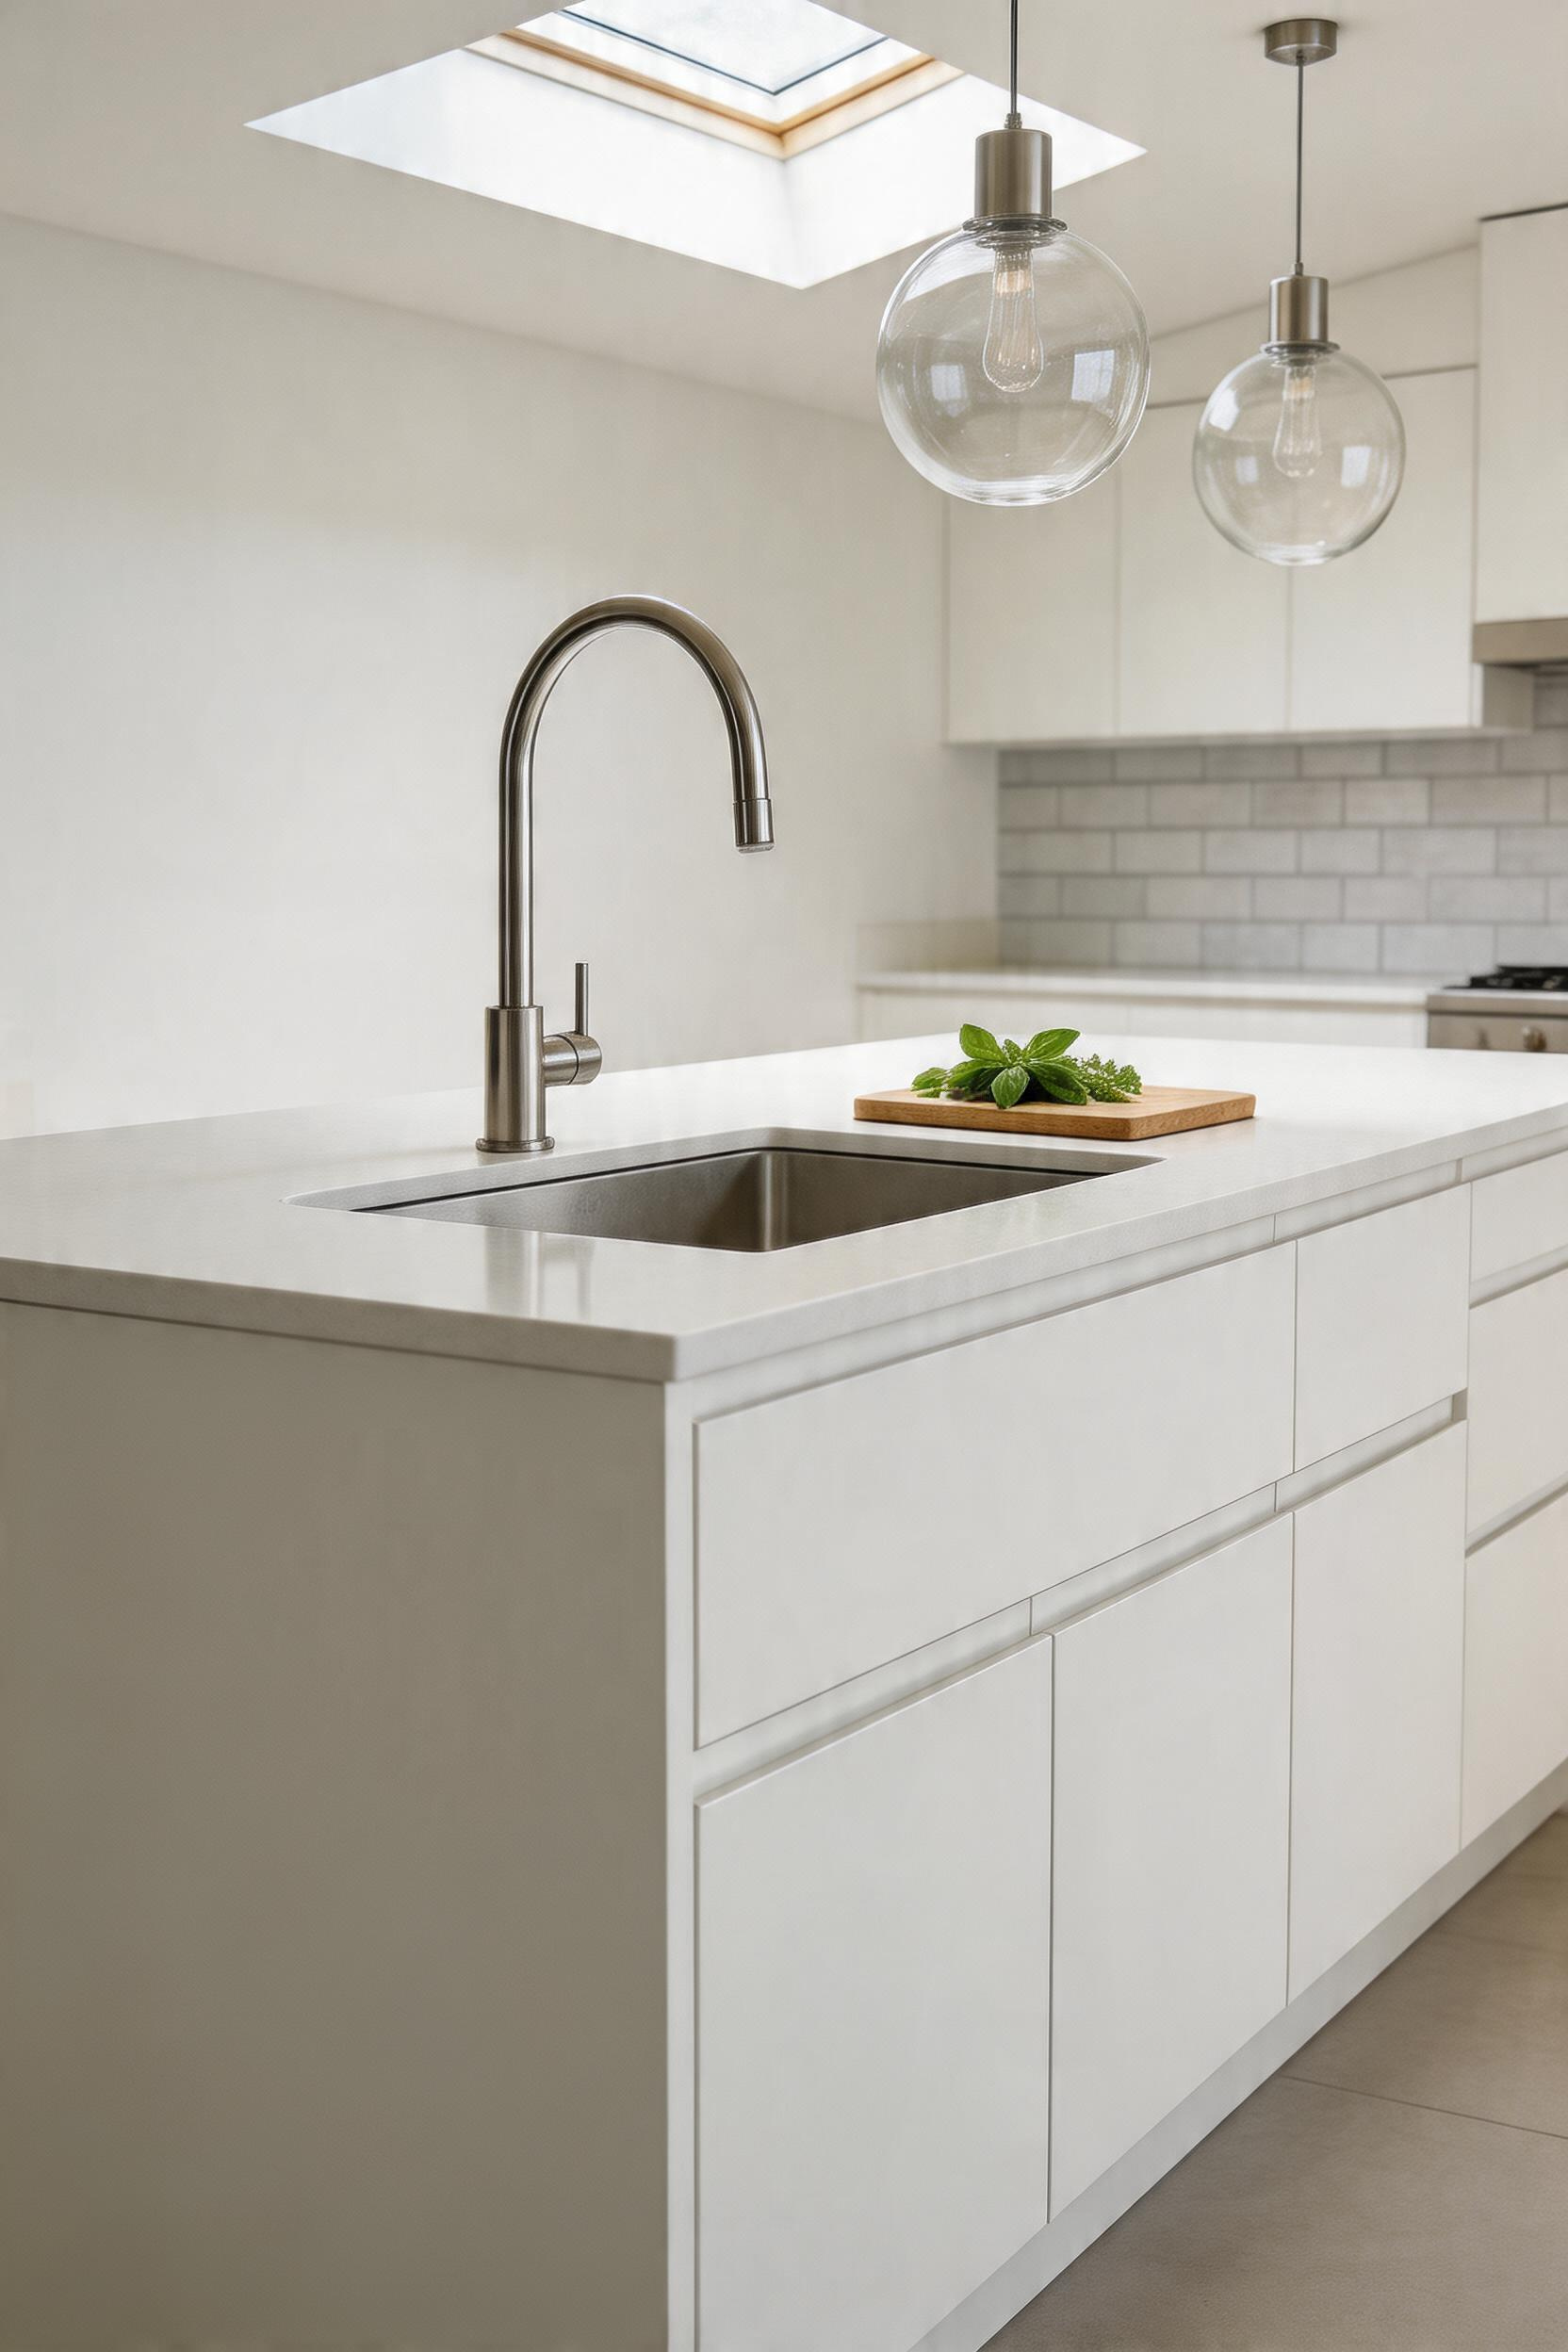
For modern aesthetics, under-mount is the only correct sink specification. The countertop surface runs continuously to the sink opening with no rim, lip, or deck, making the sink invisible from the room’s main vantage point. Stainless steel at 16-gauge (1mm thick) is the material benchmark — Kohler, Blanco, and Kraus all offer 16-inch prep sink options in the $150–$400 range. The 16-inch square format is the most versatile for an island: large enough to rinse a colander of vegetables or fill a pasta pot, small enough to preserve counter surface on both sides.
Plumbing Considerations
Supply and drain lines must run under the floor rather than through a wall, which means cutting into the subfloor, routing pipes, and patching the floor finish. Venting options are either a traditional loop vent (runs a vent loop under the island and up through the floor) or an air admittance valve (AAV), which is less invasive but not permitted in all jurisdictions — check local code before specifying. Total island plumbing runs $800–$2,500 for the rough-in; a complete installation including countertop cutout, fixture supply, and labour averages $4,000–$7,000. If you’re planning a broader kitchen renovation, the island sink is worth building into that budget from the start rather than adding as a later change order.
7. Portable Modern Kitchen Island on Locking Casters
Not every kitchen island should be fixed. Renters cannot commit to structural changes. Open-plan homes that double as entertaining spaces benefit from an island that clears to the perimeter when a large seating arrangement is needed. And homeowners planning a significant renovation in two to three years may not want to invest in a fixed installation that will be torn out. A quality moveable island solves all three situations.
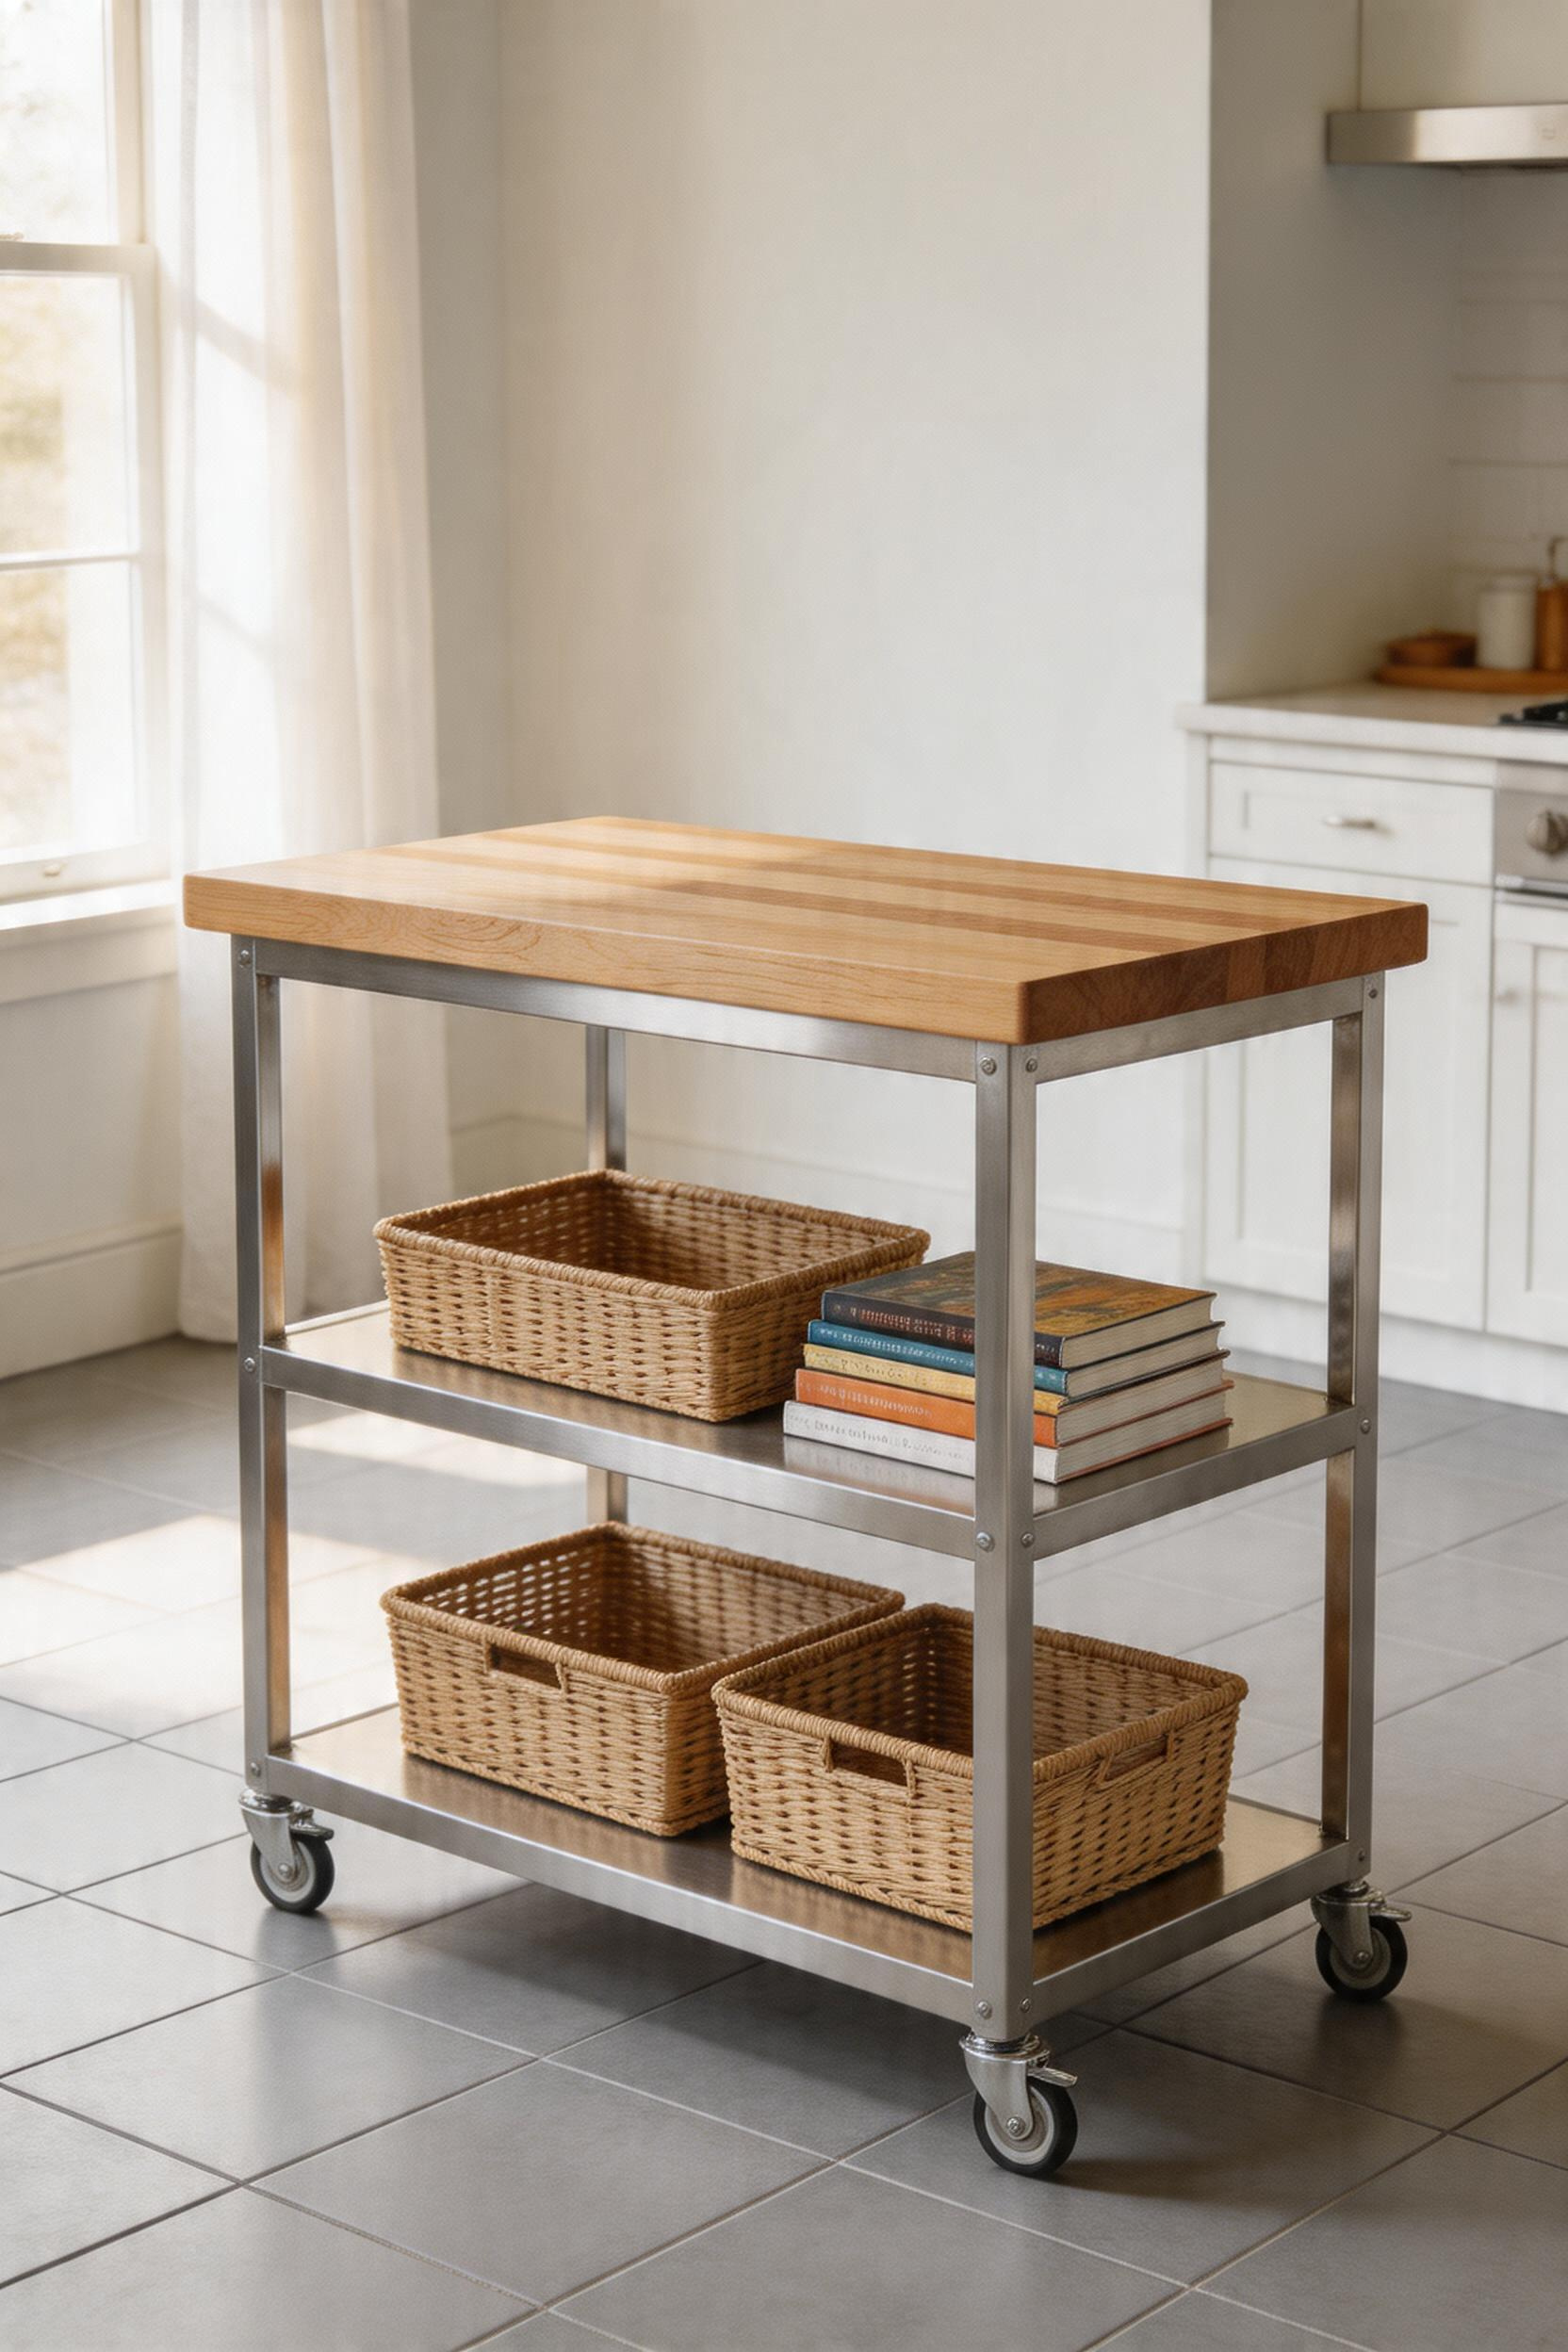
John Boos is the reference point for portable islands that actually feel like kitchen furniture rather than equipment. The Cucina Classico — all food-service grade 18/8 stainless steel in 48 × 24 or 48 × 30-inch footprints — brings commercial kitchen durability to a residential context. The Cucina Technica pairs a 2¼-inch thick edge-grain maple butcher block with a commercial-grade stainless base; the weight of the solid wood top contributes meaningfully to stability when the casters are locked. For kitchen island decor ideas that work on a moveable base as well as a fixed one, scale and material weight are the two constraints that shape the approach.
Caster Specifications
The caster specification is where cheap portable islands fail. The John Boos units use 2.5-inch polyolefin locking casters that engage both the wheel rotation and the swivel — preventing the island from drifting sideways during vigorous chopping, which is the failure mode of lesser casters. Polyolefin wheels don’t mark hardwood or tile, resist grease and cleaning products, and carry 250–350 lbs per wheel. For any custom portable island build, specify 4-inch swivel locking casters with a minimum 100kg per-wheel rating from manufacturers like Shepherd, Richelieu, or Sugatsune. One practical note: always unlock all four casters simultaneously when repositioning — unlocking only two means the island pivots around the locked pair, and on tile or stone flooring that’s how wheels leave marks.
8. Open Shelving Base for Modern Kitchen Island Storage
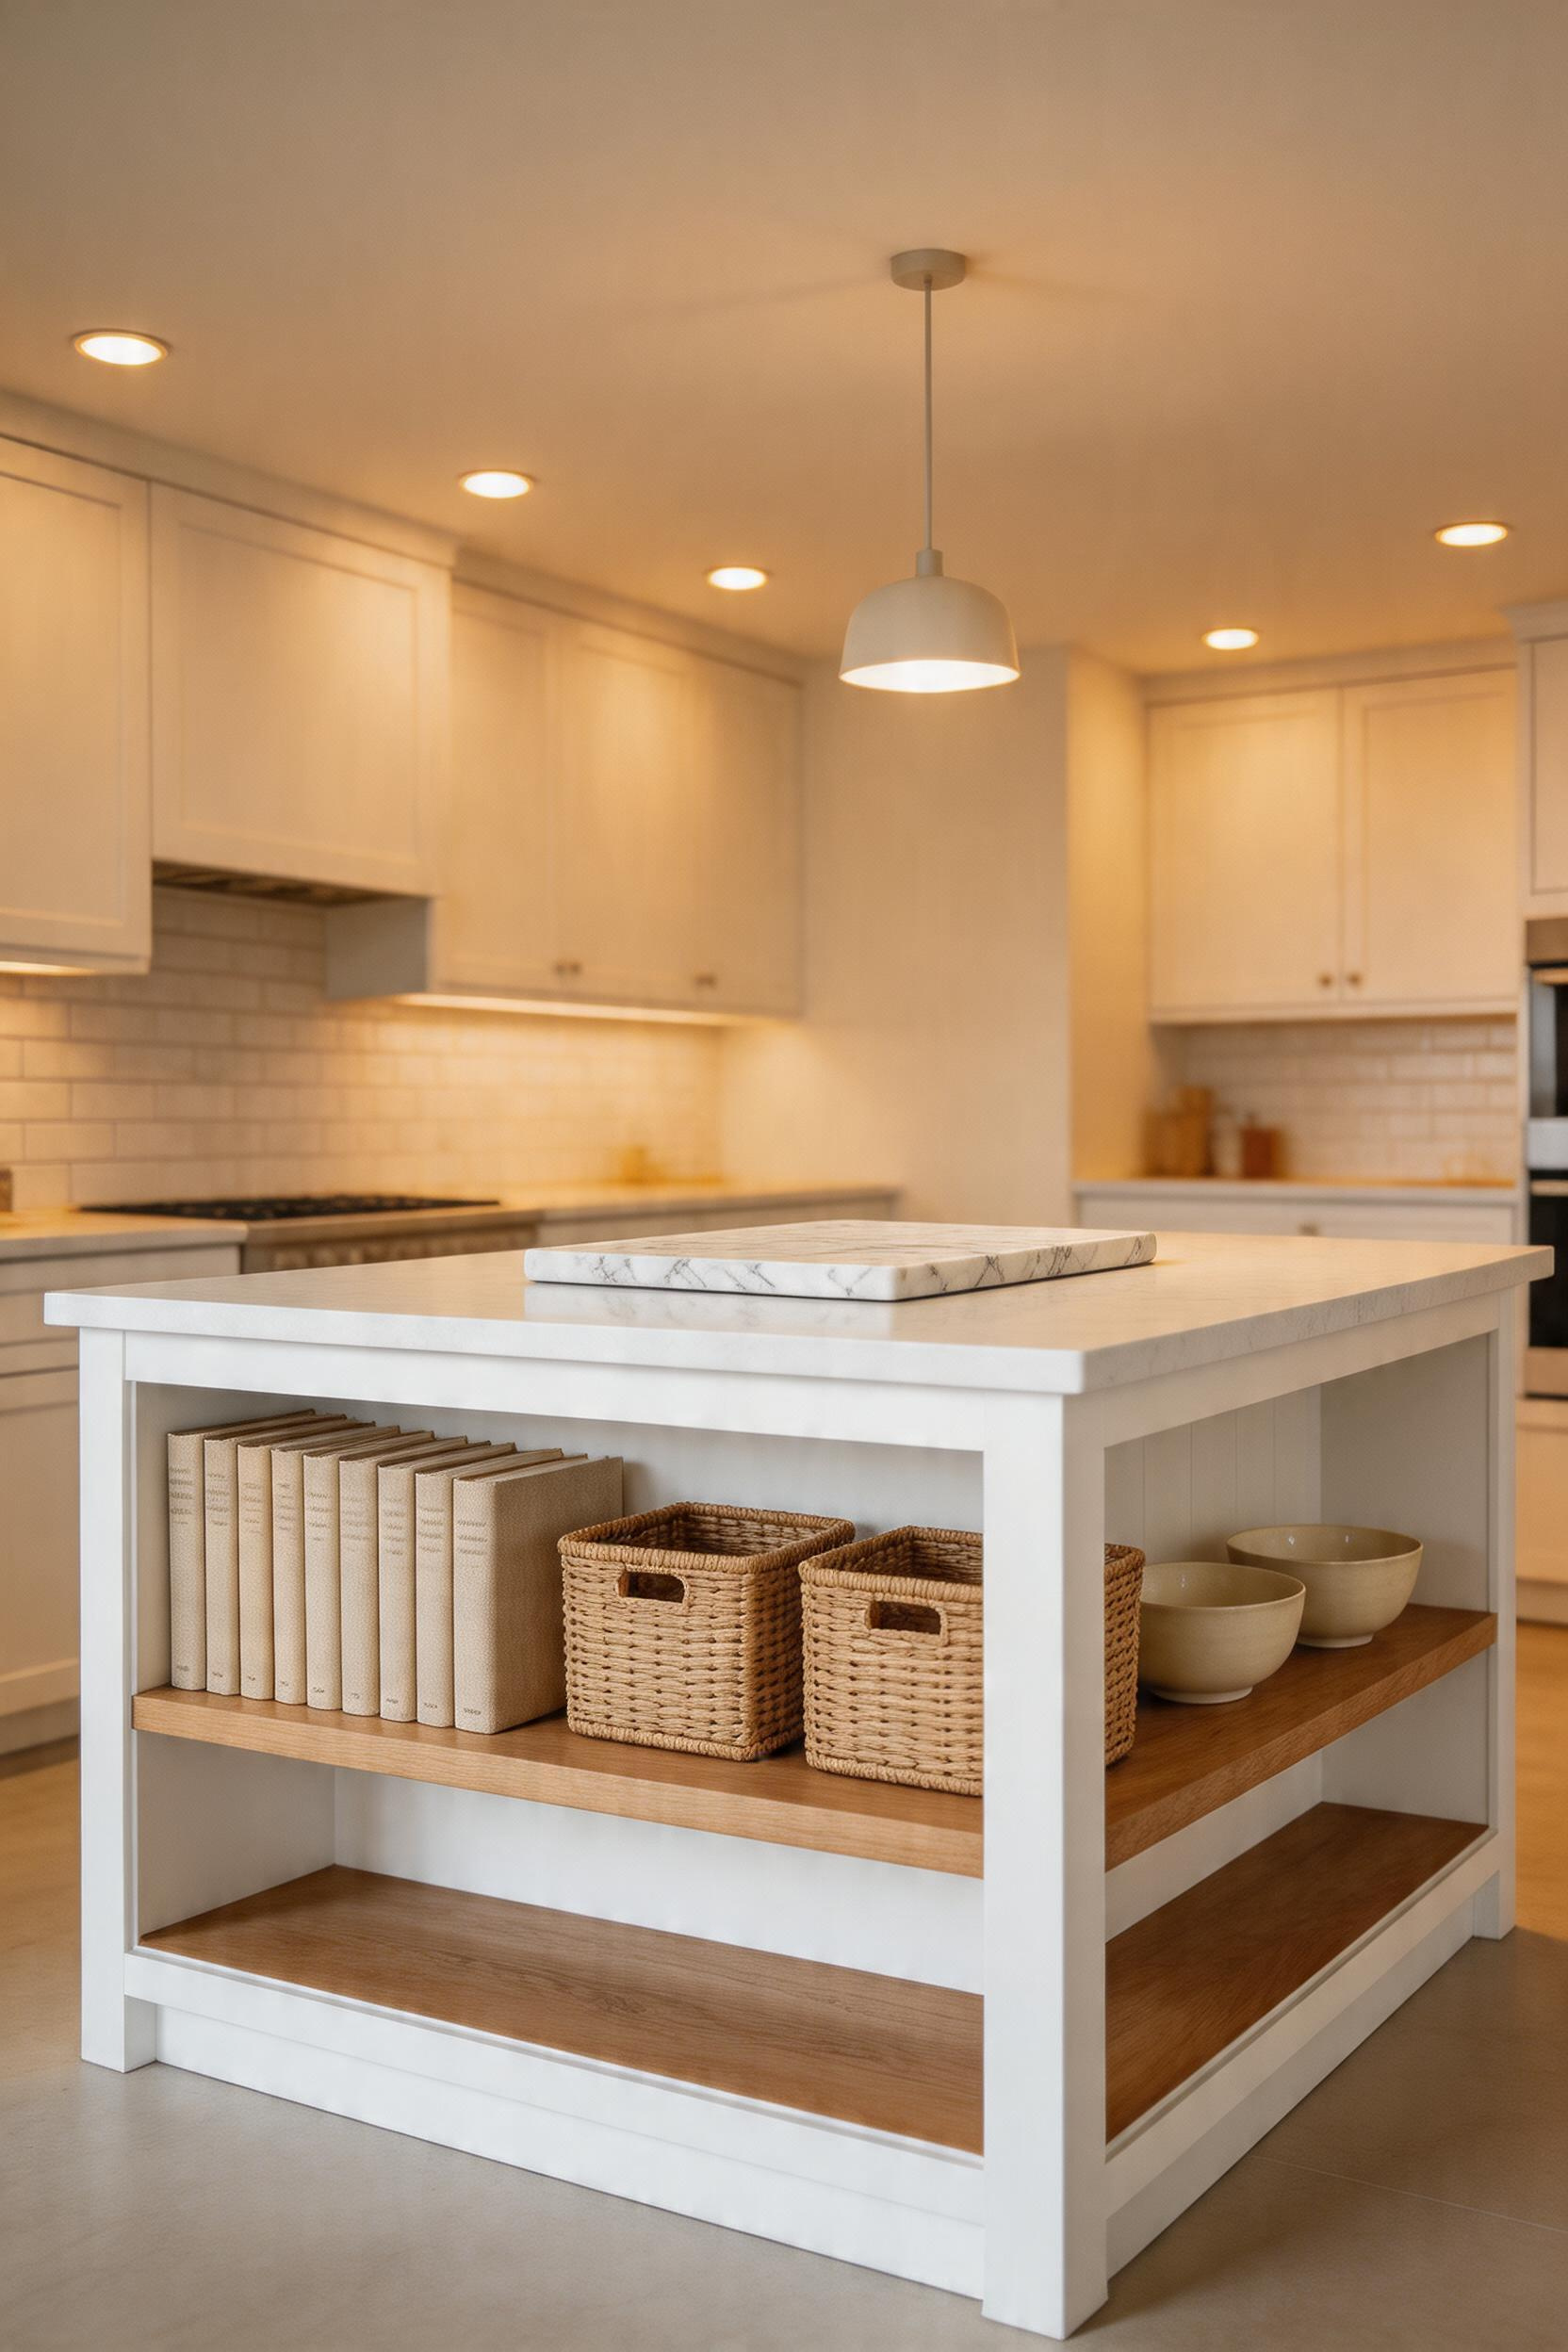
A closed-base island in a generous kitchen can become a visual barrier — a furniture block that divides the room rather than anchoring it. The open-base island — where the lower section is shelved rather than enclosed — allows sightlines to pass through at floor level, preserving the sense of spatial flow. In kitchens with beautiful flooring, it also allows the floor material to read as continuous throughout the room rather than disappearing behind a cabinet box.
What Works on Open Shelves
The styling discipline that open shelving demands is also its design dividend. A shelf that holds woven rattan baskets in one consistent style, a curated set of cookbooks with matching spines, or a row of ceramic pots creates a composed horizontal layer beneath the countertop plane. A shelf with random objects pushed to the back is clutter with better lighting. For practical storage allocation: reserve open shelves for objects that are visually consistent and don’t collect grease quickly. Cookbooks, basket-enclosed dry goods, wine bottles, and decorative ceramics all work well. Cleaning products, plastic wrap, small appliances with cords, and anything near the cooktop should stay behind closed doors — the open shelf in a cooking zone accumulates airborne oil and needs more frequent cleaning than an enclosed cabinet. Exploring kitchen storage ideas that integrate with the broader kitchen system makes the planning considerably easier. Structurally, a shelf spanning more than 24 inches without a centre support will deflect under heavy loads — specify 3/4-inch Baltic birch or a solid hardwood shelf for any span above 24 inches.
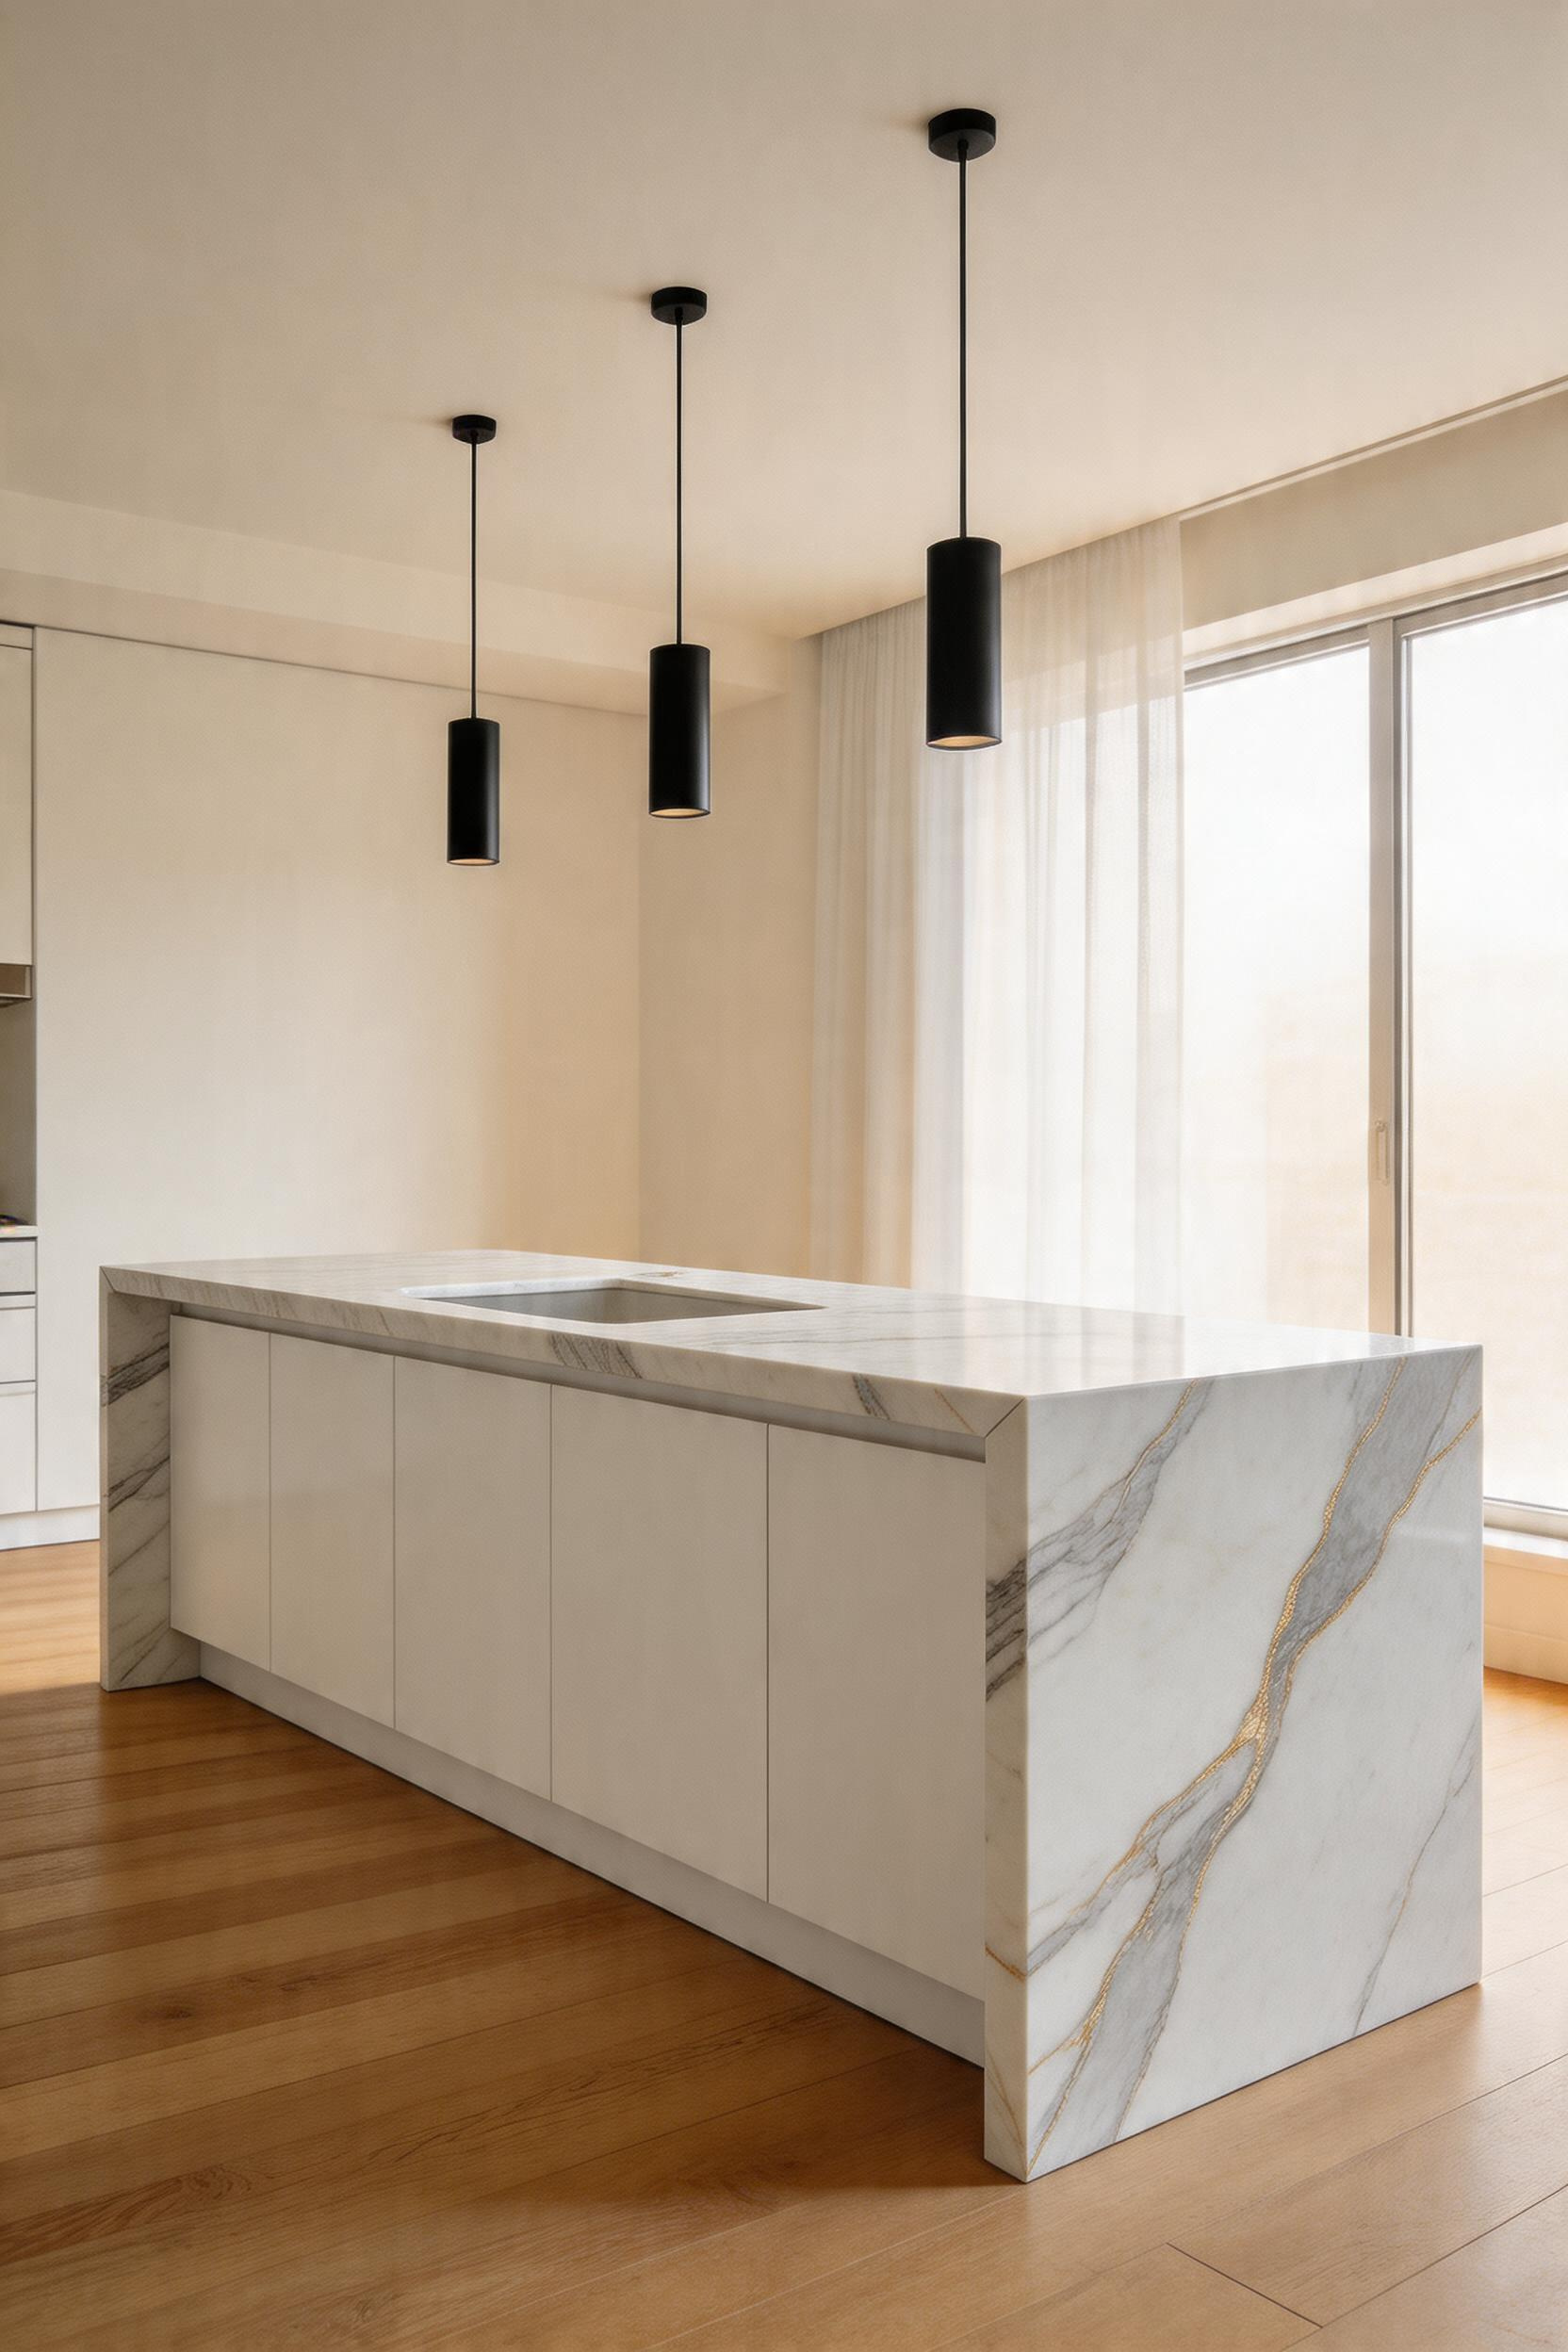
9. Marble Countertop With Brass Hardware for a Warm Modern Island
The marble-and-brass pairing occupies a specific register in kitchen design — formal without being traditional, warm enough to feel inhabited, and archival enough to feel enduring. It is also one of the most misunderstood combinations, because both materials ask for something in return for the aesthetic they provide.
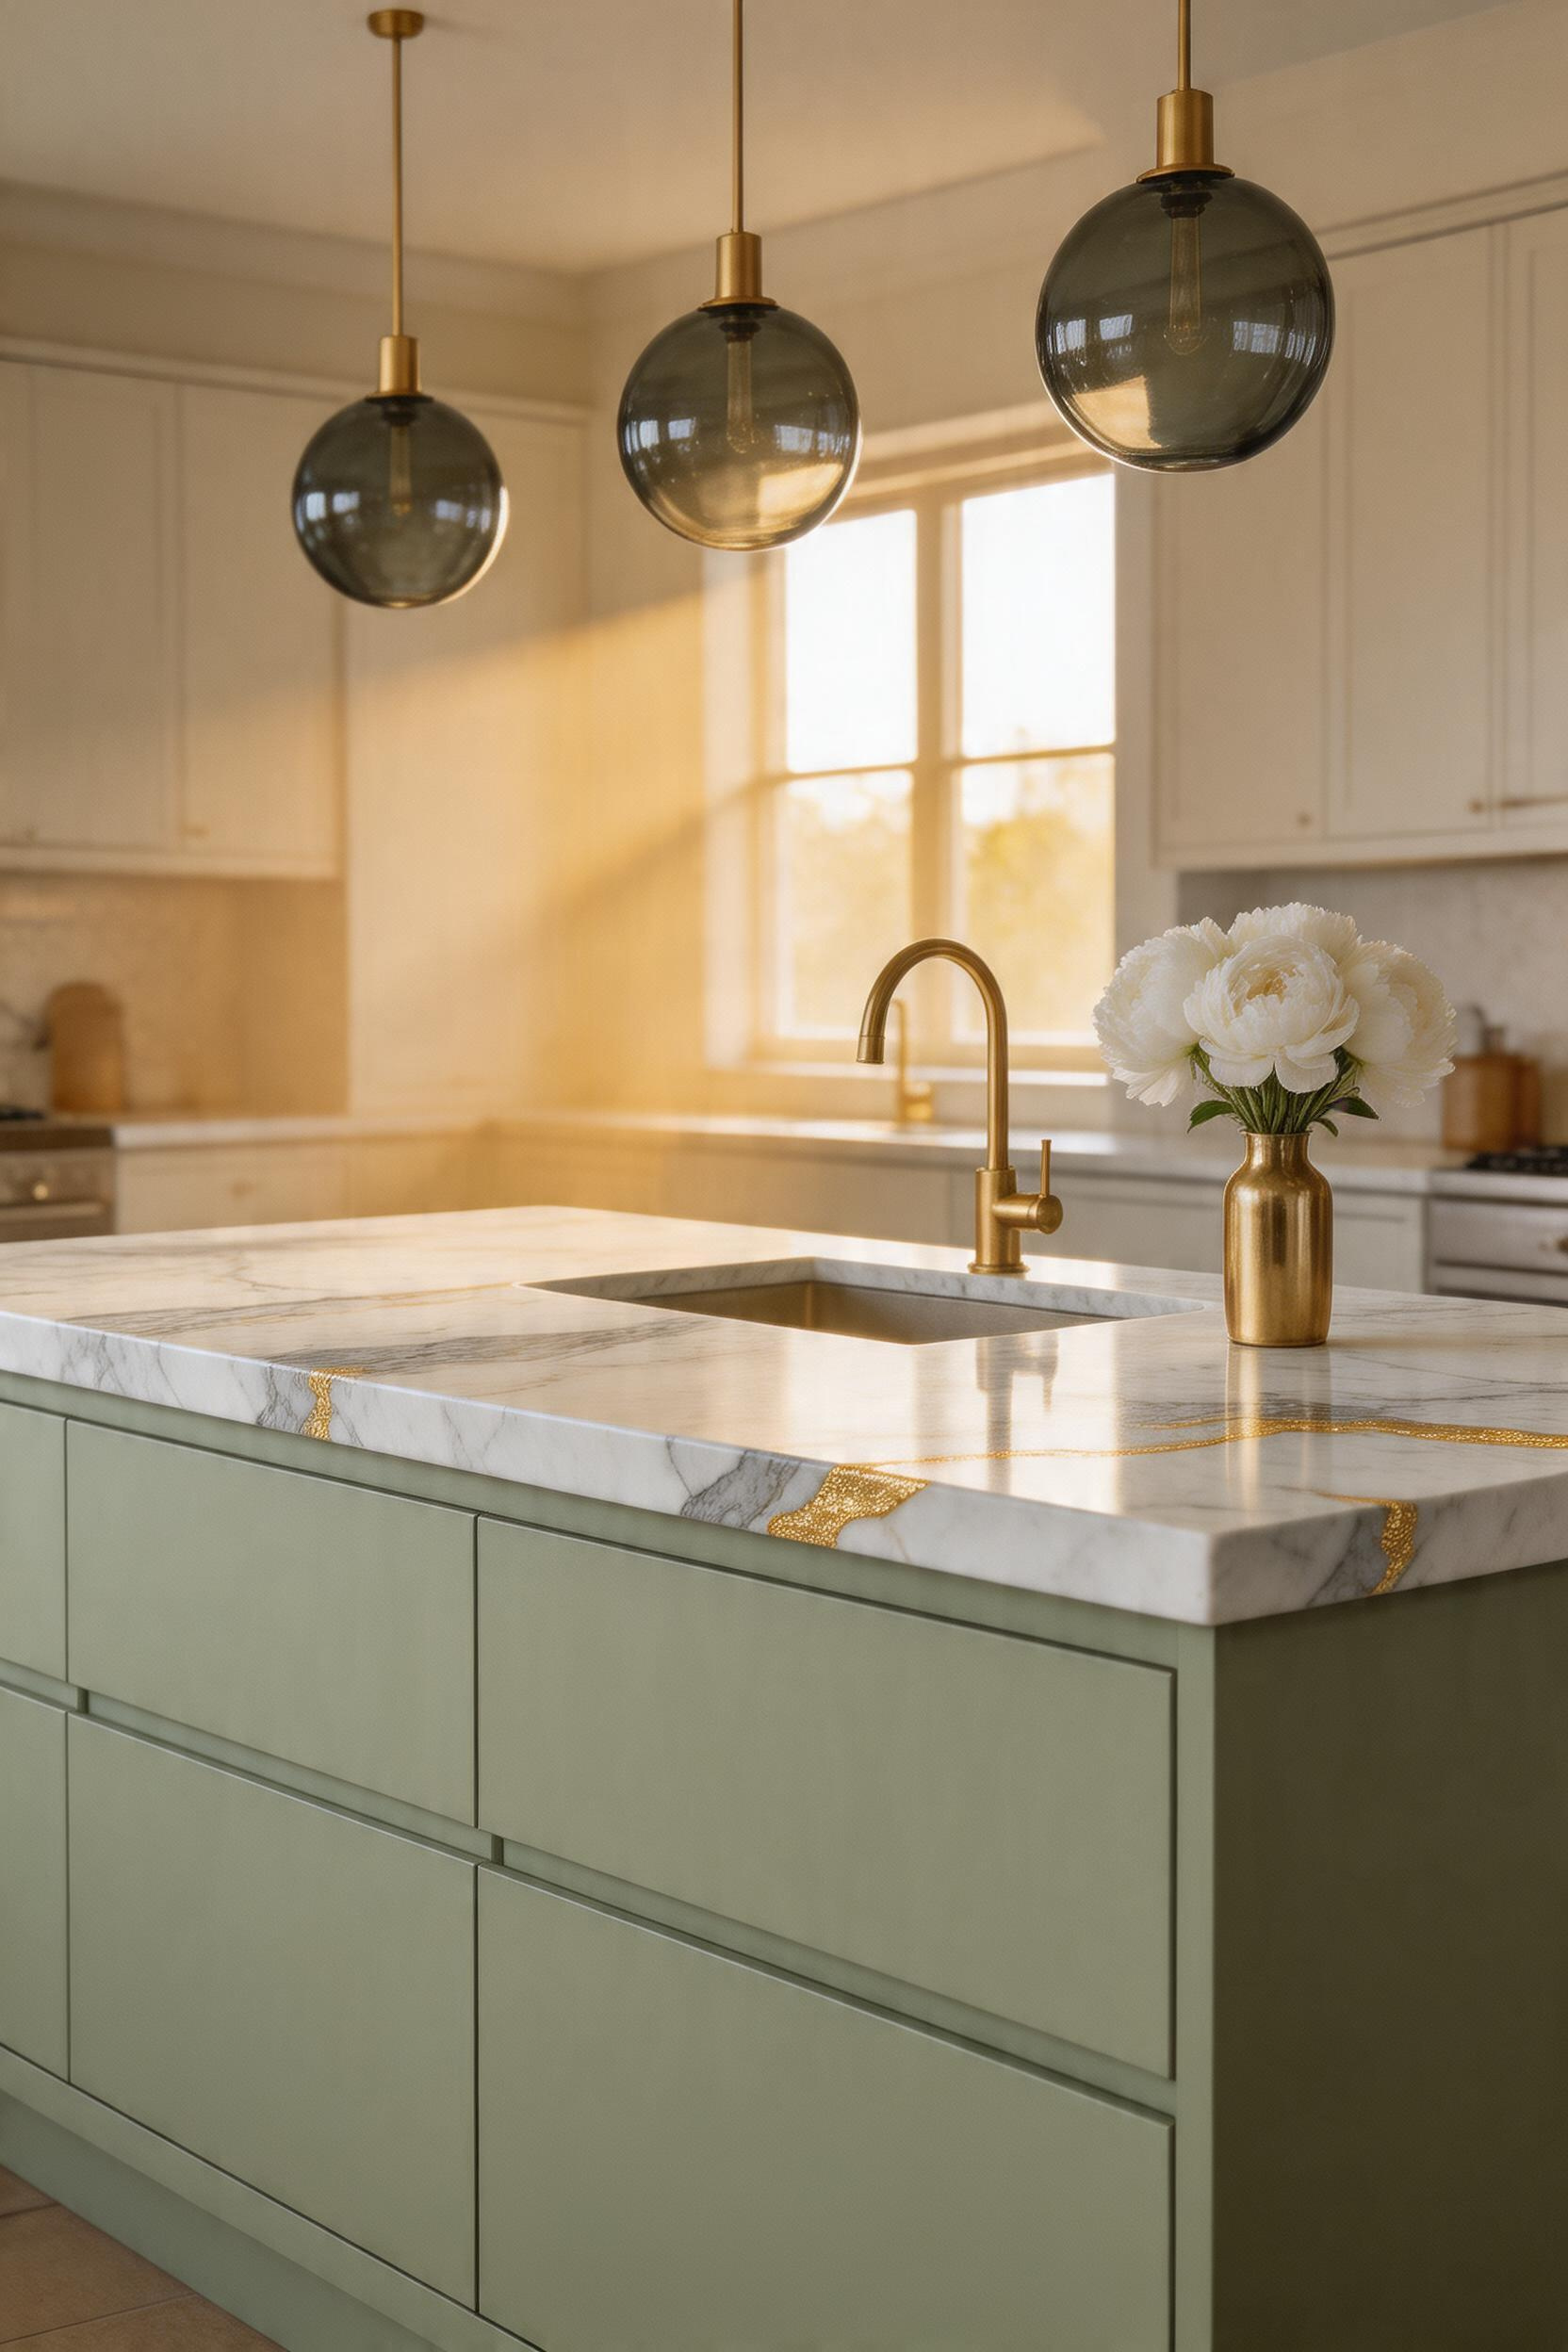
Understanding which marble to specify requires knowing its background colour as much as its vein pattern. Carrara has a grey-toned background with fine, soft, feathery grey veining — its grey undertone makes everyday marks and etching less visible, and its pricing ($75–$100 per square foot uninstalled) reflects the relative abundance of the quarry supply. Calacatta has a bright white background with dramatic, bold veining in gold, brown, or dark grey; it is rarer and priced at up to $250 per square foot. Statuario sits between them: extremely bright white background with high-contrast dark grey veining, less colour variation than Calacatta but more visual drama than Carrara.
Sealing, Etching, and Finish
For the kitchen context, specify honed rather than polished finish. Marble is calcium carbonate — any acidic substance will etch the polished surface, leaving dull patches that cannot be cleaned away; they must be professionally re-polished. Honed finish hides etching because the surface is already non-reflective. As for brass, the cabinet knobs and pulls you select set the hardware language for the entire island. Satin brass is more maintenance-friendly than unlacquered in a kitchen; it resists kitchen grease and wipes clean without developing the rapid patina that unlacquered develops. One or two considered brass elements — a faucet, pendant stems — do more than hardware on every door and drawer.
10. Wine and Bottle Storage Built Into a Modern Kitchen Island
The detail that moves a kitchen island from storage unit to considered living object is often a single specific feature — and wine storage, when it’s integrated properly rather than retrofitted as an afterthought, is one of them. Done right, it puts the bottles you’re drinking this month at arm’s reach without requiring a separate wine fridge, a wall rack, or a trip to the pantry during dinner.
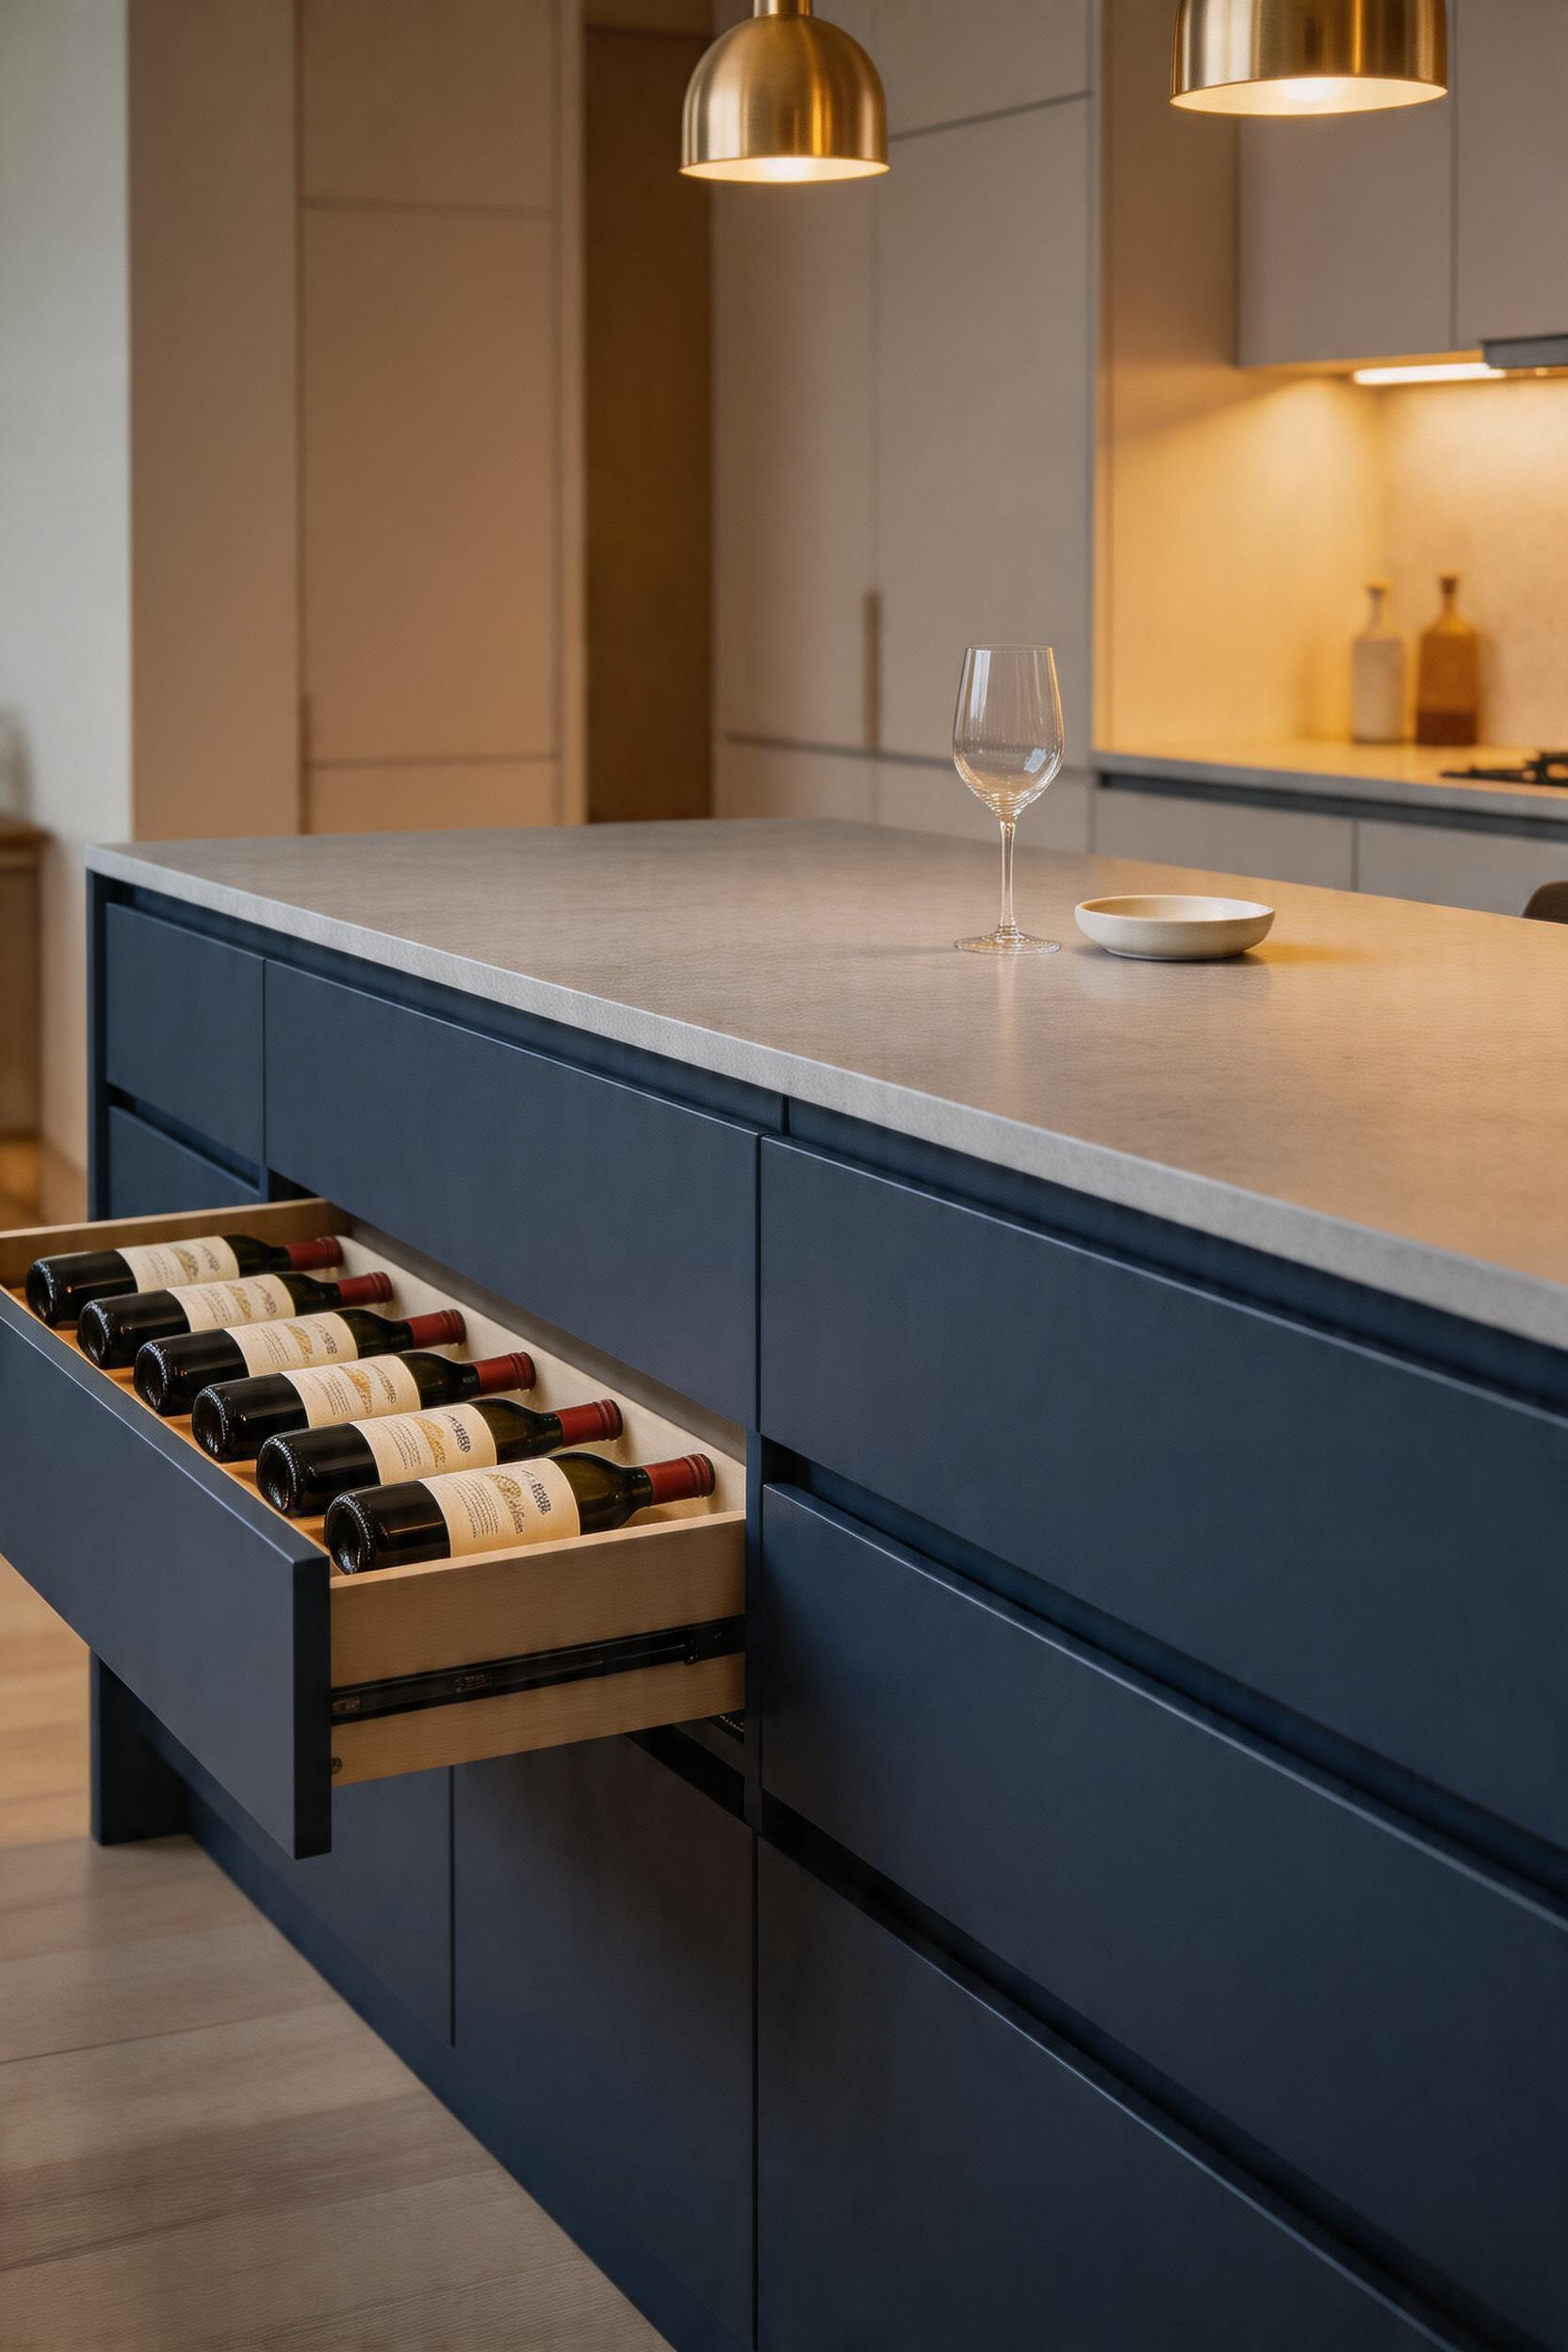
Pull-out bottle drawers are the correct specification for a modern island. The system — a full-extension drawer with individual horizontal label-facing slots — keeps every bottle visible by label without requiring you to move others to reach the one you want. When the drawer is closed, nothing is visible but a flat drawer face; the storage is completely invisible within the island’s clean profile. Häfele produces a wine tray with full-extension slides and soft-close for 18-inch or 24-inch cabinet widths, holding 4–6 bottles. A 24-inch section on the island end opposite seating is the right allocation for a meaningful everyday wine collection within reach.
Temperature and Placement
Island bottle drawers suit wines you plan to drink within 6–12 months; they are not suitable for investment wines intended for long-term ageing. Kitchen ambient temperature during cooking regularly reaches 75–85°F, which accelerates ageing and affects quality over time. If the island is large enough to accommodate a dedicated cooling drawer — Sub-Zero and Liebherr both make 24-inch wine drawer units that maintain 45–65°F — the specification upgrades from casual storage to a genuine cellar zone. Also, don’t locate bottle storage in the drawer immediately adjacent to an under-island dishwasher. The heat and steam from a drying cycle will warm the surrounding zone considerably, and the bottles closest to the appliance will experience the most temperature variation.
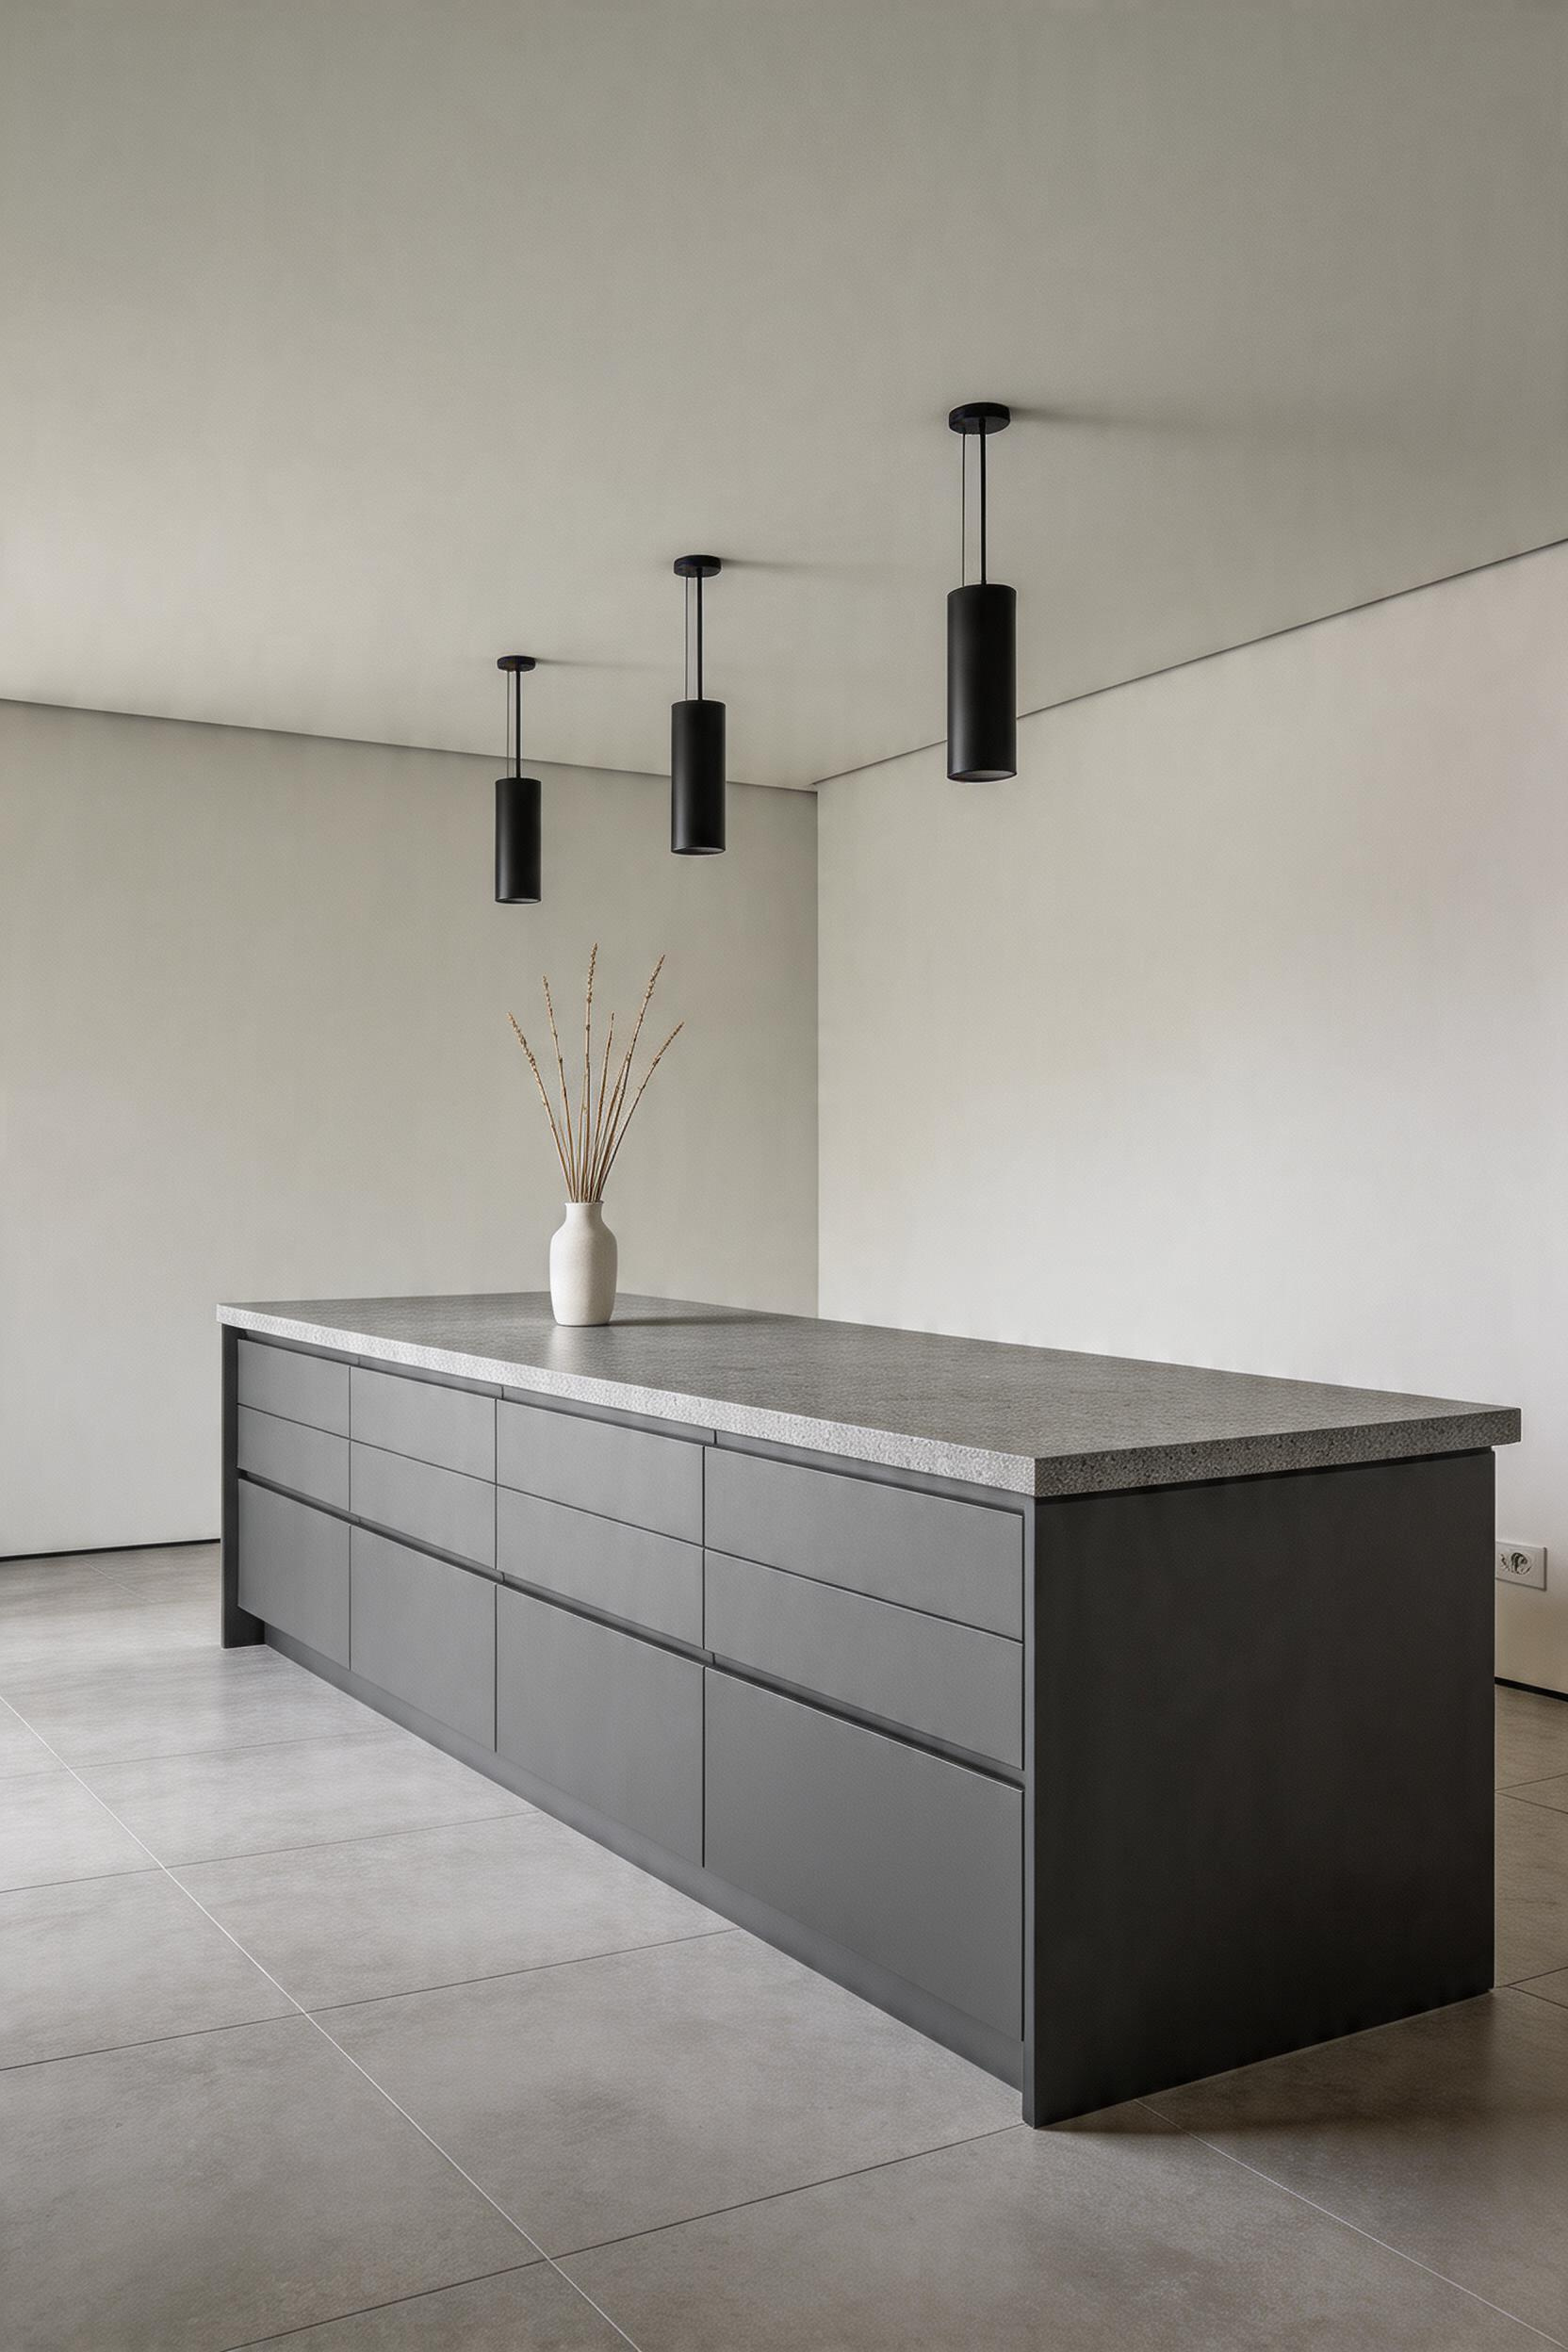
11. Black Quartz Top on a Matte White Island Base
The high-contrast monochrome island is a design move with a long lineage — it draws on the same visual logic as black-and-white photography, where the absence of colour forces the composition to carry everything. In a kitchen, black quartz on a matte white base delivers maximum graphic clarity with the maintenance advantages of engineered stone. There’s no ambiguity in this pairing: the boldness reads as intentional, which is the difference between a considered design statement and a kitchen that happens to be two colours.
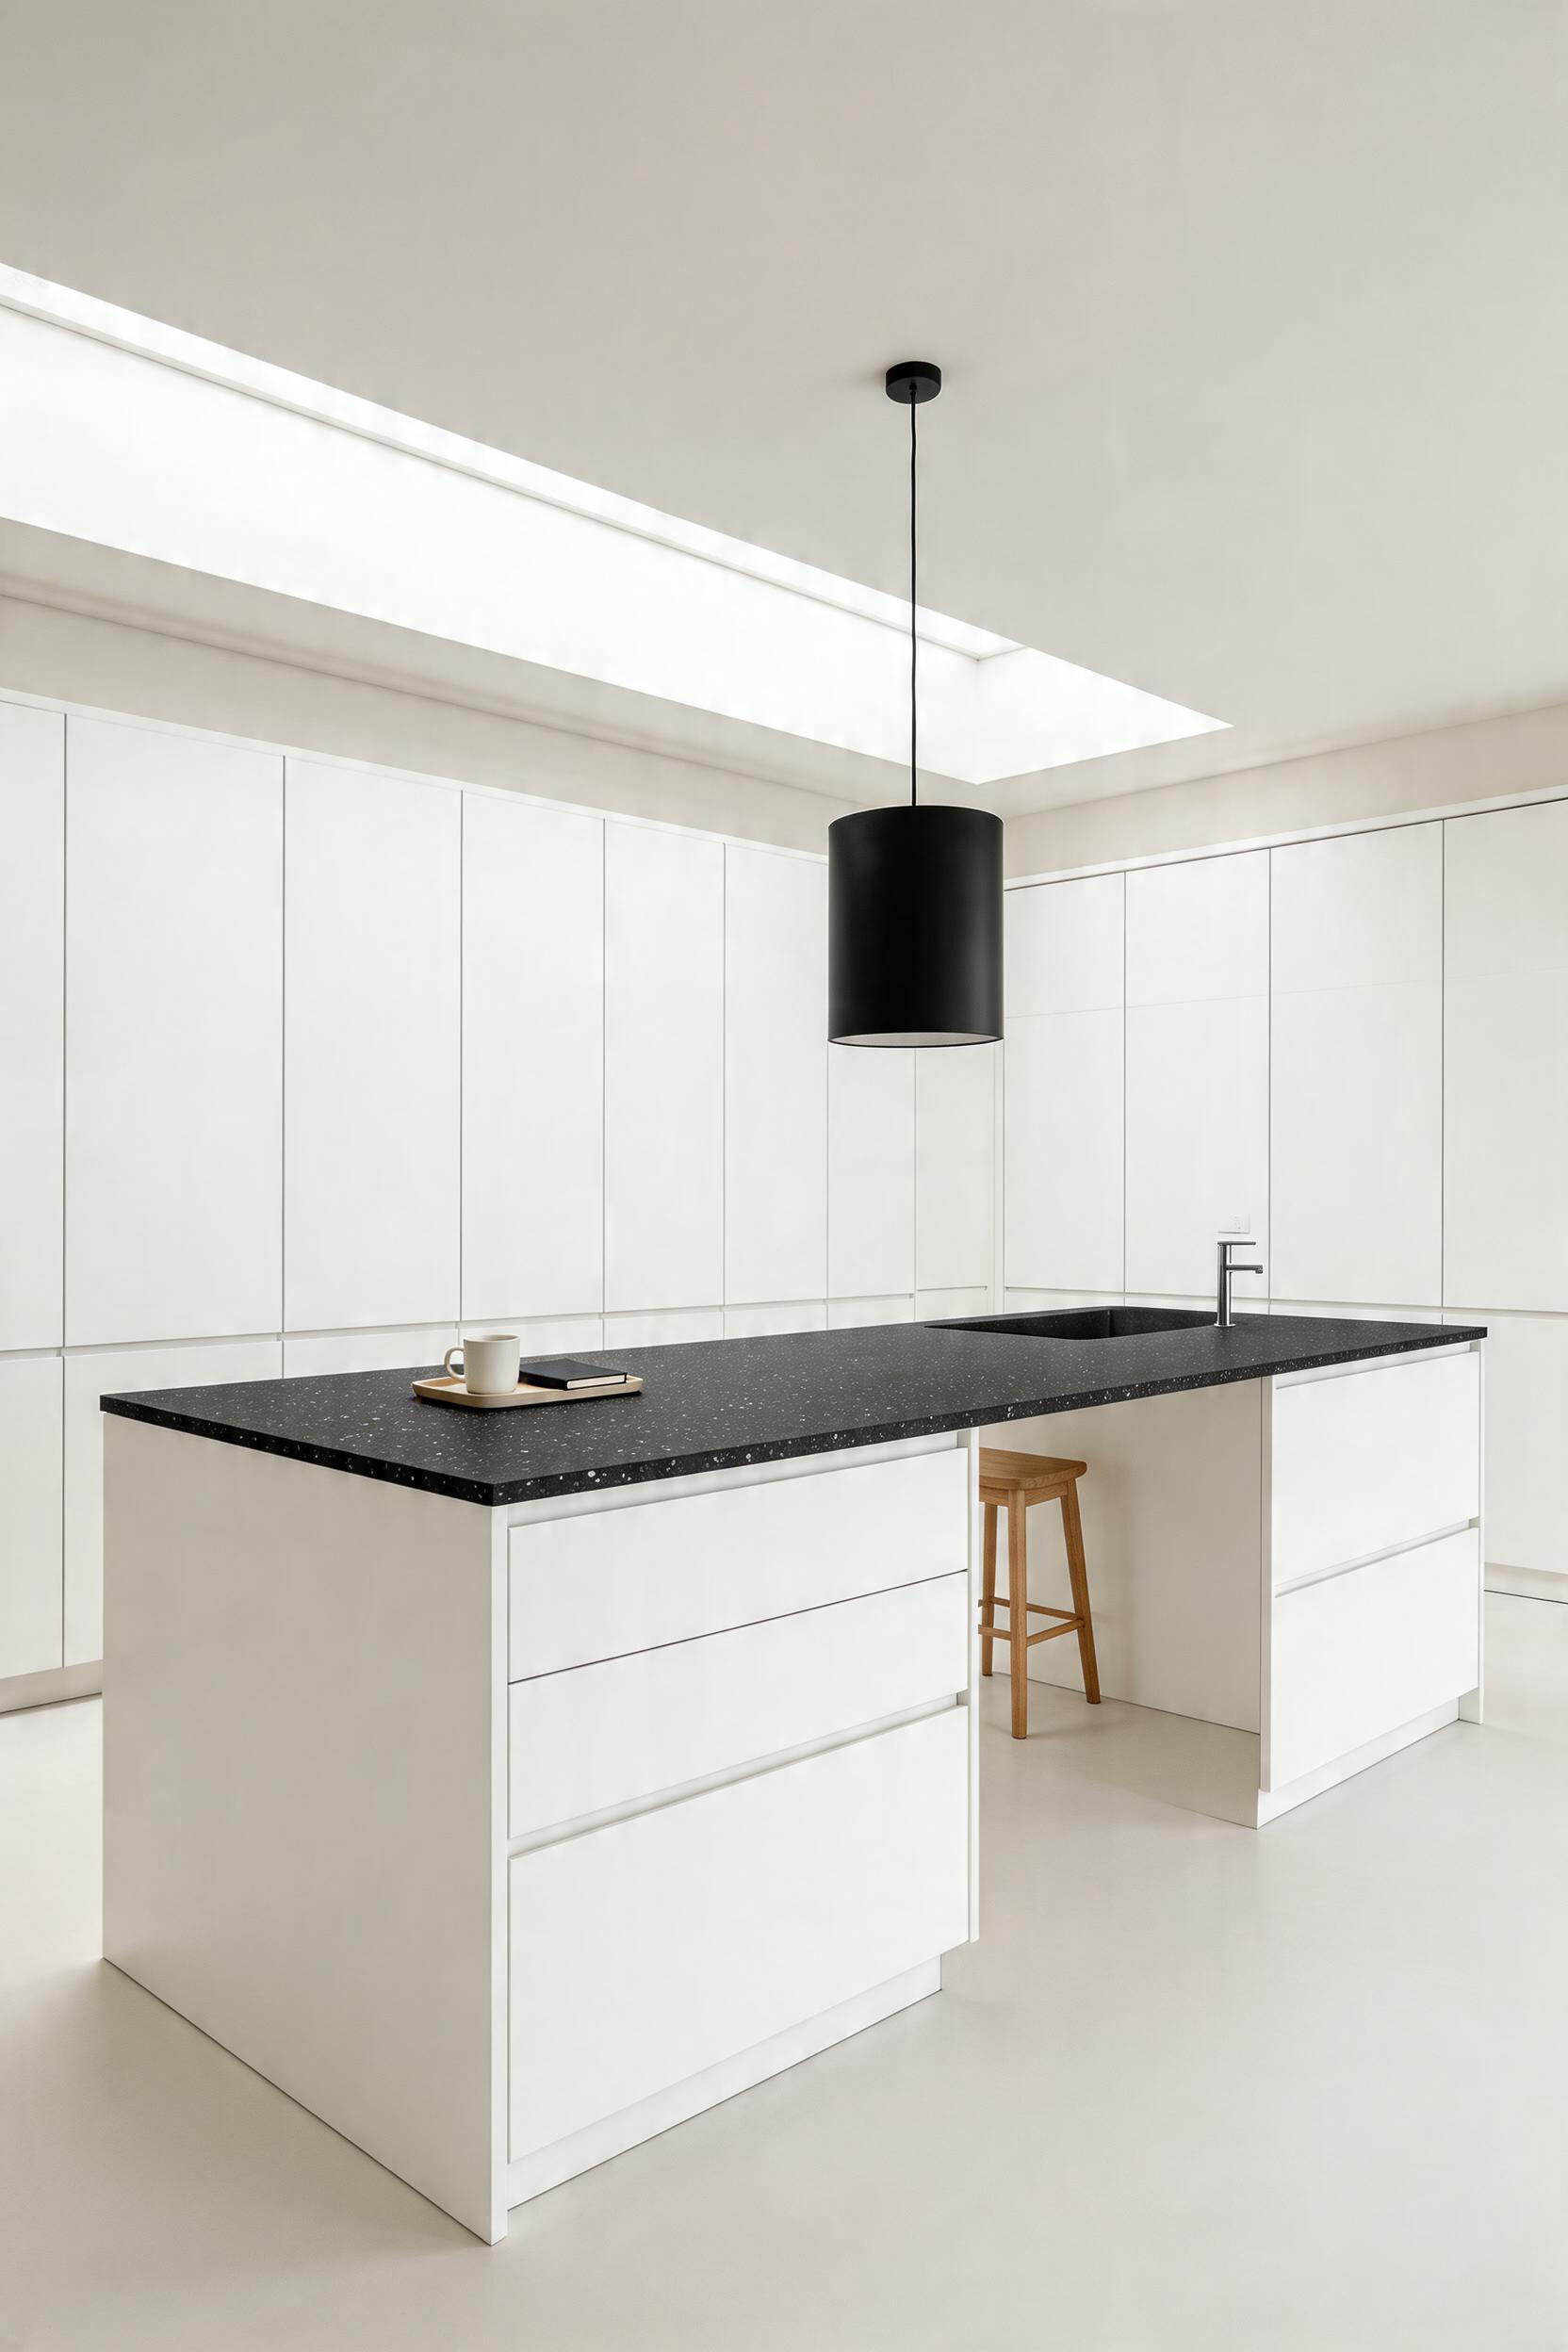
The material selection shapes how animated the surface feels. Cambria Blackpool Matte — a jet black with fine white and grey aggregate movement — prevents the countertop reading as a flat, inert plane; the particle variation catches light differently at different angles and makes the surface feel like a material rather than a colour applied to a substrate. Silestone’s Stellar Night takes a different approach, with subtle specular inclusions that reflect light with a controlled sparkle. For a warmer interpretation, Caesarstone Piatra Grey is technically dark grey rather than pure black — its grey undertone pairs better with creamy or warm white cabinet finishes than with optical white. Browsing kitchen island ideas that use contrast at scale shows how the approach plays out across different kitchen sizes and lighting conditions.
Finish Makes the Difference
Finish is the technical decision that determines how liveable the specification is. Polished black quartz shows every fingerprint, water spot, and smear — the reflective surface amplifies every mark. Matte black quartz is significantly more forgiving; the surface diffuses light and fingerprints blend into the texture rather than standing out. Leathered finish — created by diamond brushing the polished surface — is the most effective option for an island used as a breakfast bar or homework station, where hand contact is constant. It also has a tactile quality that distinguishes it from every other surface in the kitchen.
12. Narrow Modern Kitchen Island Idea for Tight Galley Spaces
The most common planning error in kitchen design is adding an island to a kitchen that cannot comfortably accommodate one. The result is a kitchen that is harder to use than it was before the island arrived — congested aisles, appliance door conflicts, and the constant negotiation of two people trying to pass each other. The NKBA guidelines exist precisely to prevent this.
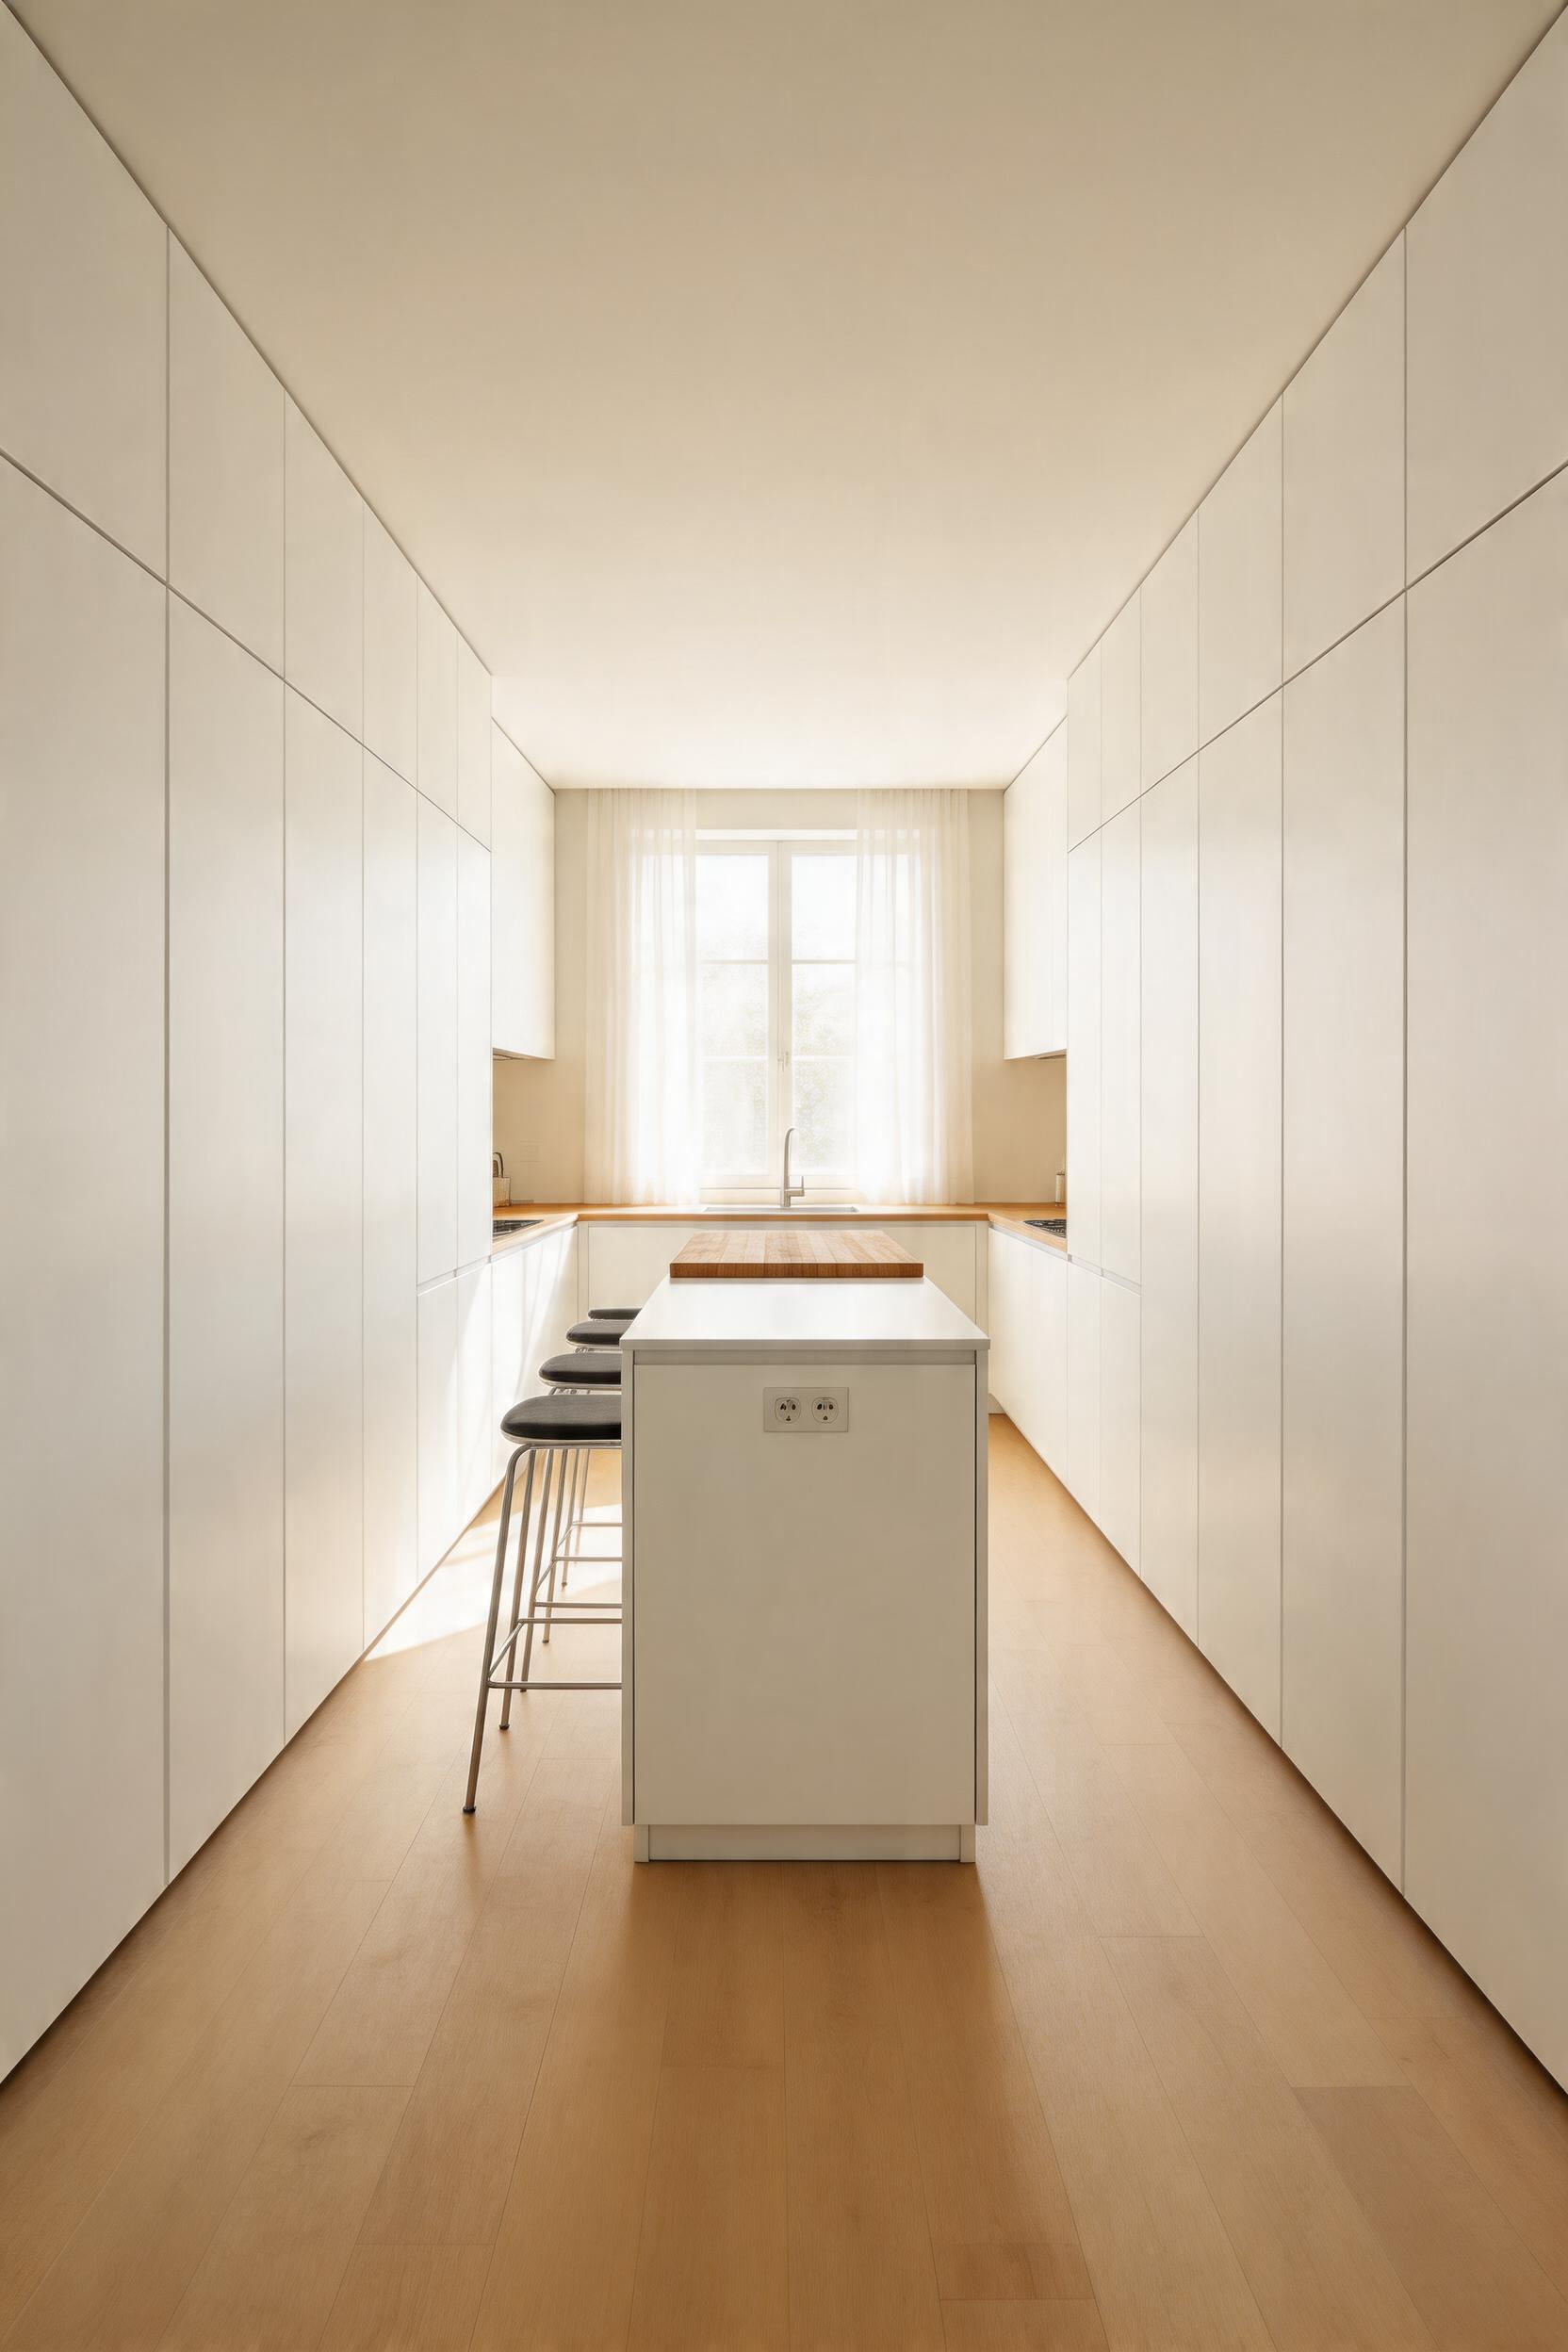
Minimum clearance on each side of the island is 42 inches for a one-cook kitchen, 48 inches for households where two people regularly cook simultaneously. The 36-inch clearance that technically satisfies some interpretations of the guidelines is a passage width, not a working width — bending to reach a low oven or dishwasher in a 36-inch aisle is genuinely uncomfortable once you’ve tried it. Measure both aisles before specifying any island; a kitchen needs at least 12 feet of width to accommodate a standard 24-inch deep island with 42-inch clearances on both sides.
What a Narrow Island Can Still Do
Within those constraints, a narrow island — 18 to 24 inches deep — can still add meaningful value. An 18-inch deep island holds two parallel rows of 7–9-inch deep drawers: sufficient for utensils, a spice collection, or kitchen linens. At 24 inches, the island matches standard base cabinet depth and can hold full-depth drawers and shelves — a 24 × 48-inch island adds 8 square feet of additional counter surface, which is a significant gain in a galley kitchen. For narrow islands serving double duty as seating, bar-height format (42 inches) allows a 12-inch overhang to accommodate bar stools without consuming the countertop working surface. Integrated pop-up or flush countertop outlets from Leviton, Legrand, and others eliminate the need for a backsplash power source and turn the island into a charging and appliance station as well as a prep surface.
13. Pendant Lighting Over Your Modern Kitchen Island
Pendant selection is the highest-impact, most reversible decision in a kitchen renovation. The fixtures hang at eye level, they’re immediately visible from every vantage point in the room, and they can be replaced without structural changes, permits, or significant cost. Getting the height, size, and spacing right is primarily a mathematical exercise — but the formula is more specific than most installation instructions acknowledge.
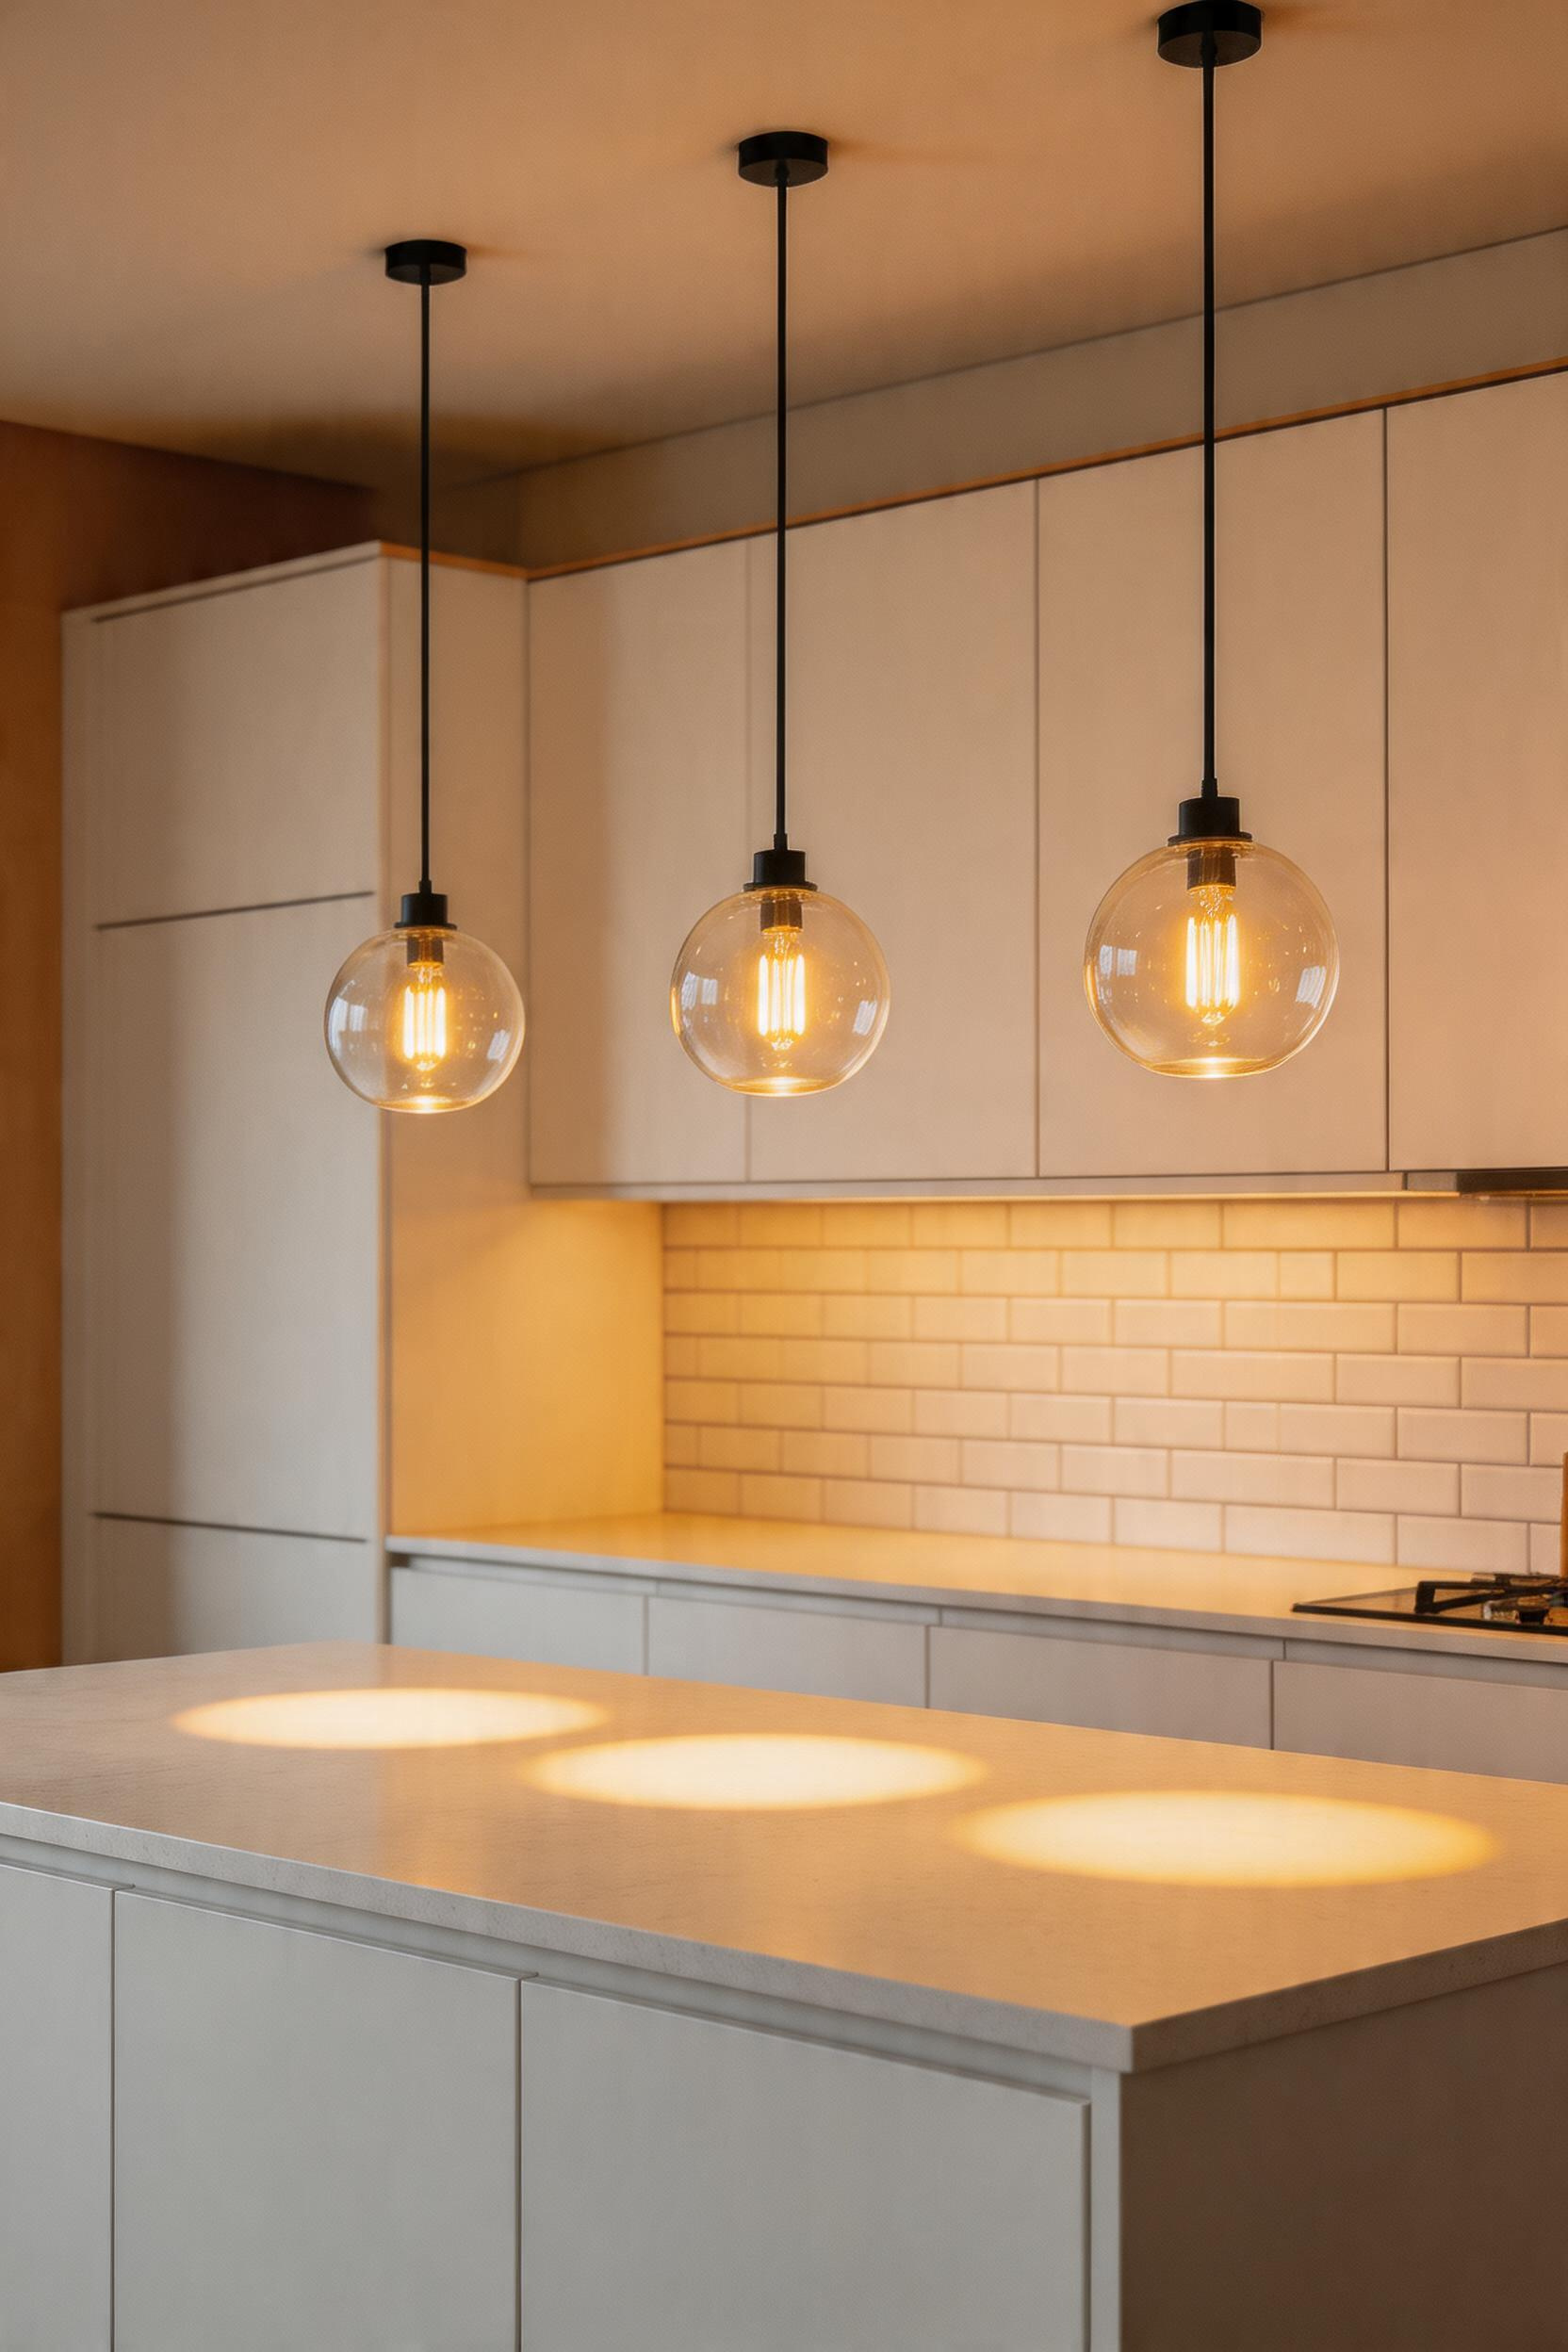
Hanging height specification: 30–36 inches from the bottom of the pendant to the countertop surface. For ceilings above 8 feet, add 3 inches per additional foot — a 10-foot ceiling calls for pendants hung 36–42 inches above the counter to maintain proportion. The 30-inch minimum is a practical safety threshold: a pendant bottom at 66 inches above the floor puts the fixture at a level where taller users will brush the shade during normal kitchen activity.
The modern pendant aesthetic defaults toward clean geometry: clear or smoked globe pendants with minimal hardware, cylinder forms in metal or concrete, and linear pendants that span the island’s length with multiple light points along a single bar. For long islands — 72 inches or more — a single linear pendant is visually cleaner than three individual pendants and easier to specify for the correct width. Understanding how modern kitchen lighting trends are approaching scale and finish helps calibrate what feels current versus what dates quickly.
Sizing and Spacing Formula
The relationship between fixture size and island width follows the one-third to one-half rule: a pendant 12–18 inches in diameter suits a 36-inch wide island. Spacing formula for multiple pendants: subtract 12 inches from the island’s total length (6 inches from each end), then divide the remainder by the number of fixtures. For a 72-inch island with two pendants, that’s 30 inches from each end, with 30-inch spacing between centres — a placement that looks deliberate rather than approximated. For islands under 60 inches, one or two pendants; 60–84 inches, two pendants; 84 inches and longer, three pendants.
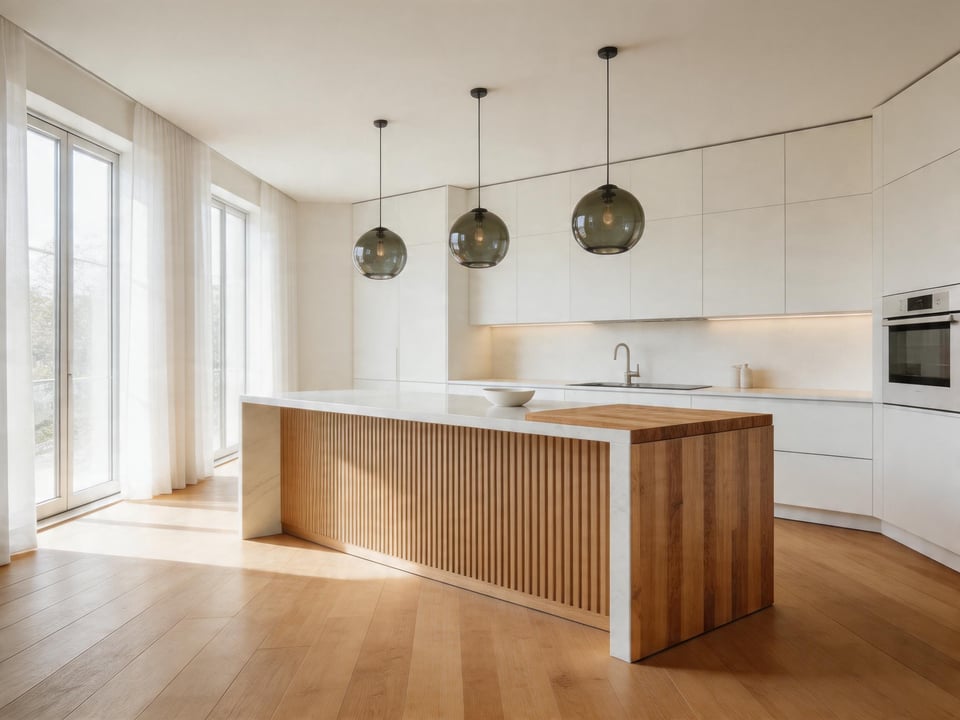
14. Mixed Material Island With Stone Top and Wood Accents
The most visually sophisticated modern kitchen islands are those where two materials are placed in deliberate dialogue rather than isolated from one another. A stone top with wood end panels or a floating base shelf creates a layered, furniture-like quality that a single-material island — however beautiful the stone — cannot achieve. The key is understanding how material temperatures interact and where the wood accent goes.
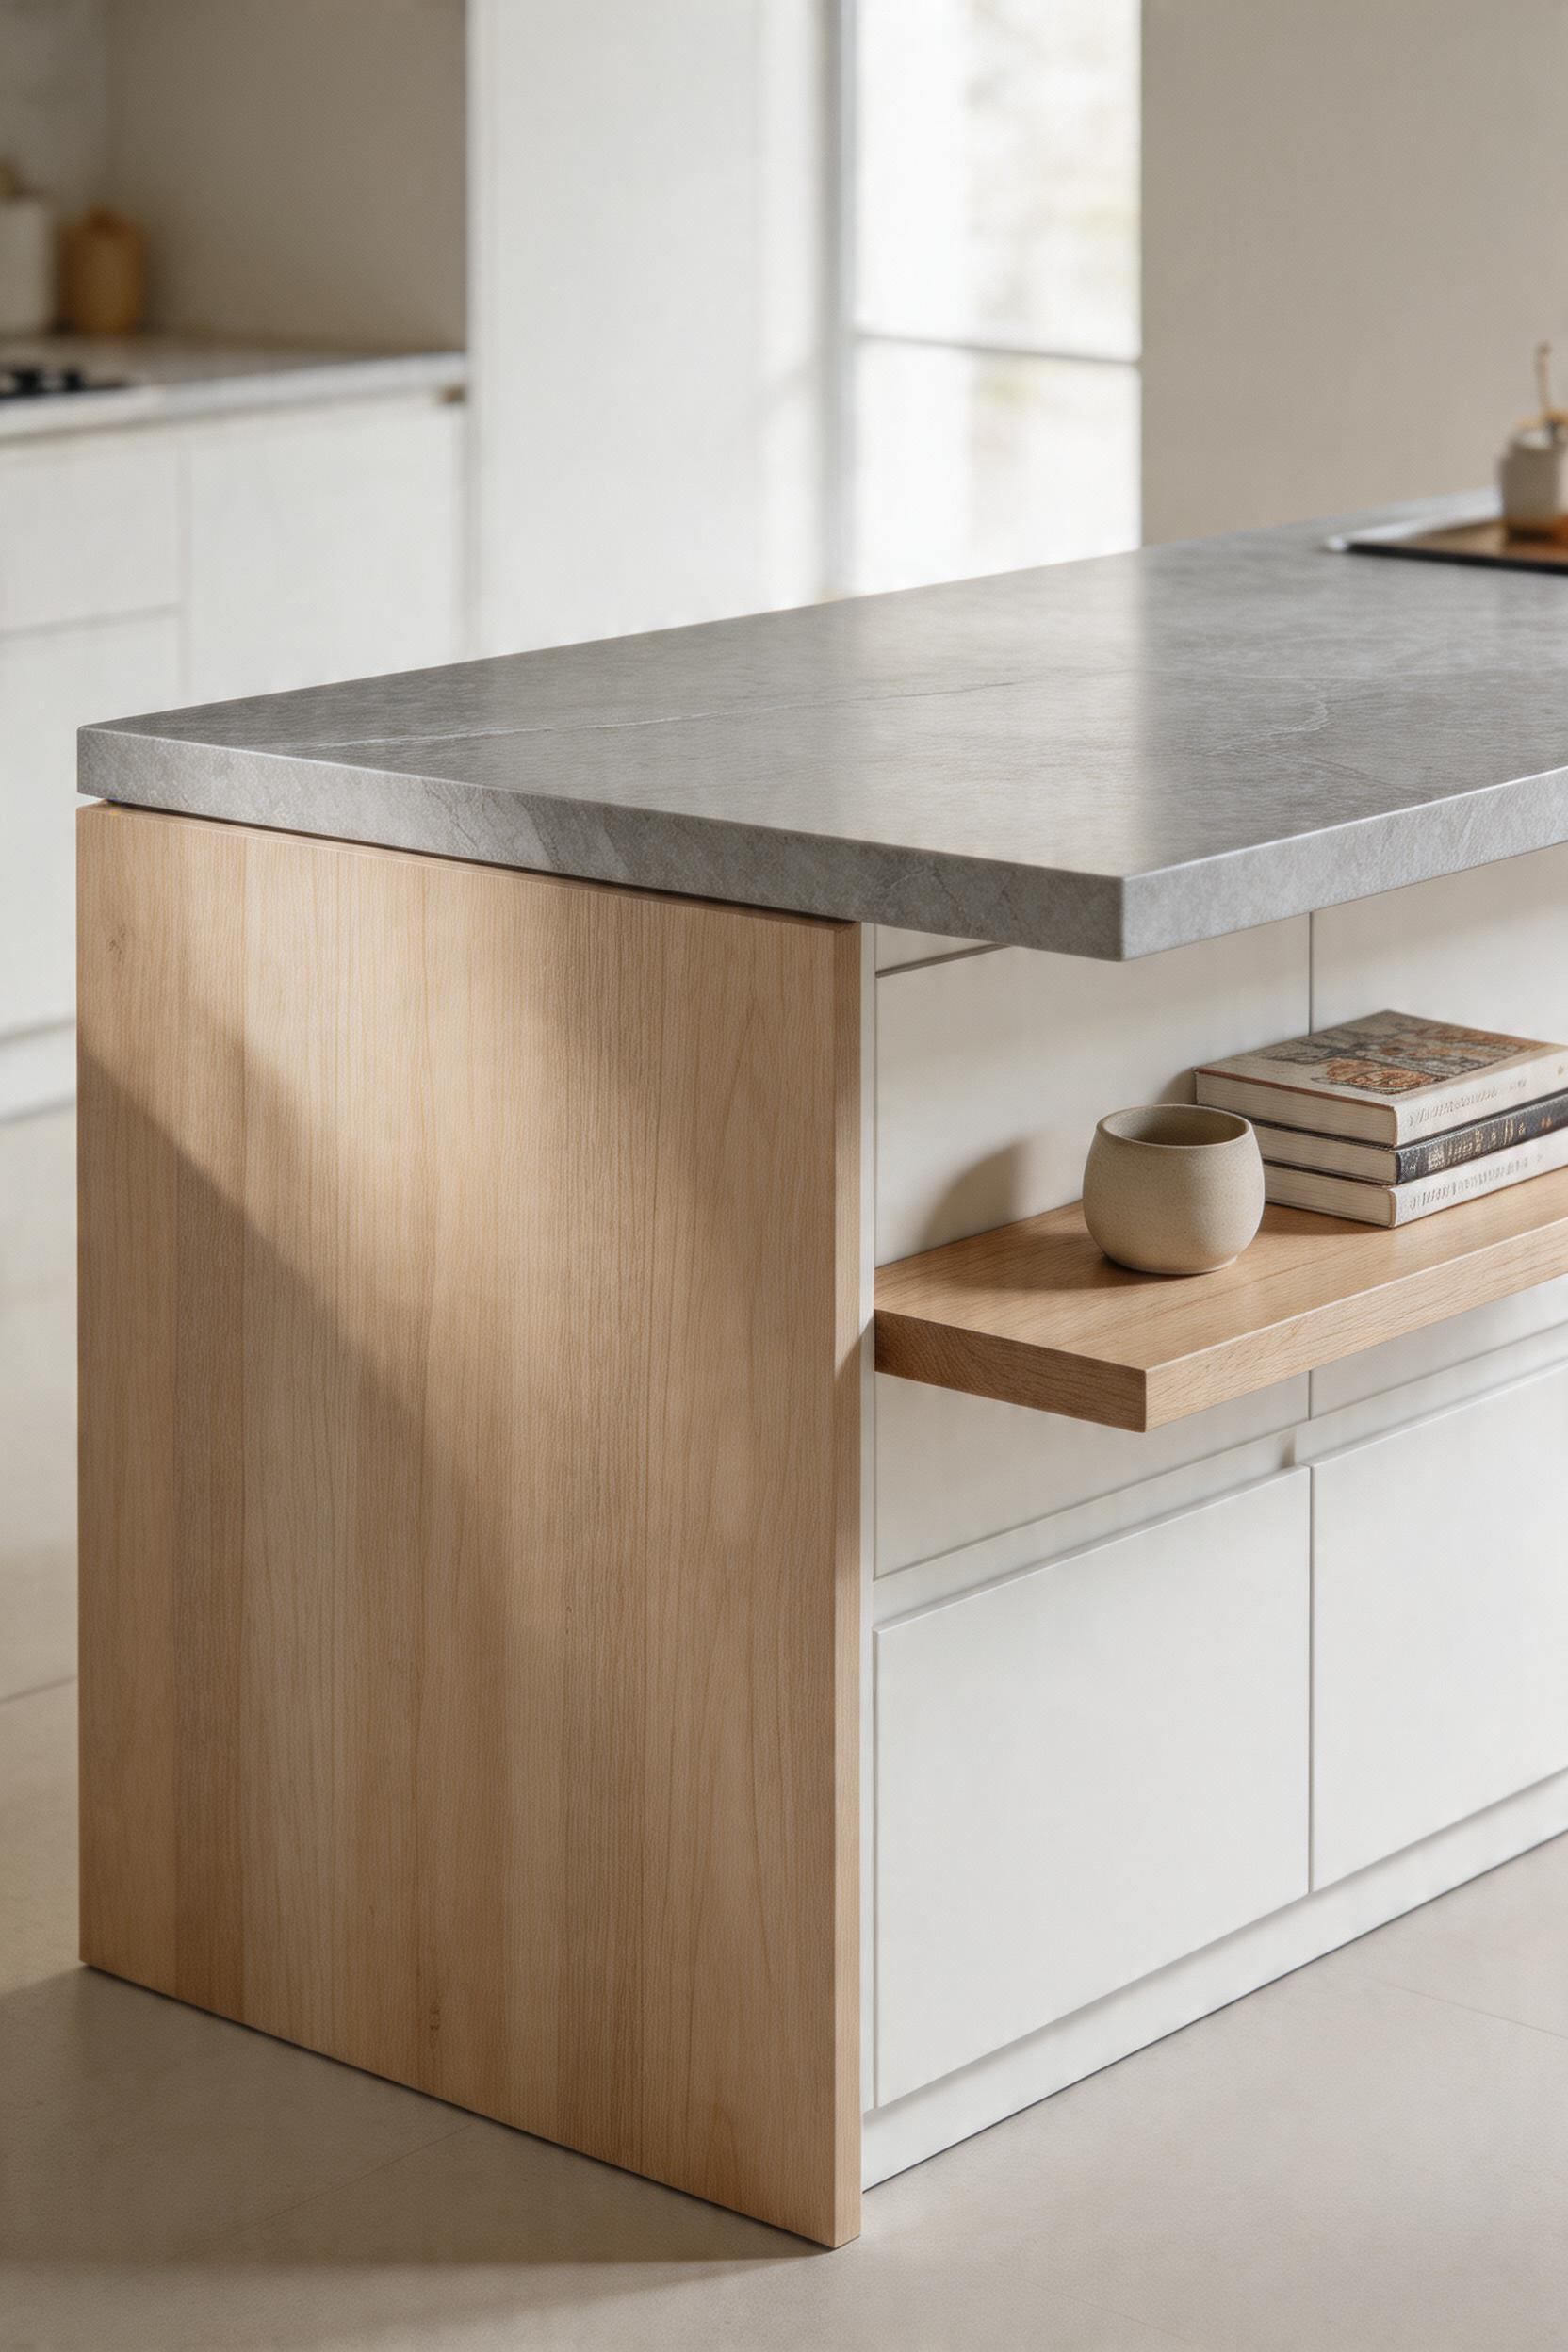
The end panel placement is the most impactful decision. Extending the wood panel to align precisely with the outer edge of the countertop — rather than stopping flush with the cabinet box — creates a detail that makes the island read as a designed object. The panel wraps the end of the stone, eliminating the visual gap beneath the overhang and giving the island a furniture-forward profile visible from across the room.
Material temperature is the principle that determines whether the combination works. Warm-toned stone — beige quartzite, gold-veined marble, warm grey quartz — pairs with warm wood species: walnut, teak, natural or lightly finished oak. Cool-toned stone — white Calacatta marble, cool grey engineered quartz, blue-grey slate — pairs with cooler wood tones: ash, maple, or white-washed oak. Mixing warm stone with cool wood produces a visual tension that reads as a mismatch rather than a contrast; the materials look like they were selected independently rather than together.
Installing Wood Accents
For existing islands, a wood end panel is straightforward to retrofit: 3/4-inch hardwood plywood or solid wood, finished with a hard wax oil or 2K polyurethane topcoat for kitchen durability, and secured from inside the cabinet box. A floating wood shelf beneath the cantilevered overhang adds the third layer — the composition shifts from two materials to three, which is more complex but also more resolved. Finish is critical: a hard wax oil or 2K polyurethane topcoat protects against the oils, moisture, and heat that kitchen wood accents will inevitably experience. Unfinished wood below the countertop overhang sits in the splatter zone and will absorb grease and stain quickly.
15. Fluted or Reeded Panel Detail for a Modern Kitchen Island Face
Fluted panels — vertical parallel grooves cut into or applied to a cabinet surface — have become the single most recognisable texture in contemporary kitchen design. They earn that position because they do something very few other surface treatments can: they create shadow lines that change throughout the day. The island reads differently in flat morning light than it does under evening lamplight. That dynamic quality — a surface that behaves differently at different hours — is something no flat-front door achieves.
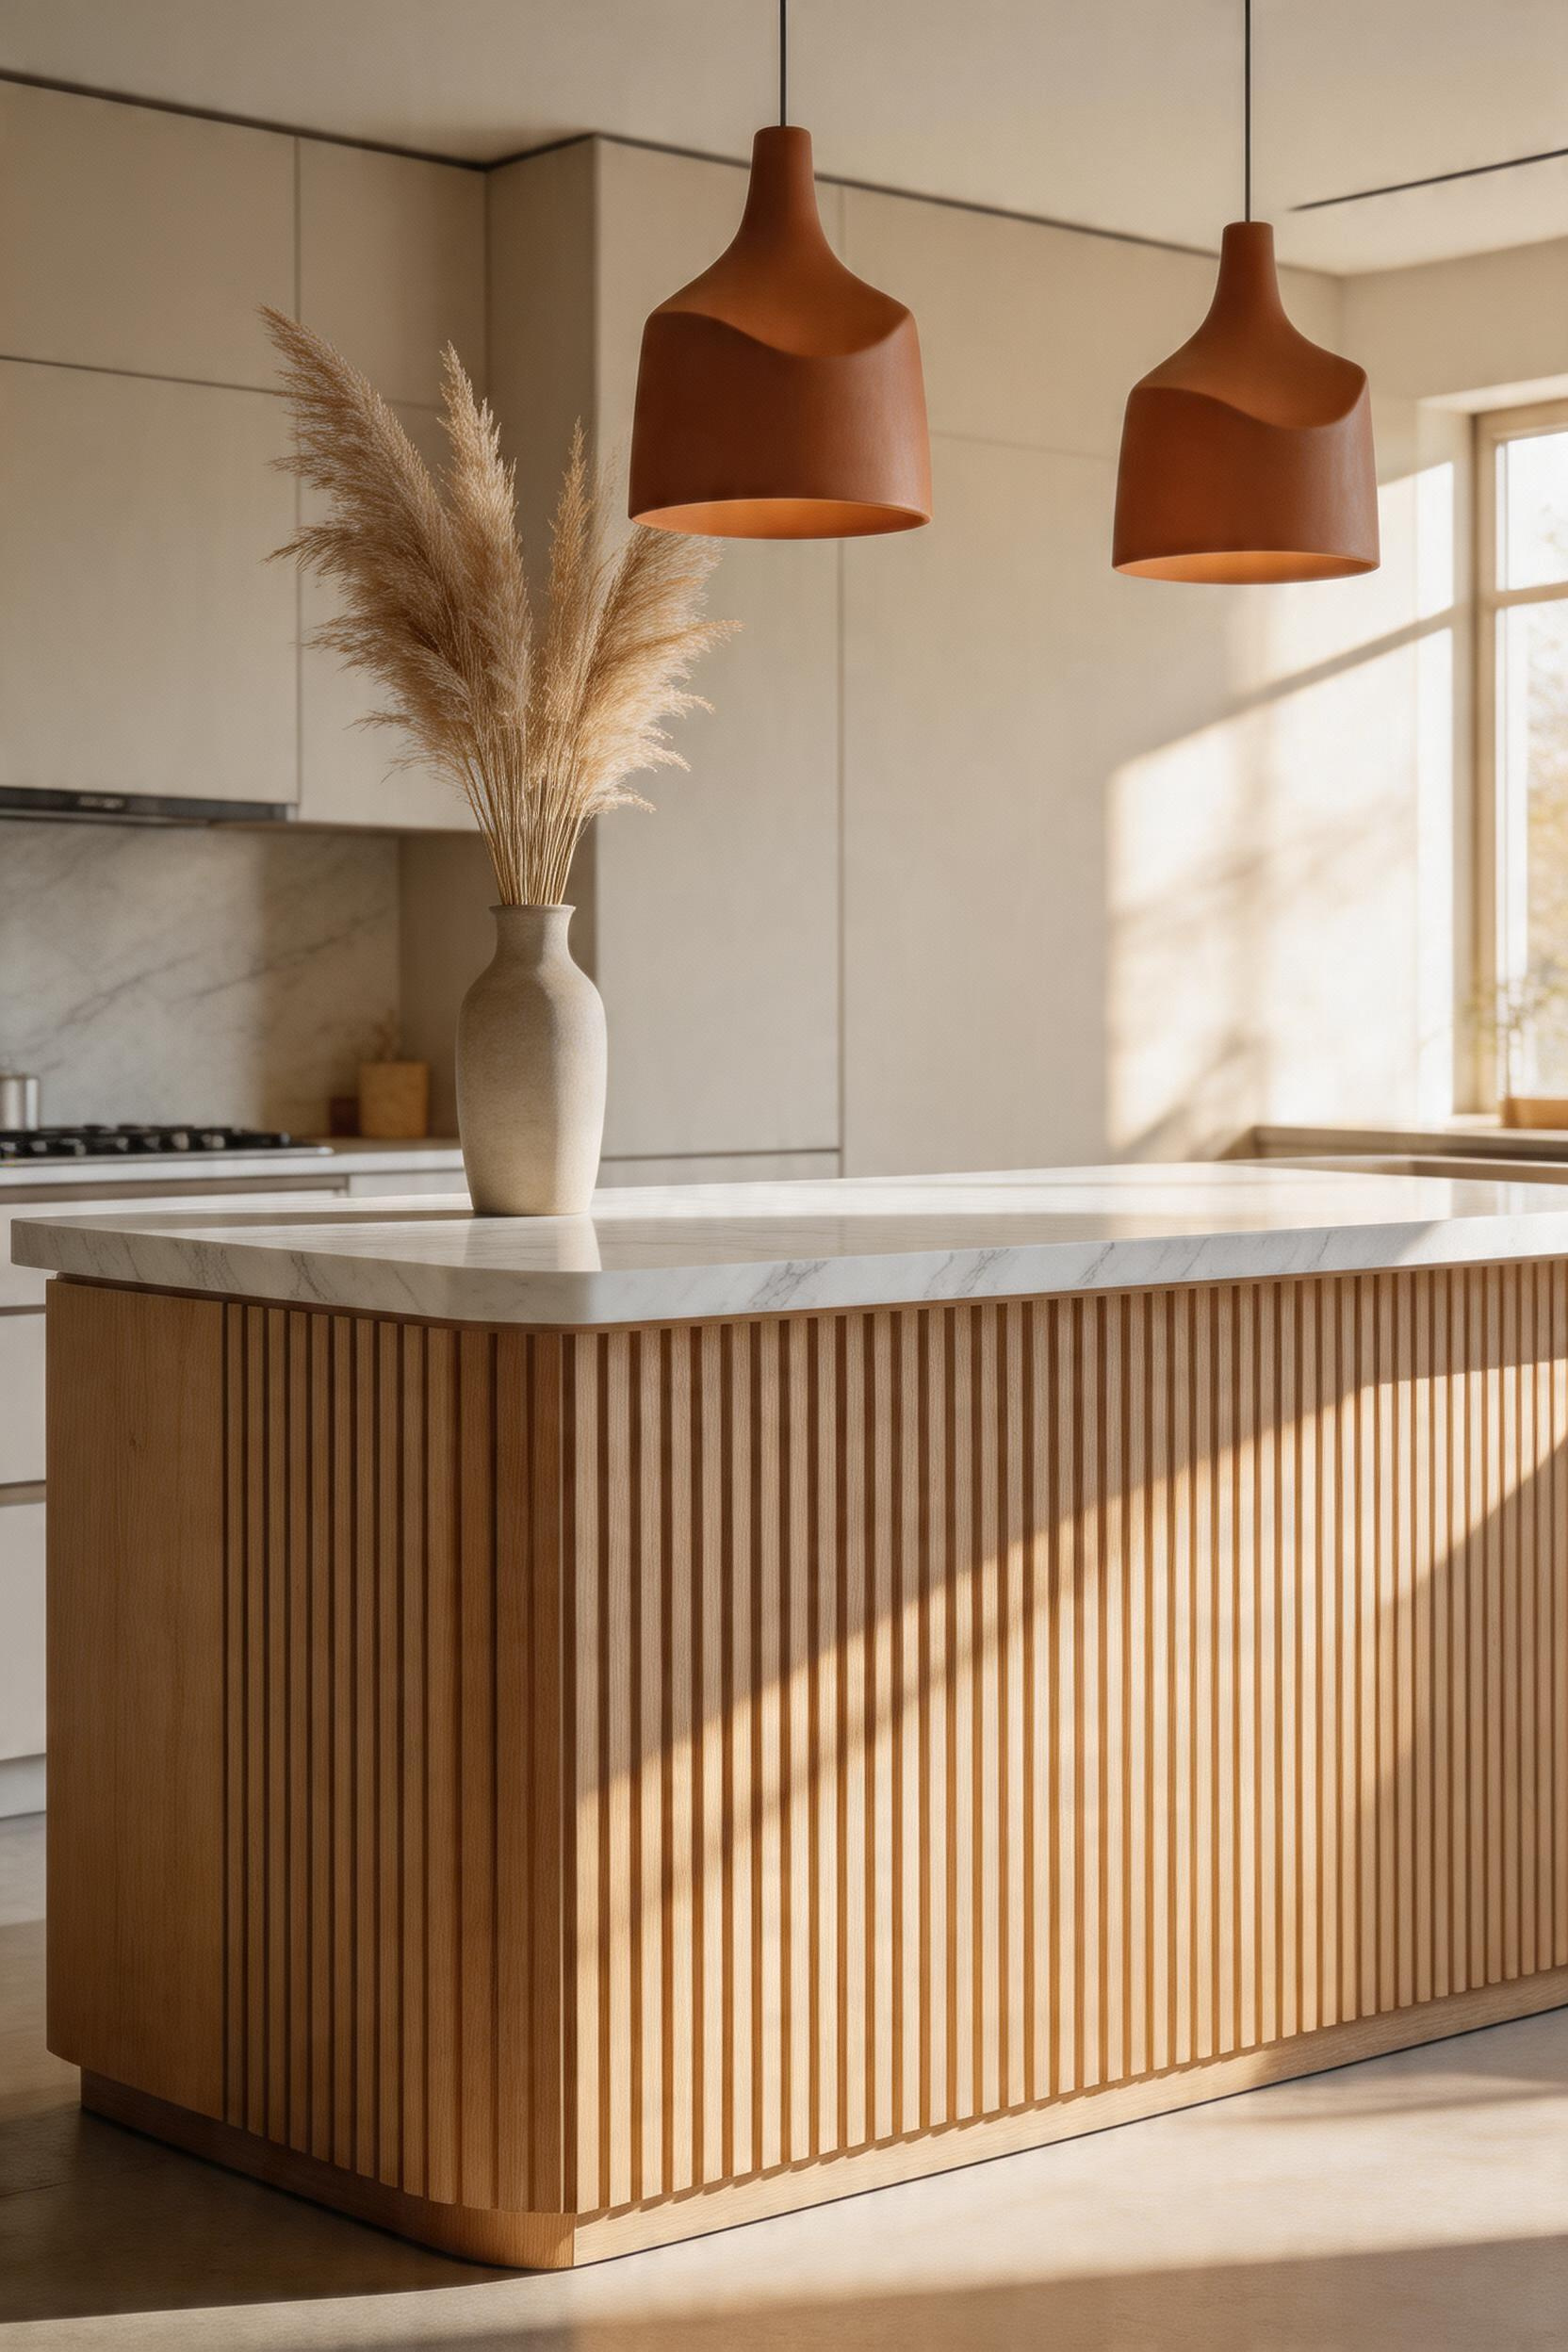
The trend has Art Deco roots, which is why it reads as historically informed without feeling nostalgic. Applied to a modern kitchen island, the association is more Bauhaus craft object than 1920s hotel lobby. The effect has moved from high-end custom kitchens into mainstream cabinetry offerings; fluted fronts sit 15–40% above the cost of comparable flat doors depending on material, finish, and groove depth.
Material choice determines the character of the fluting. Routed solid wood or wood veneer creates clean, precise lines with natural grain variation in the grooves — the most refined option and the most expensive. MDF with routed fluting is the cost-effective alternative: stable, paintable, and available from cabinetmakers at standard pricing. Ready-made 3D MDF fluted panels are available for DIY island wraps from specialist suppliers. The groove depth matters: shallow fluting (6–10mm) is subtle and suits smaller kitchens where the texture adds interest without dominance; deeper fluting (15–25mm) creates pronounced shadow lines and reads as a sculptural surface.
Where to Place the Fluting
The island end panel is the most impactful, lowest-commitment application — the end face is the most visible surface from the room’s main vantage point, and fluting here creates the statement without committing to fluted fronts across every drawer and door. A full-face wrap — all drawer and door fronts in fluted material — is the maximalist approach that reads as a sculptural object from all angles. An apron-front treatment — fluted panels applied to the lower portion of the island below the seating overhang — is a hybrid approach that adds texture where it’s most seen without affecting the drawer and door function above it. One caution: don’t mix fluted panels with Shaker cabinet doors in the same kitchen. The routed-groove geometry of fluting conflicts with the stepped-profile geometry of Shaker framing; the combination reads as stylistically uncertain.
Finding the Right Modern Kitchen Island Design for Your Space
The choices that define a modern kitchen island fall into two categories: those that deliver their return visually, and those that deliver it functionally. Waterfall edges, marble tops, fluted panels, and high-contrast colour combinations are material and aesthetic investments — they shape how the kitchen reads from across the room, and they reward the attention of anyone who spends time in the space. Integrated sinks, wine storage, open shelving, and narrow island formats are functional investments — they change how the kitchen actually works, and their return is felt every time someone cooks.
The most useful question to answer before committing to a modern kitchen island design is not which of these ideas looks best in photographs, but which combination addresses both priorities for your specific kitchen. Most islands do both — but the primary emphasis should be established before the cabinetmaker quotes.
Three questions worth settling first: How much clearance do you actually have on each side — not estimated, but measured? Does this island include plumbing? And what is its primary use — prep, seating, storage, or display? The answer to each one shapes every material and form decision that follows.
Invest the budget in the surface first. The countertop and base finish are the most visible elements and the hardest to change later. Hardware, lighting, and accessories can be updated incrementally as your sense of the kitchen develops. Allow 10–15% contingency — plumbing changes, electrical upgrades for island outlets, and countertop fabrication consistently run over initial estimates. A modern kitchen island done well changes the way a house feels. That’s worth getting right.