Most kitchen renovations spend 80% of the budget on cabinets and countertops, then squeeze whatever’s left into lighting. It’s the wrong order of operations. A kitchen with mediocre surfaces and great lighting feels polished. A kitchen with gorgeous cabinetry under bad light looks flat, cold, and half-finished. I’ve spent nine years designing residential lighting systems, and the right kitchen lighting fixtures are consistently the most impactful upgrade a homeowner can make — and the most consistently underplanned one.
The good news is that you don’t need to redo everything. The right fixture in the right location — or the right combination of fixture types — changes how a kitchen reads entirely. Kitchen lighting fixtures fall into a handful of categories, and understanding what each one does best makes the selection process a lot more logical and a lot less overwhelming. Here are 16 types worth knowing, with the technical details that actually matter.
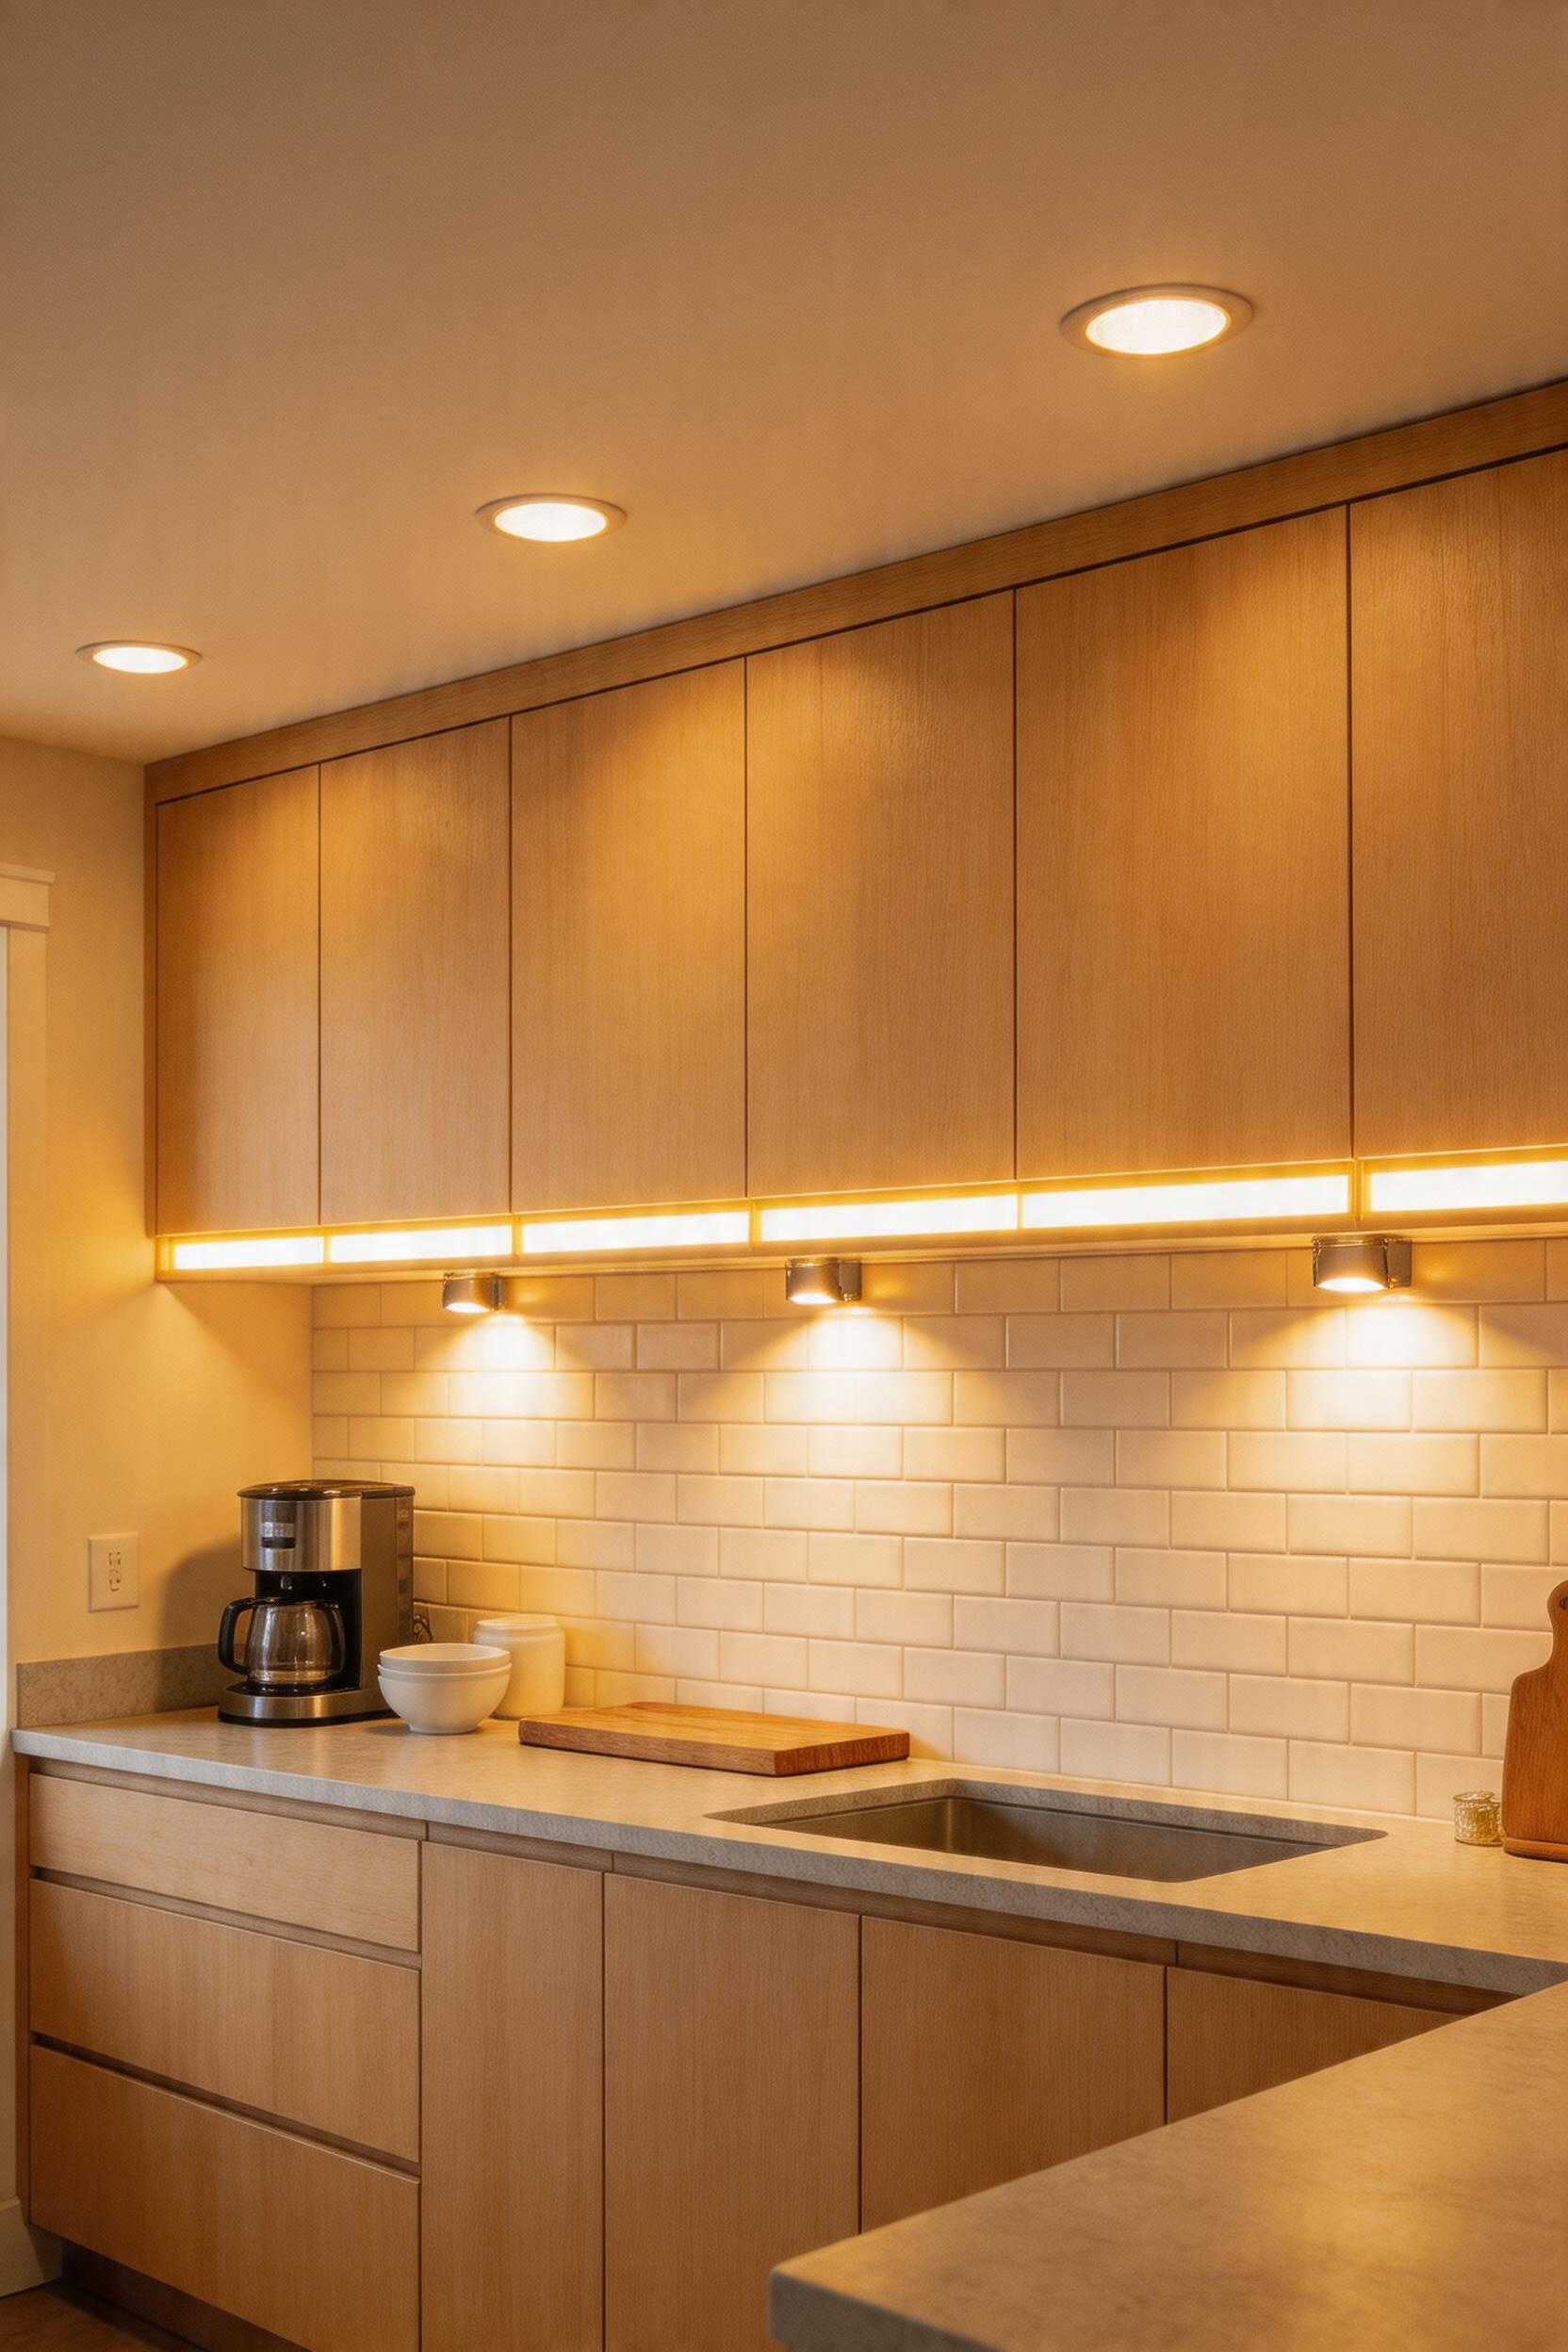
1. Under-Cabinet LED Strip Lights for Task-Focused Work Zones
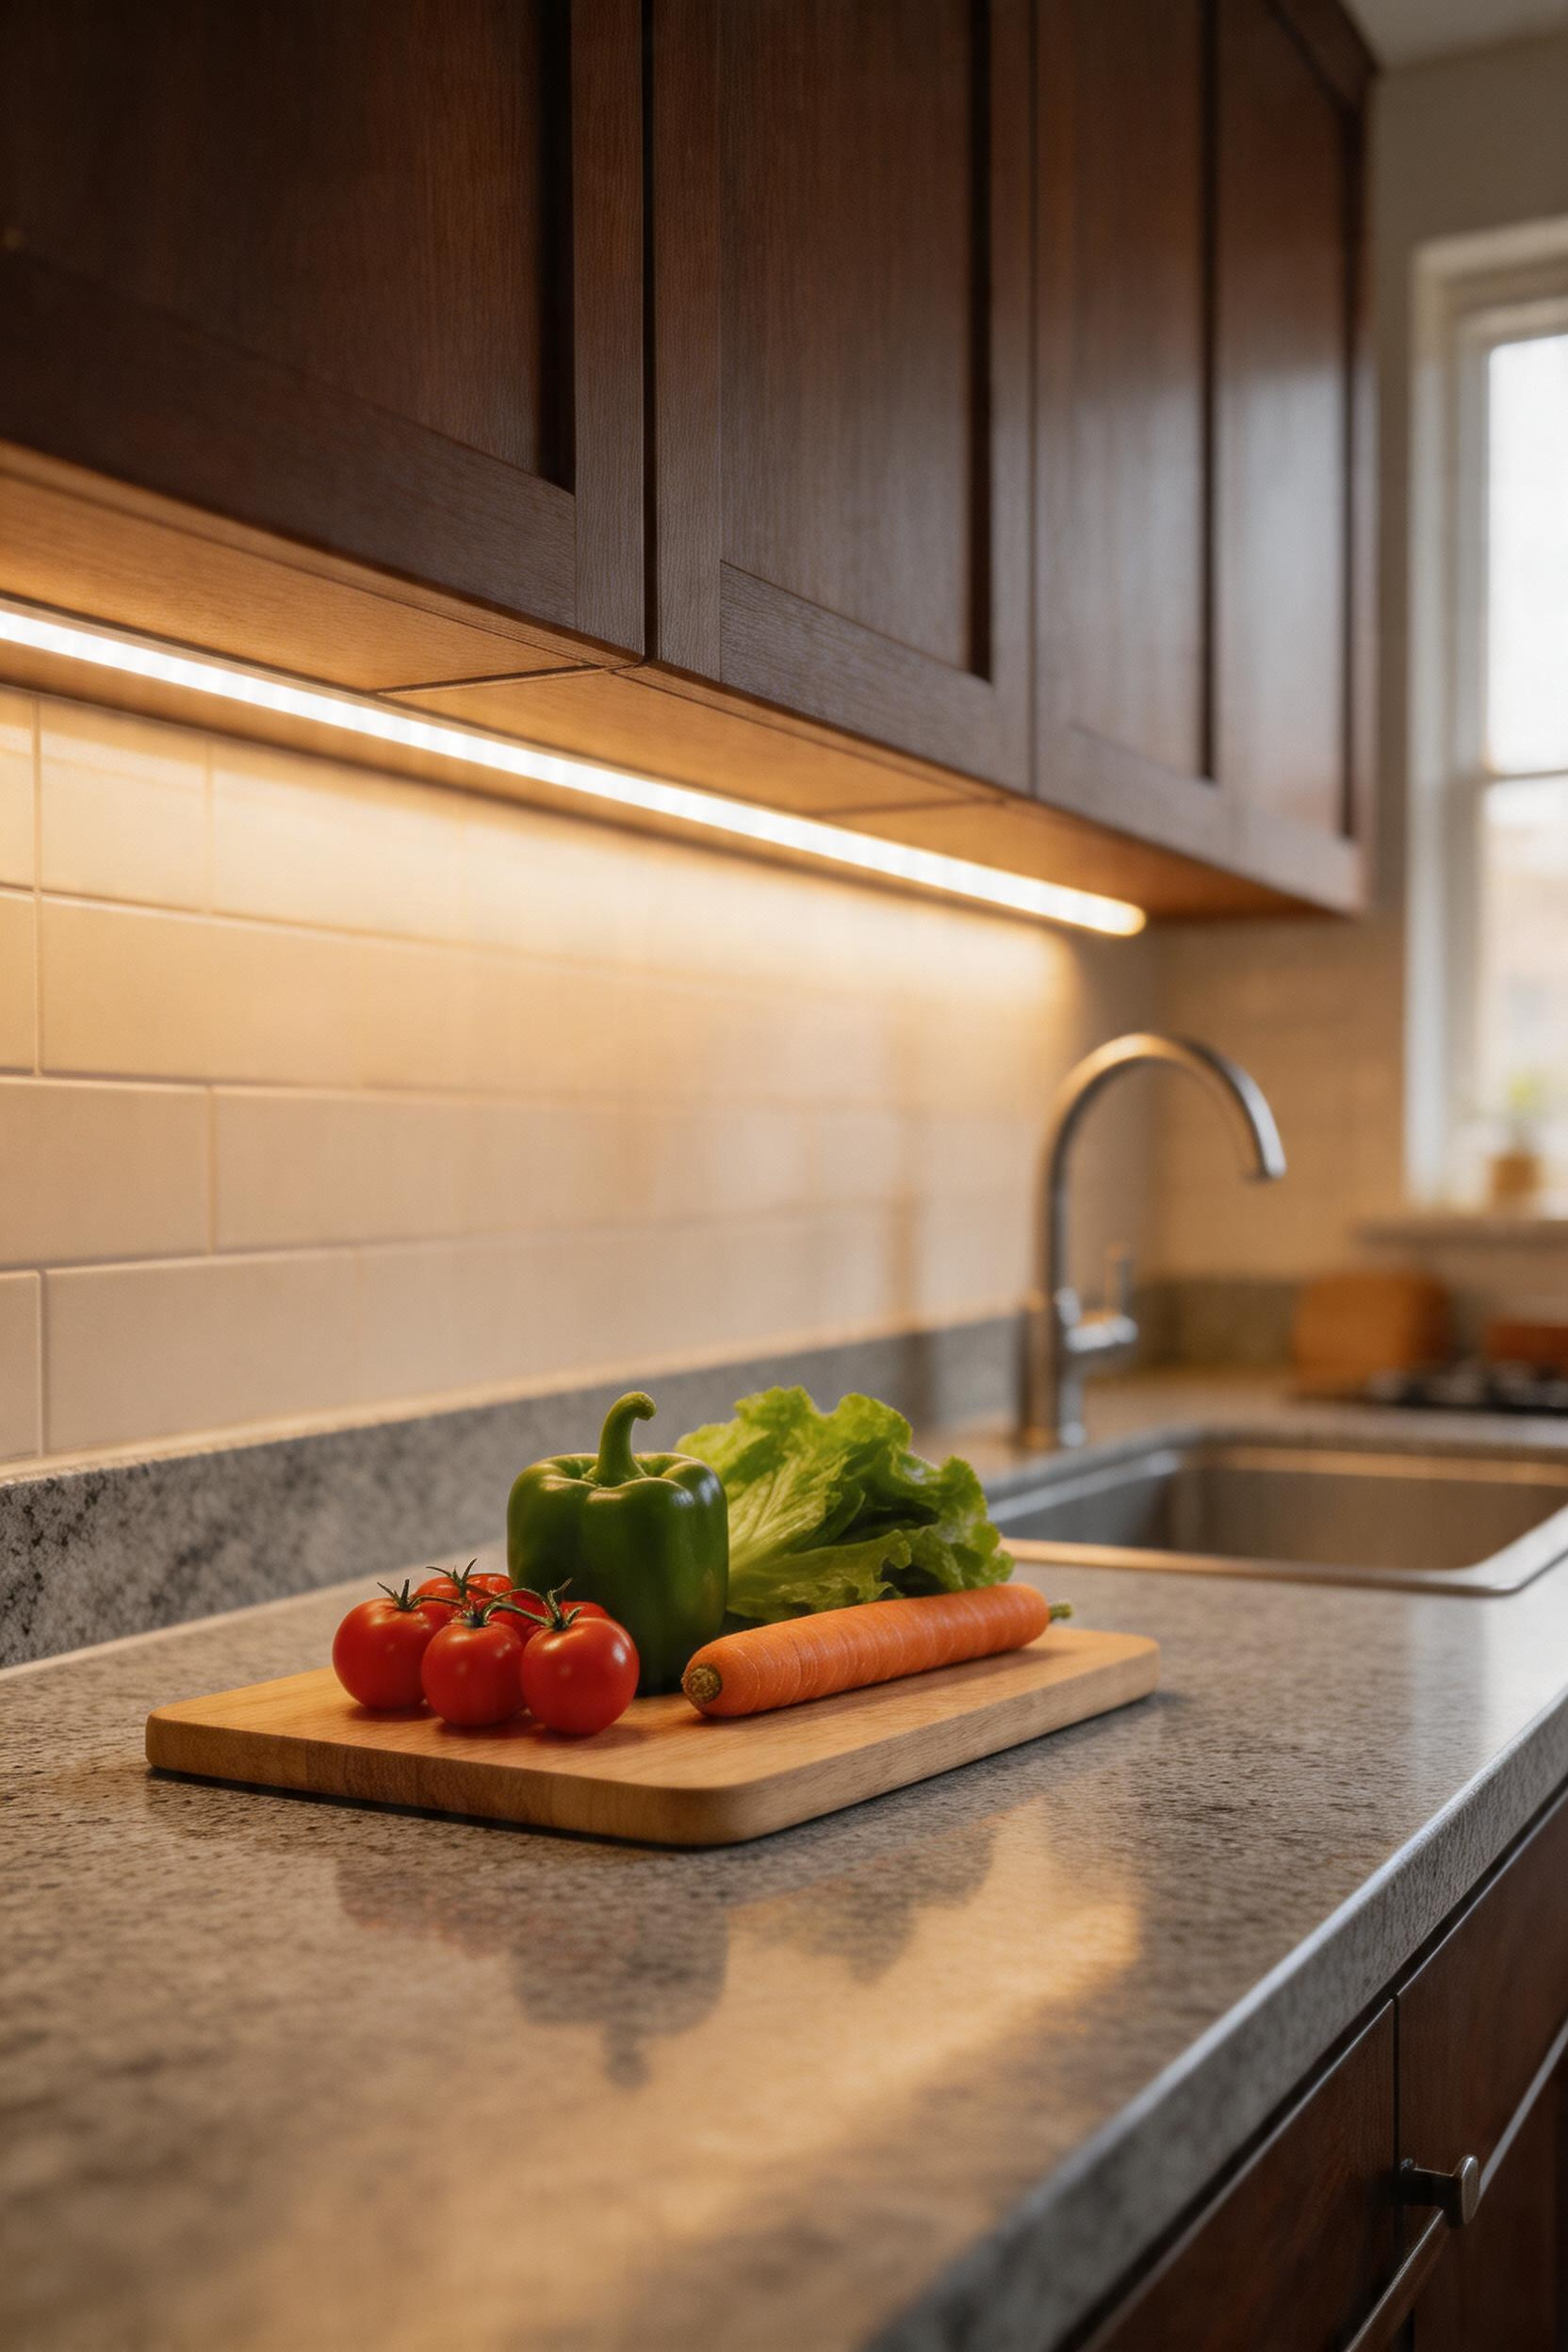
If you’ve ever chopped vegetables in the shadow of your own hands, you already understand why overhead lighting alone is inadequate. Ceiling fixtures illuminate the tops of your cabinets beautifully. Under-cabinet strips illuminate the counter — which is where the work actually happens. The difference in visibility is somewhere between 40% and 60%, and once you’ve worked with both, going back feels impossible.
Strip lights eliminate the shadow your body and upper cabinets cast on the cutting board — a basic functional requirement for serious cooks.
Plug-in systems cost $200–500, install in an afternoon, and suit rentals. Hardwired systems run $400–800+ but hide cords. Hardwire during renovations when walls are open.
Choosing Colour Temperature and CRI for Kitchen Work
On colour temperature: aim for 3000K–4000K for kitchen task work. The 2700K warm-white that feels cosy in a bedroom makes your counter look slightly yellow, which affects how you read meat doneness and vegetable freshness. CRI matters here too — look for CRI 90+ as a minimum, and CRI 95+ if food colour accuracy is important to you. The R9 value (how accurately the light renders reds) should be above 80 to handle meats and tomatoes correctly. Super Bright LEDs’ 24-inch selectable-temperature fixture delivers 825–900 lumens with a switch between 2700K, 3000K, and 4000K — a good entry point for those unsure which temperature suits their kitchen.
One mistake I see constantly: people run strips only under the cabinets directly above the main prep area and leave secondary counter runs dark. Light all your counter runs. The asymmetry of one bright counter and one dim one is jarring in practice.
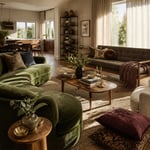
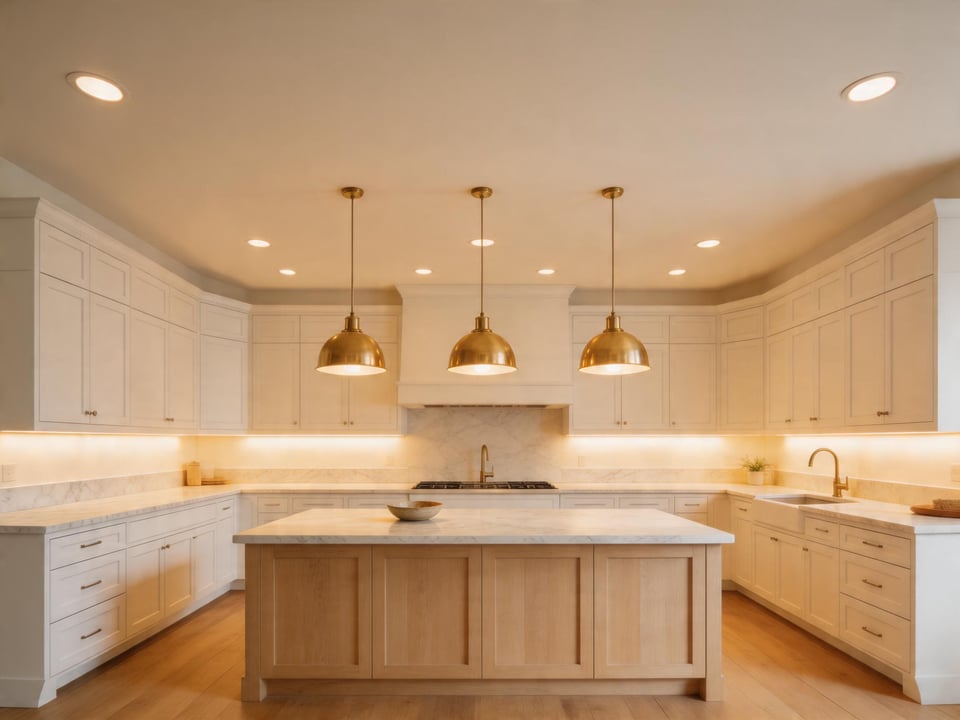
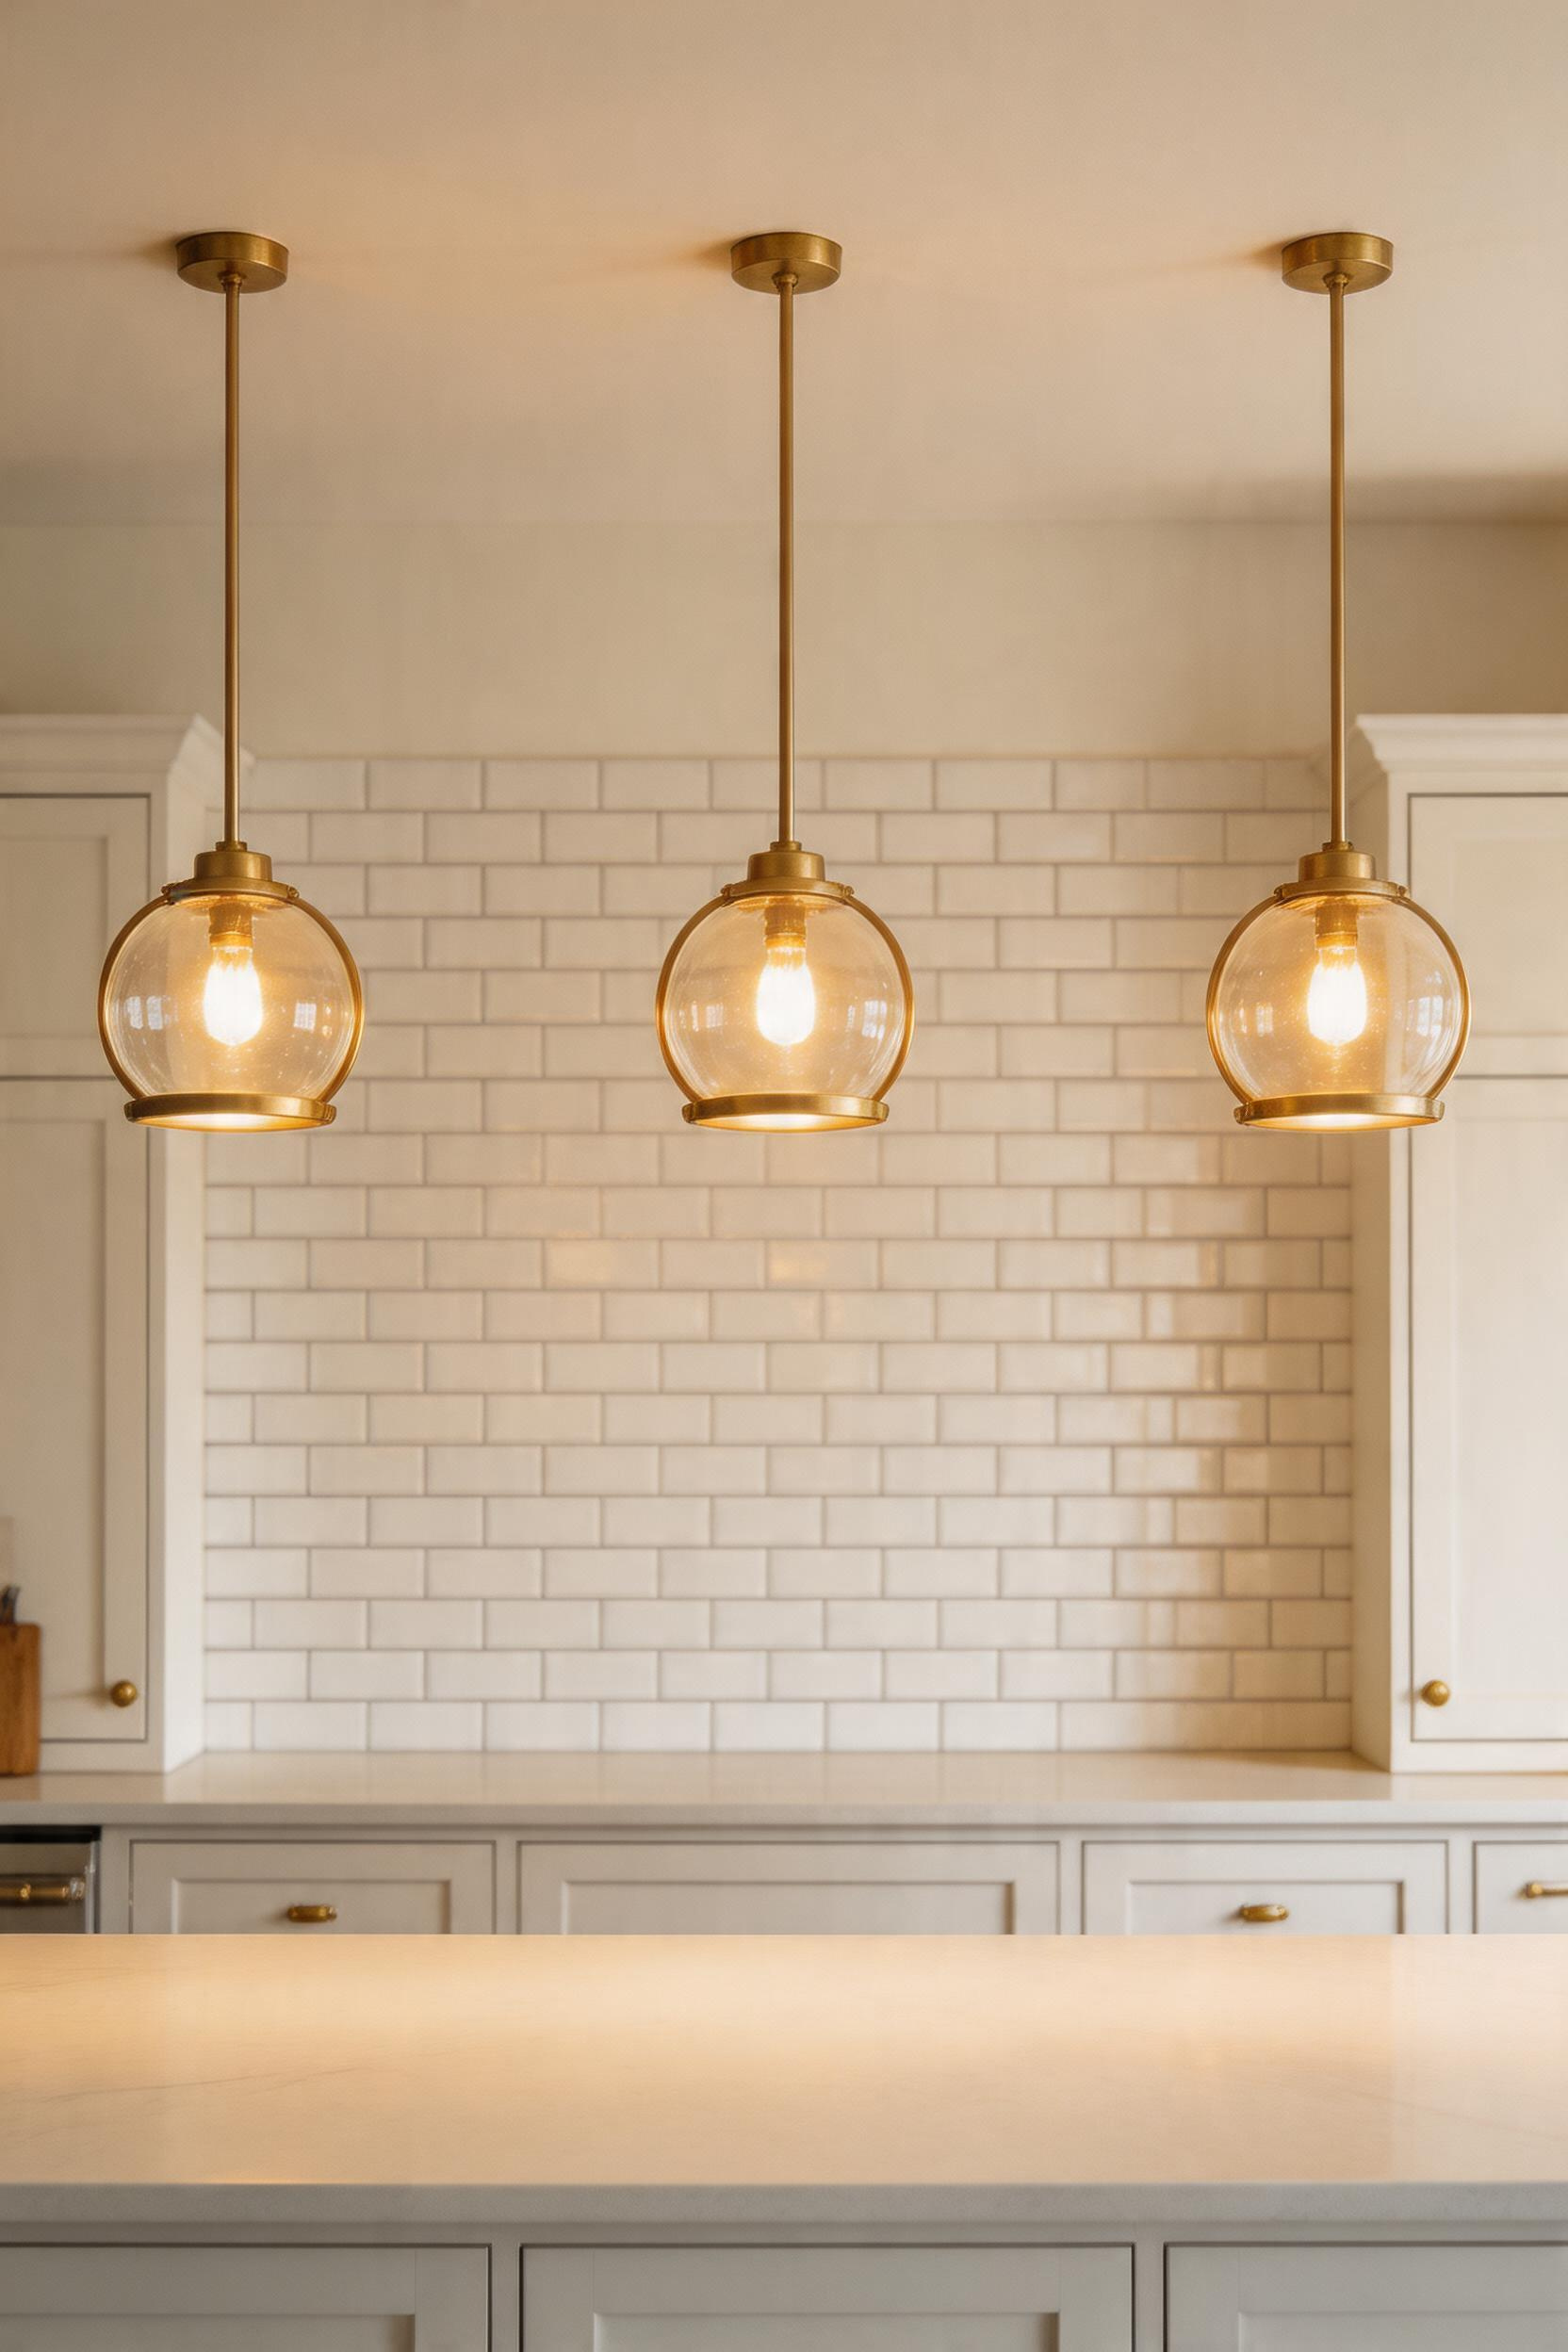
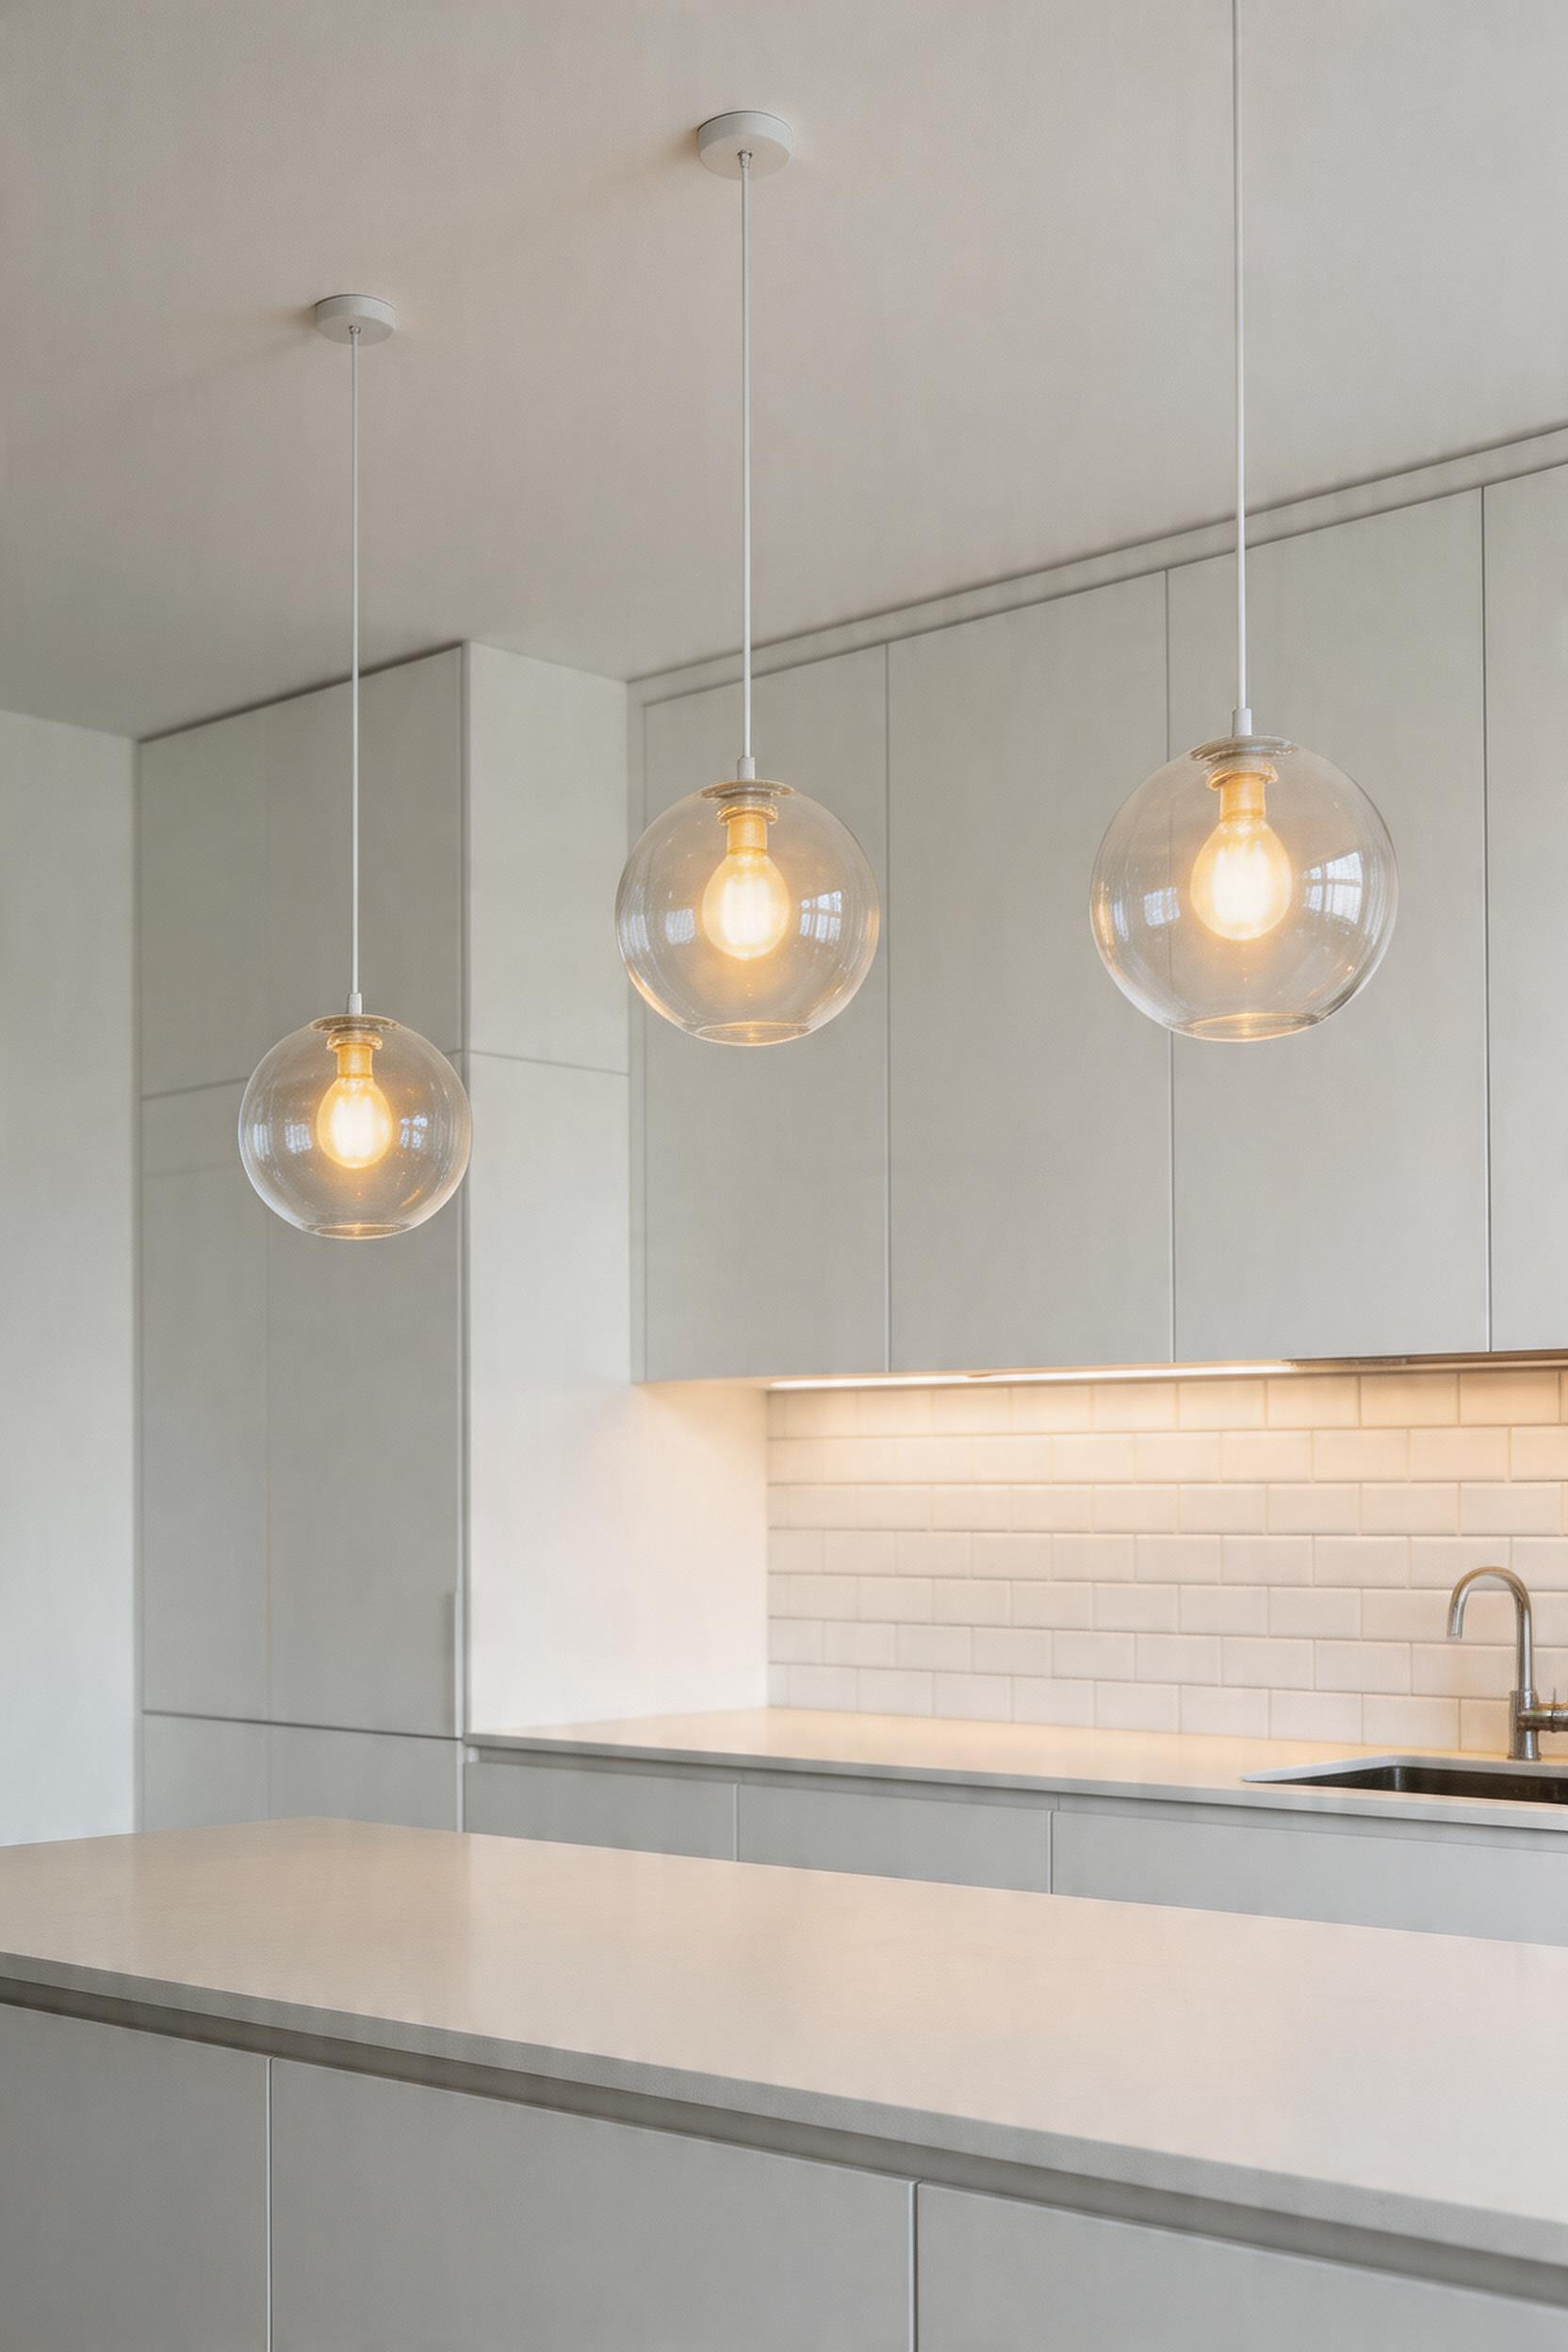
2. Pendant Lights Over Islands — Kitchen Lighting Fixtures With the Most Visual Impact
Pendant lights over a kitchen island are frequently misplaced: hung too high, spaced too close, or sized too small. Getting these three parameters right turns pendants into the room’s defining feature.
Drop height is the most critical variable. For counter-height islands (36 inches), pendants should hang 28–34 inches above the surface. For bar-height islands (42 inches), drop that clearance to 24–28 inches. These aren’t suggestions — go lower and you’re blocking sightlines across the island; go higher and the pendant loses its visual connection to the surface.
For 6-foot islands, space two pendants 24–30 inches apart. For 8-foot islands, use three. A single oversized pendant (18+ inches) works but should be supplemented with recessed ambient lighting rather than relied on alone.
Match pendant finish to the room’s existing hardware. If your cabinet pulls are brushed nickel, a matte black pendant reads as intentional contrast — but only if that contrast is repeated elsewhere in the room. Isolated contrast looks like a mistake. Coordinated contrast looks designed.
3. Recessed Can Lights for Clean, Even Ambient Coverage
Recessed lights are the ambient baseline of modern kitchens. Done well, they provide even light. Done poorly, they create hot spots and dark pools — a chessboard effect that no other fixture can fix.
The spacing rule is straightforward: space recessed cans at half the ceiling height apart from each other, and half that distance from the walls. In an 8-foot ceiling kitchen, that means cans spaced 4 feet apart, with the first row 2 feet from the wall. This produces overlap between adjacent cone patterns and eliminates the gaps.
IC-rated fixtures matter if your ceiling sits below insulation (most single-storey homes). Non-IC require 3 inches clearance minimum — ignoring this violates fire code. IC upgrade costs $5–10 per fixture.
Also, dimmer compatibility deserves more attention than it gets. Most LED-compatible dimmers are TRIAC (forward-phase) or ELV (reverse-phase). Check your specific bulb or fixture’s dimmer compatibility list — not all LED drivers work with all dimmers, and mismatches create buzzing, flickering, or lights that won’t dim below 30%. Lutron’s compatibility finder is the most reliable tool for this. One of the most reliable kitchen lighting fixtures for even ambient coverage is a properly spaced recessed can array.

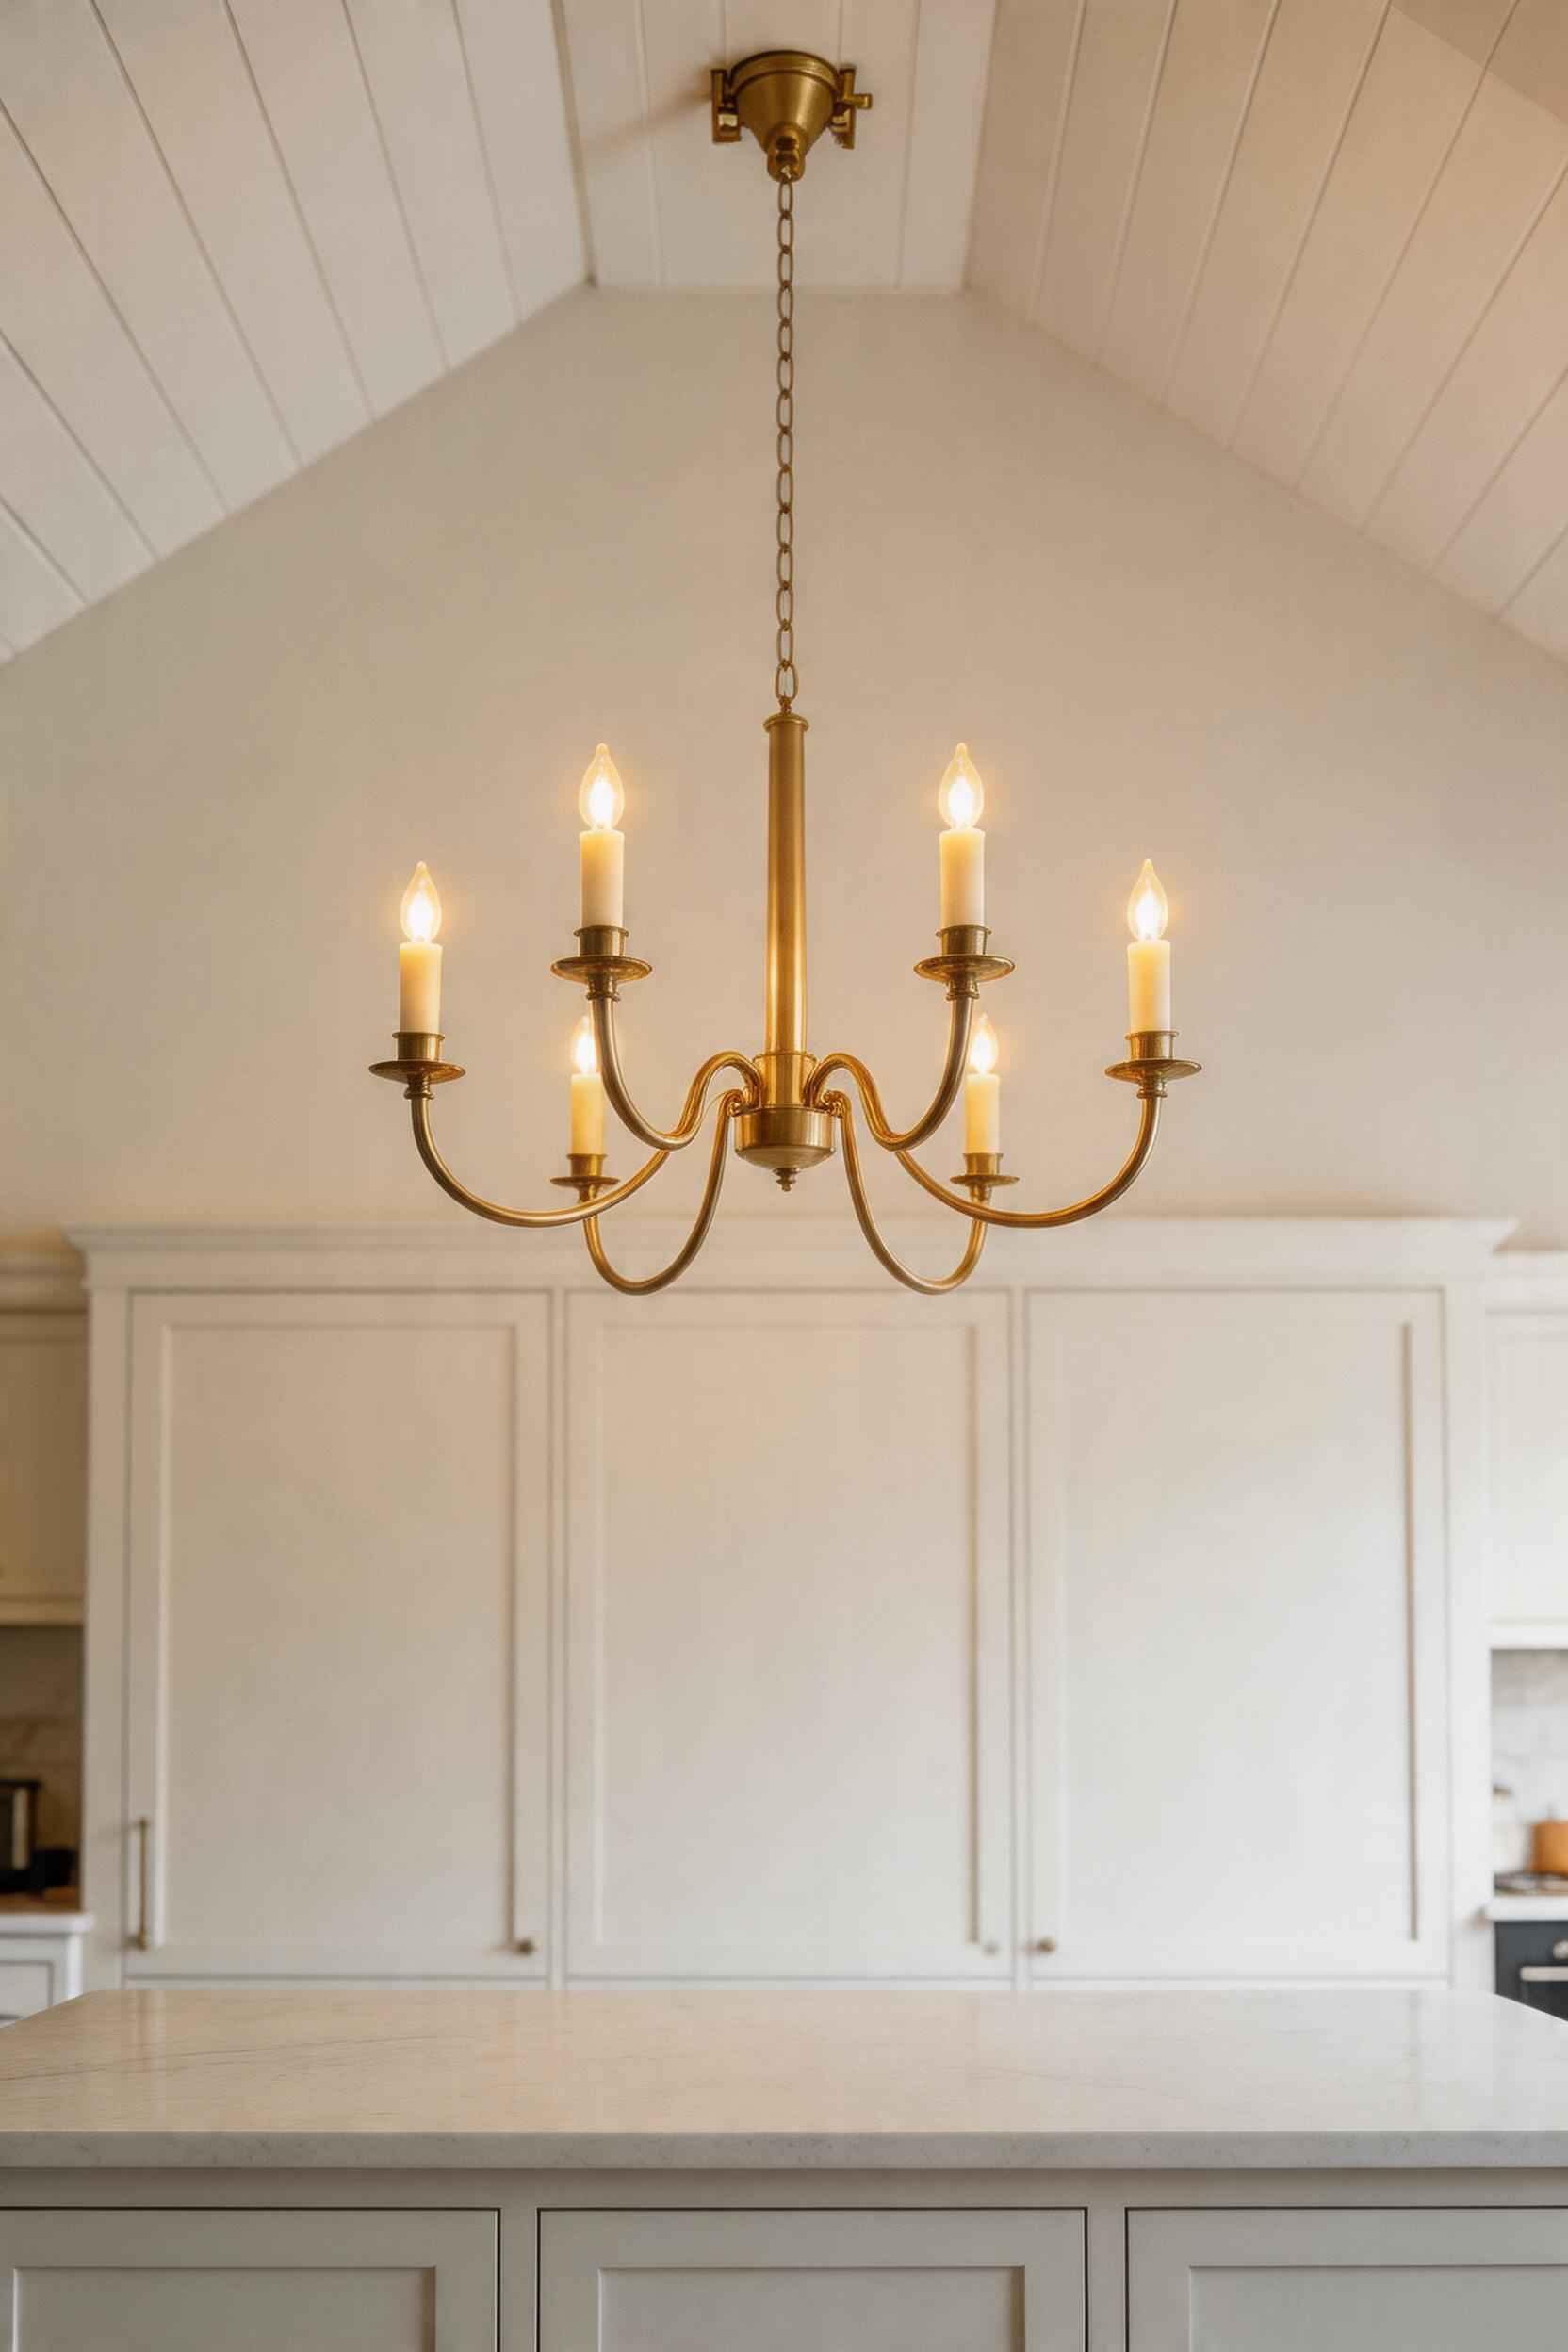
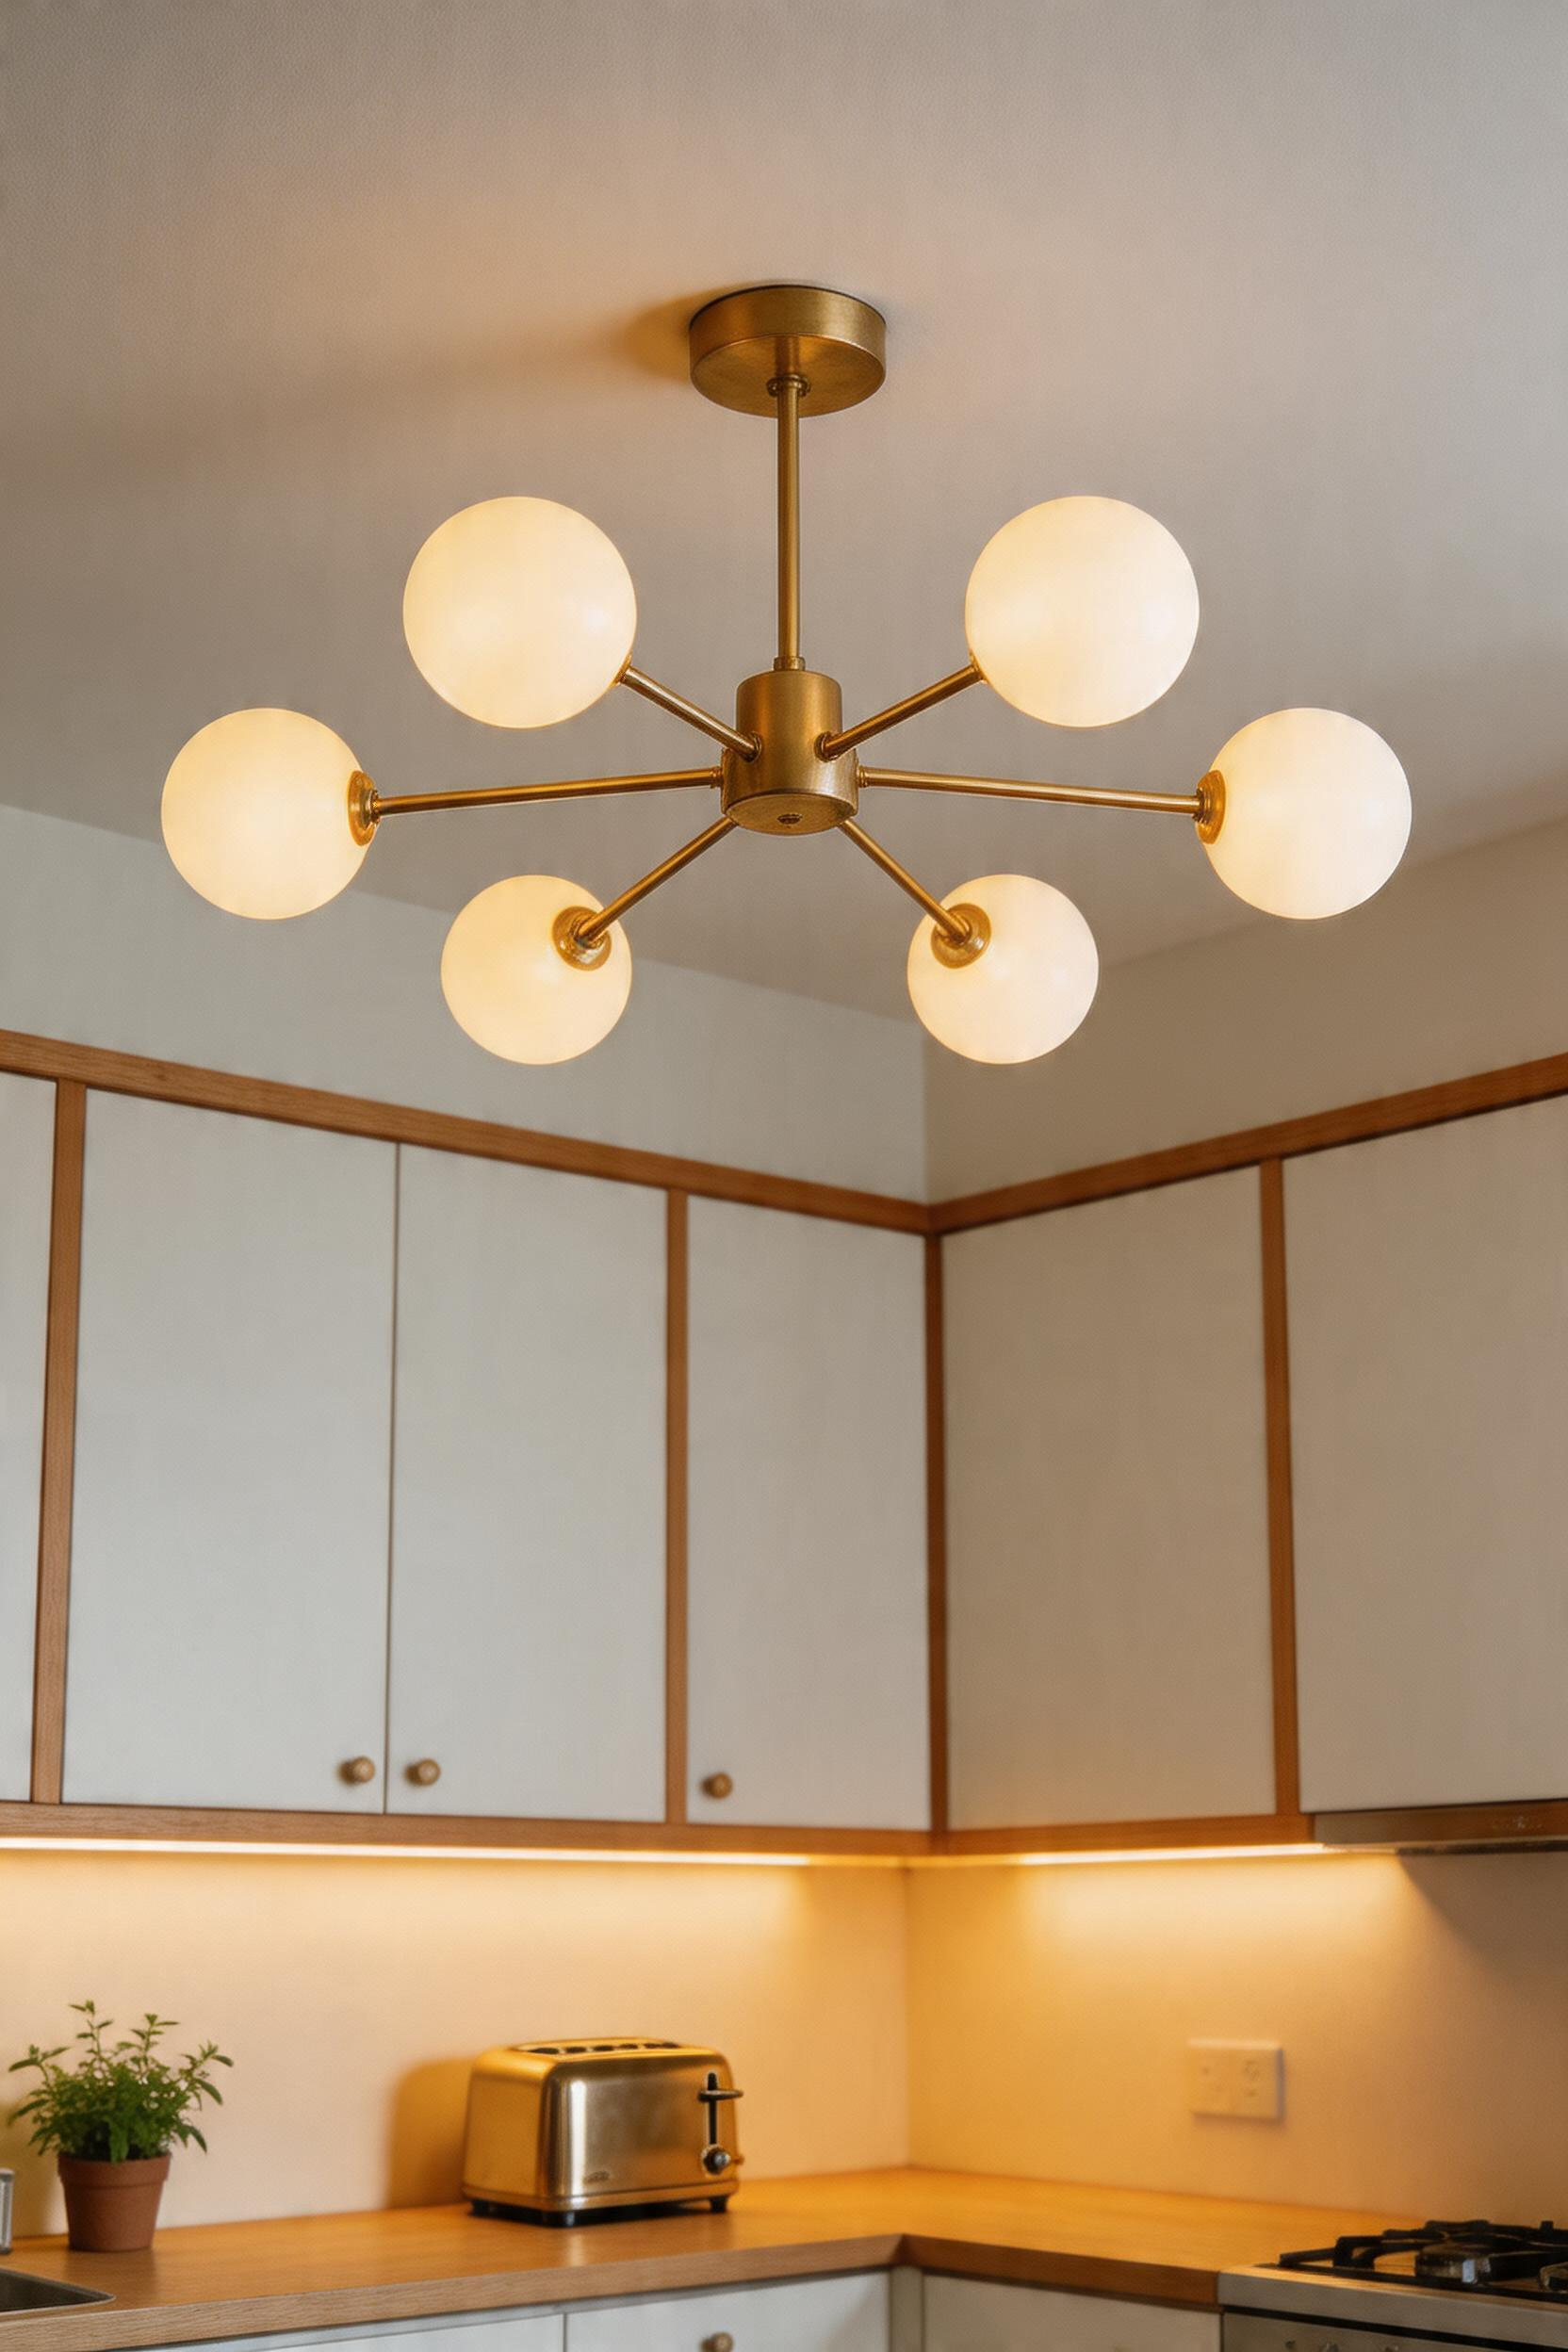
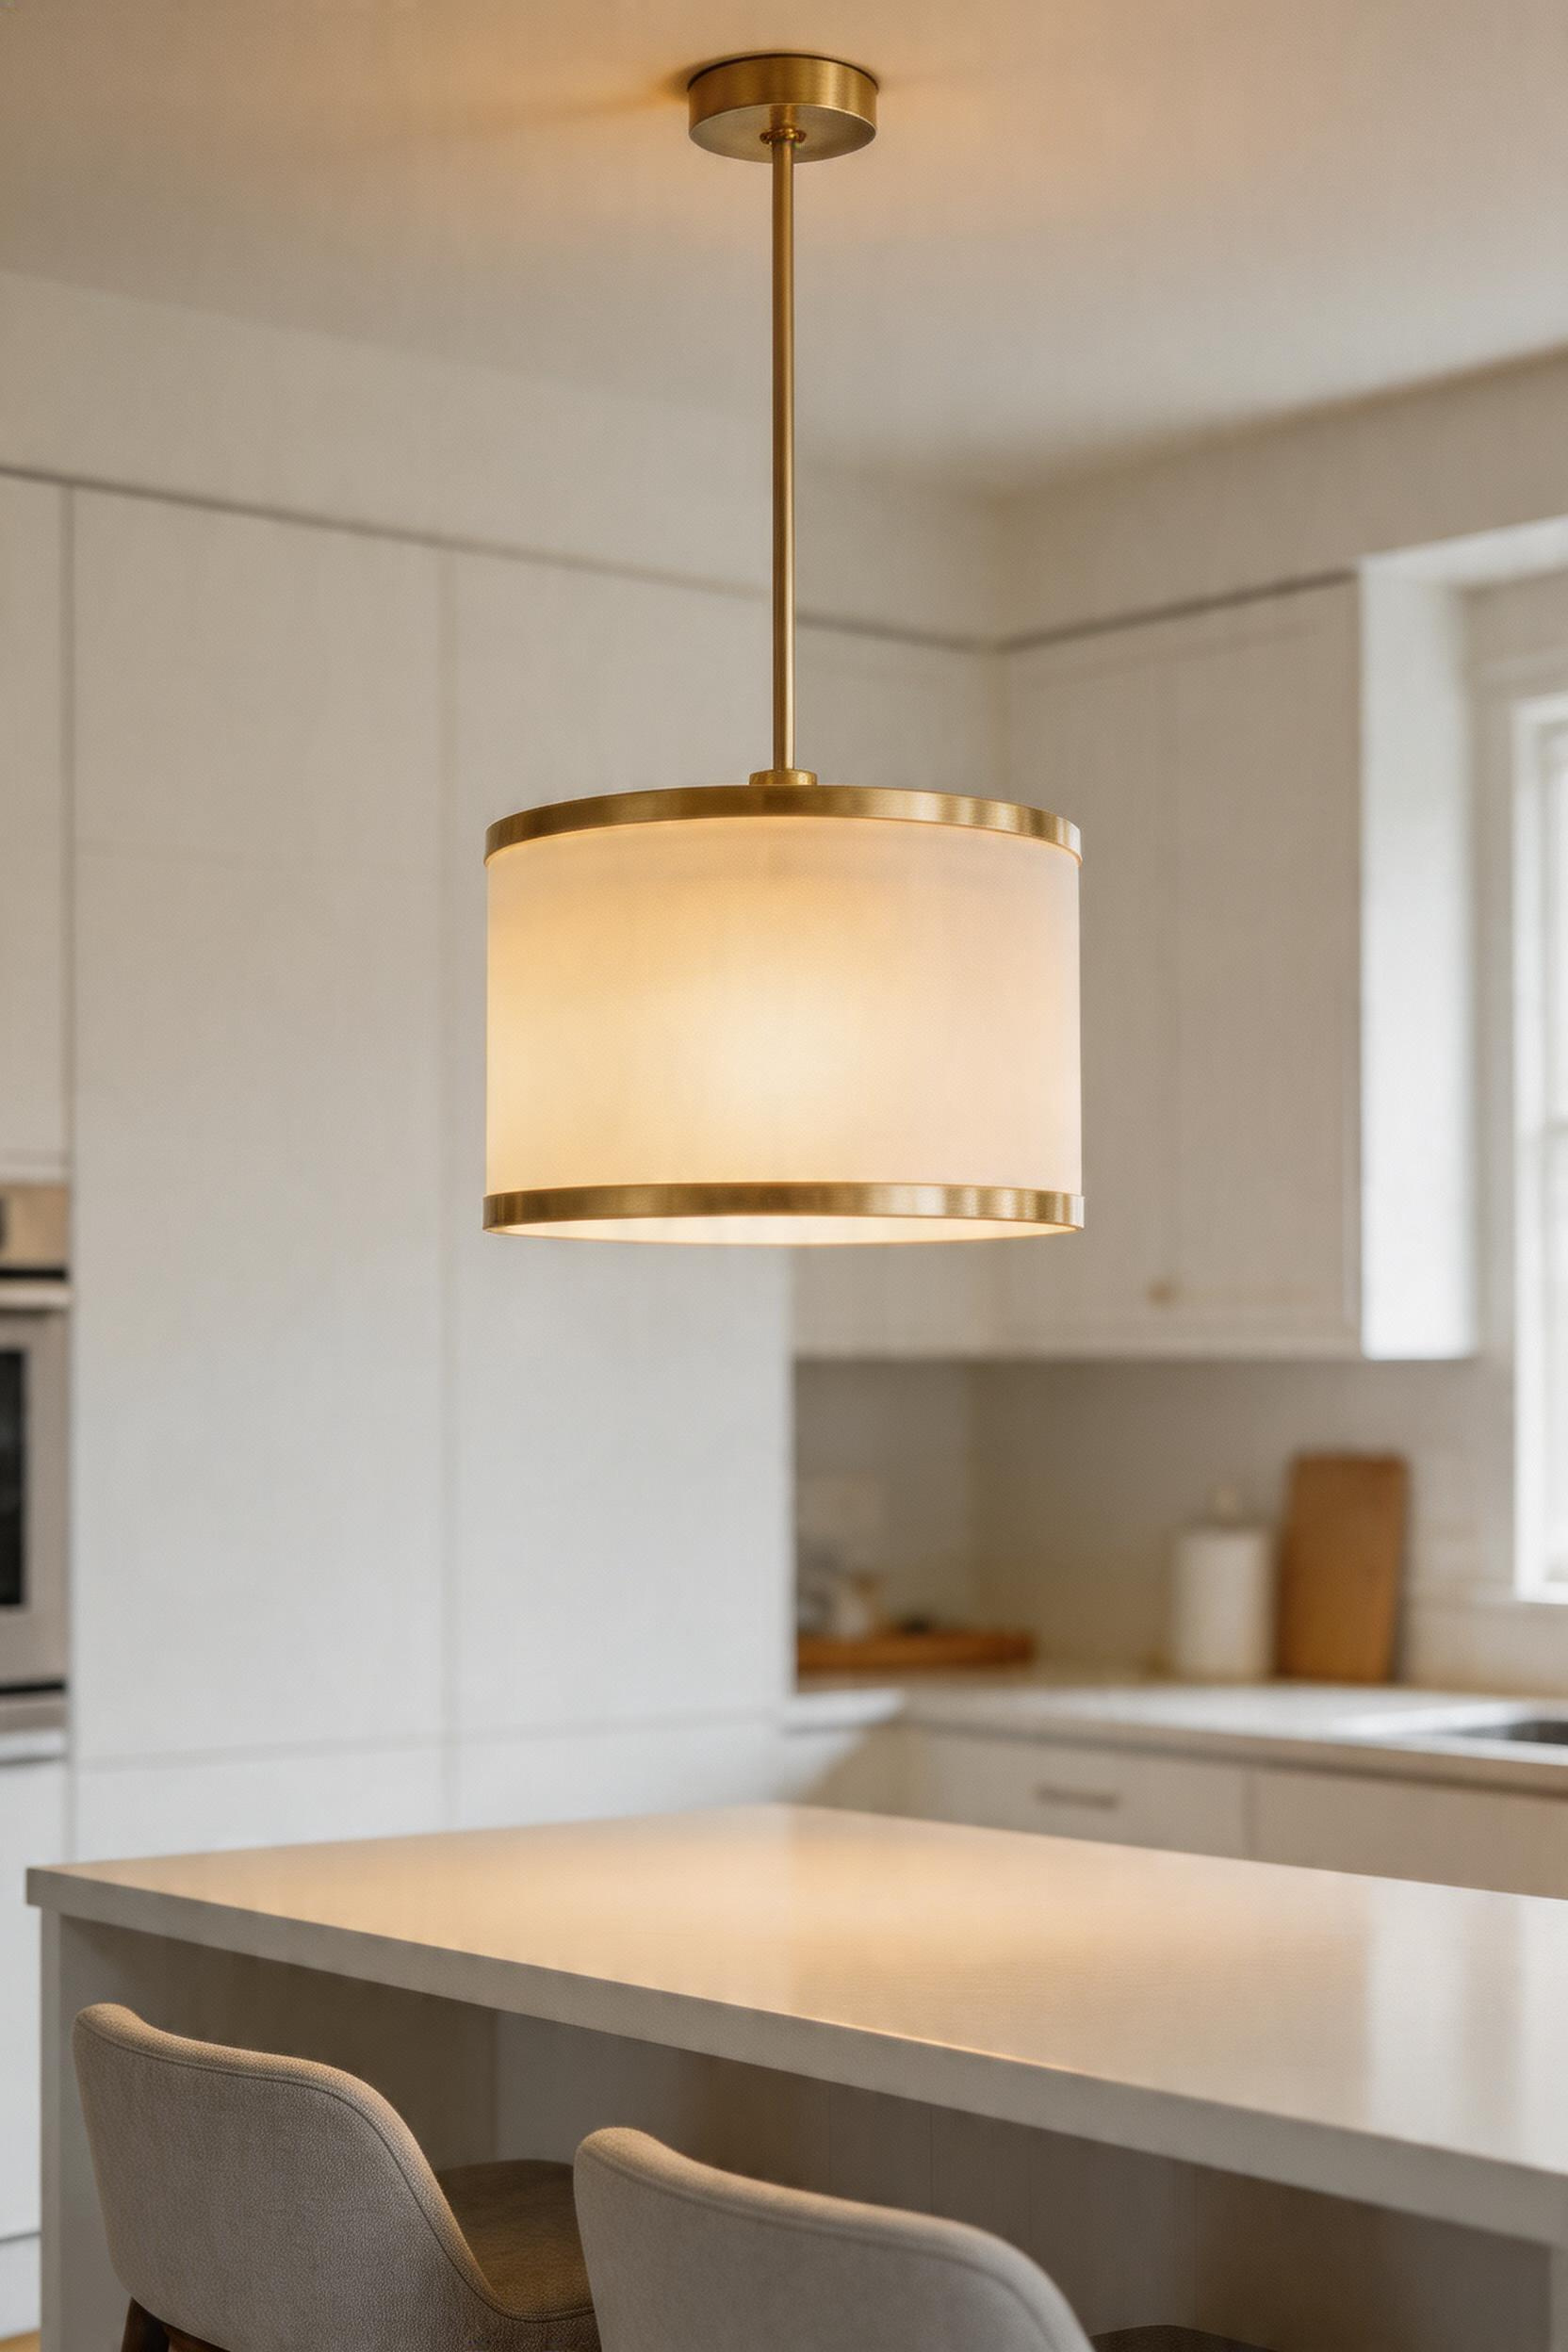
4. Statement Chandeliers That Anchor a Kitchen’s Visual Weight
A chandelier works when three conditions align: ceiling height above 9 feet, an island or table that functions as a gathering point, and enough visual real estate. When present, it creates a focal point that organises the room’s composition.
Sizing is the most common error. The rule of thumb is to add the room’s length and width in feet and convert that sum directly to inches for the chandelier’s diameter. A 12×14-foot kitchen becomes a 26-inch chandelier. For a 10×10 kitchen, that’s 20 inches. These are minimums — the fixture reads as undersized if your eye has to hunt for it.
Clearance rules: a chandelier’s lowest point should be at least 7 feet from the floor in any walkway. Over a kitchen island or table, 30–36 inches of clearance between the bottom of the fixture and the surface is standard. On a 9-foot ceiling above a 36-inch counter, that gives you roughly 18 inches of fixture height to work with before the proportions start to strain.
Finish selection matters as much as size. The chandelier’s metal should align with at least two other metal tones already in the room — cabinet hardware, faucet, range hood — and the palette shouldn’t exceed three metals total. A warm brass chandelier in a kitchen full of stainless hardware looks like it arrived from a different house.
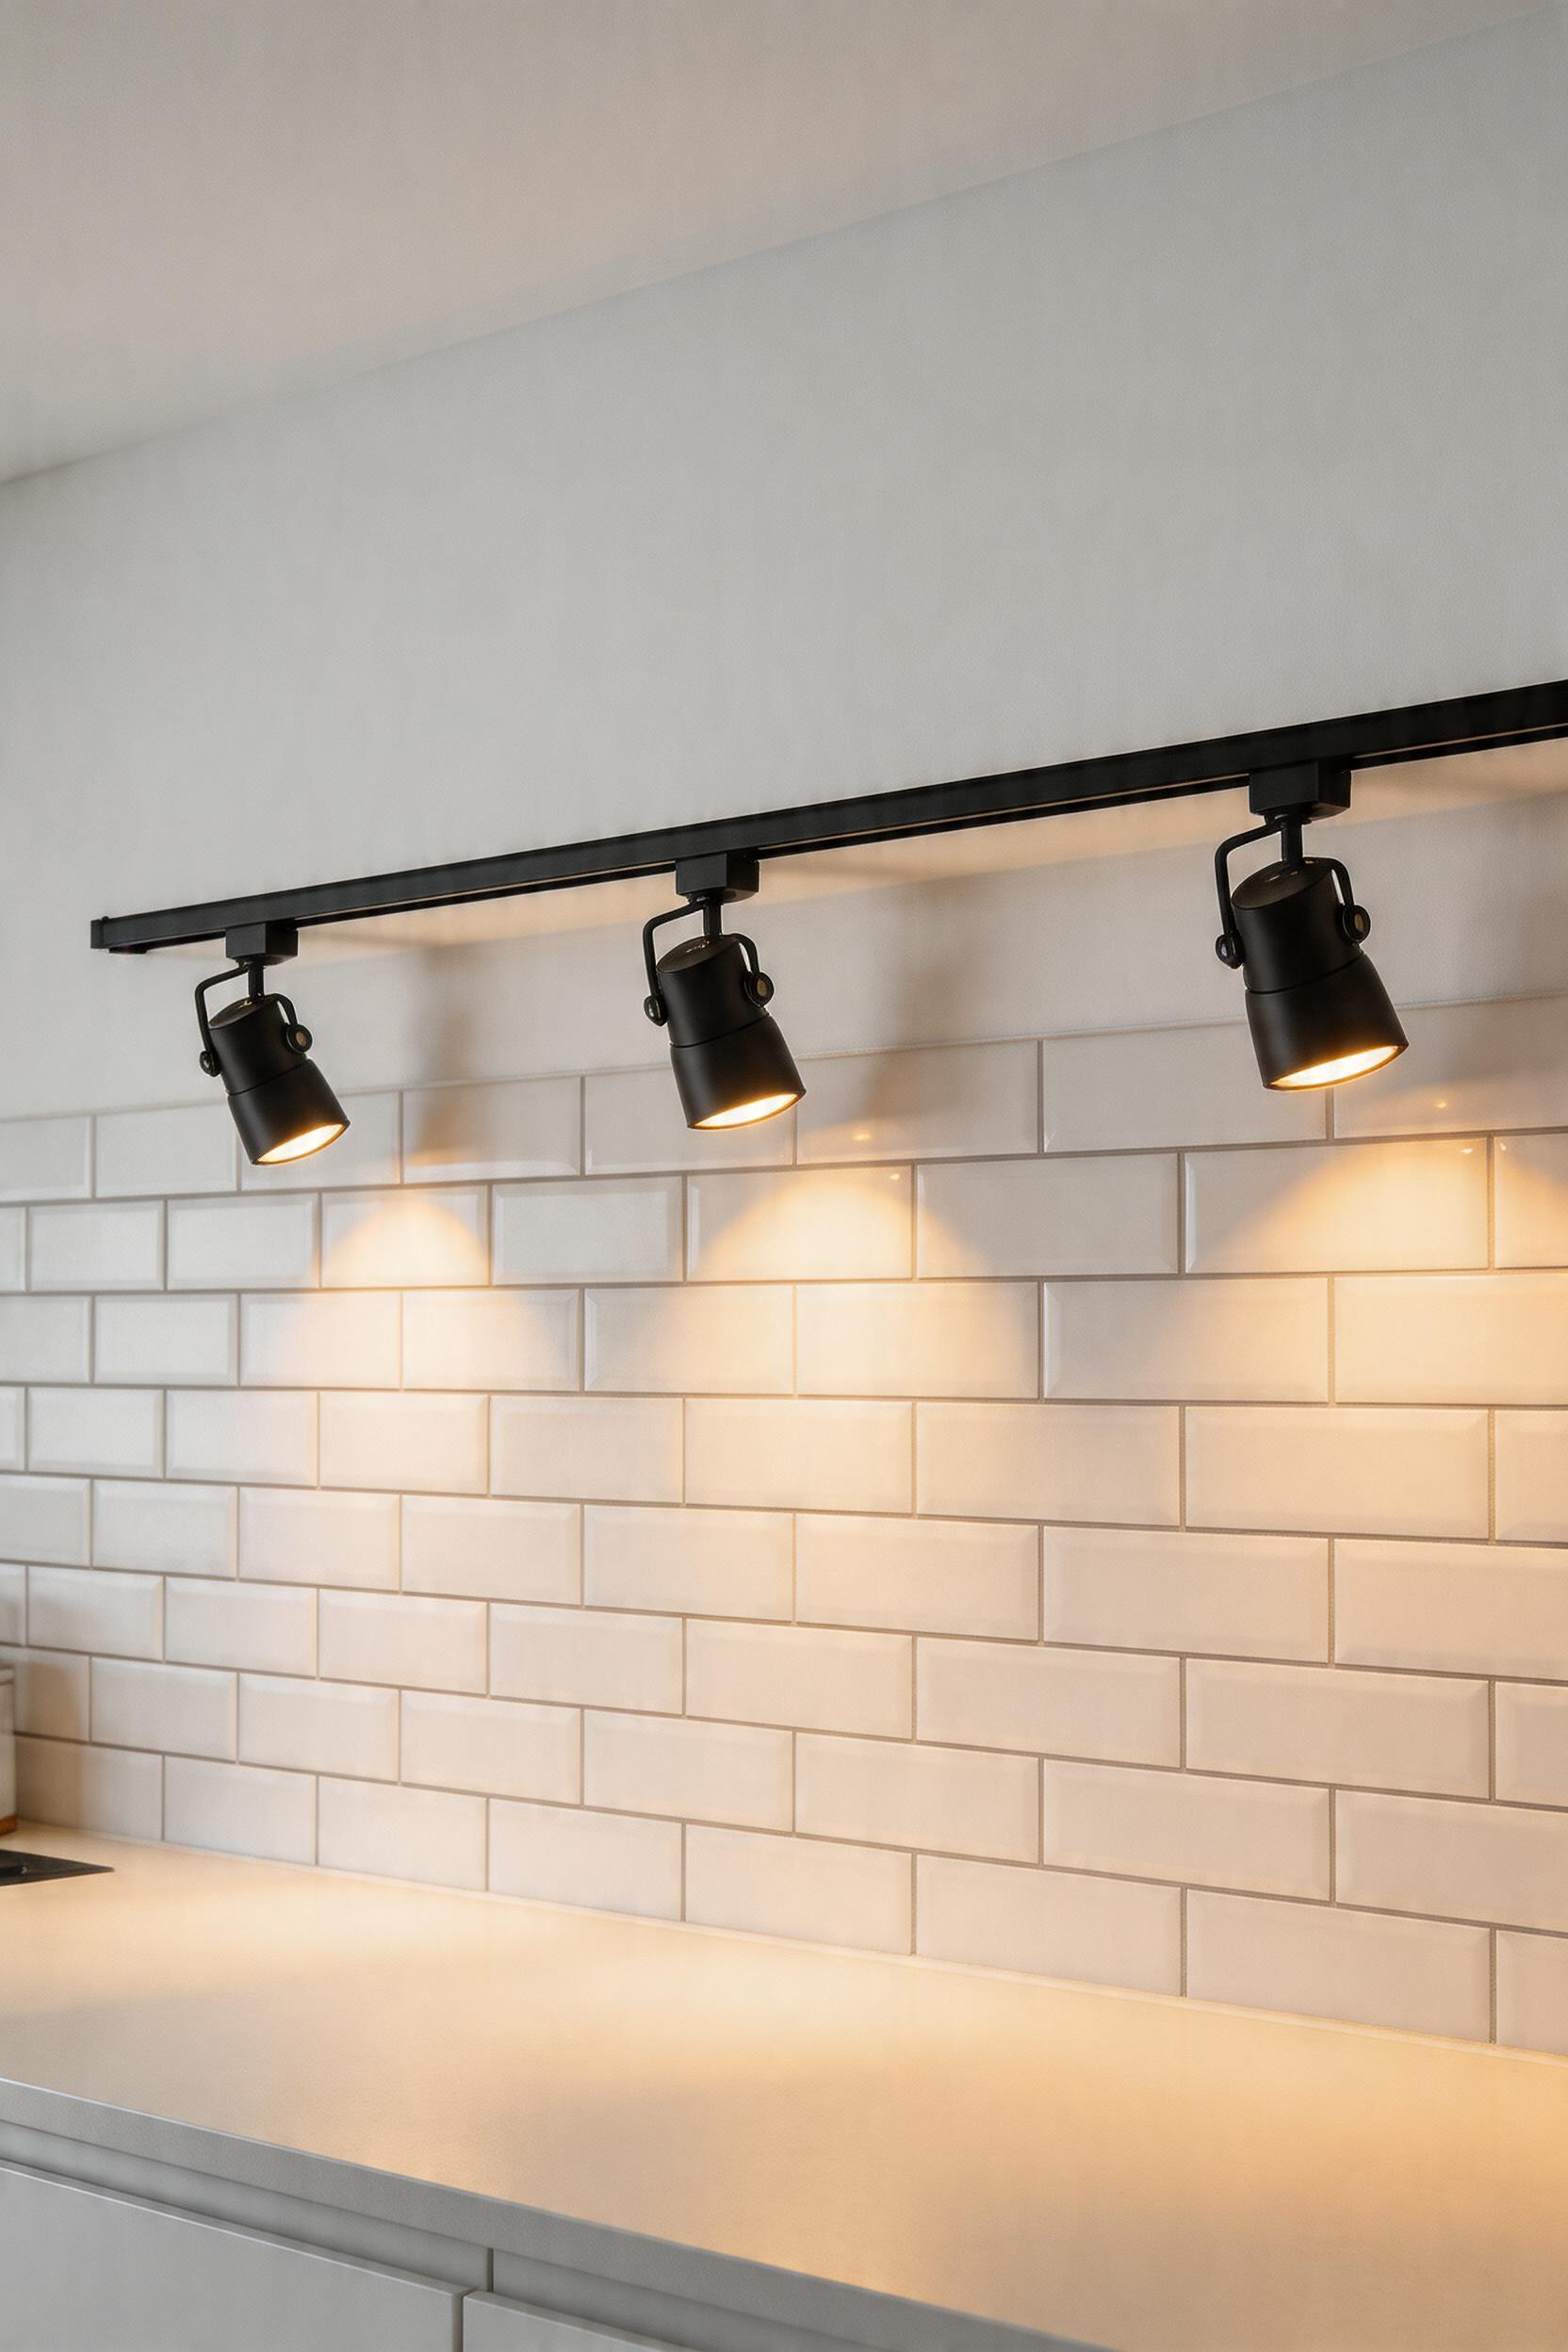
5. Track Lighting Systems: Versatile Kitchen Light Fixtures for Irregular Layouts
Track lighting has a dated reputation, but modern systems offer directional flexibility that fixed recessed layouts cannot match.
Modern track lighting genuinely earns its place in specific kitchen configurations: L-shaped layouts where two walls need coverage from a single circuit, galley kitchens where a single central run can address both counter runs simultaneously, and angled or vaulted ceiling kitchens where traditional recessed layout calculations break down. It’s also the right answer for kitchens where the island position might change — track heads adjust without new drywall.
The head type defines the fixture’s performance. Fixed heads deliver consistent downlight at one angle. Gimbal ring heads (like the Nuvo TH220 and TH223, running $30–50 per head) rotate 358 degrees and tilt up to 35 degrees, directing light precisely to counters, open shelving, or artwork. Swivel-head designs give full articulation for accent work. For a kitchen doing double duty as task space and display space, gimbal ring heads on a single track give you all three lighting modes without changing the hardware.
Multi-circuit track — where different sections of the same track are on independent dimmer circuits — is the premium option and worth it if your kitchen layout has genuinely different zones that need different light levels at different times of day.
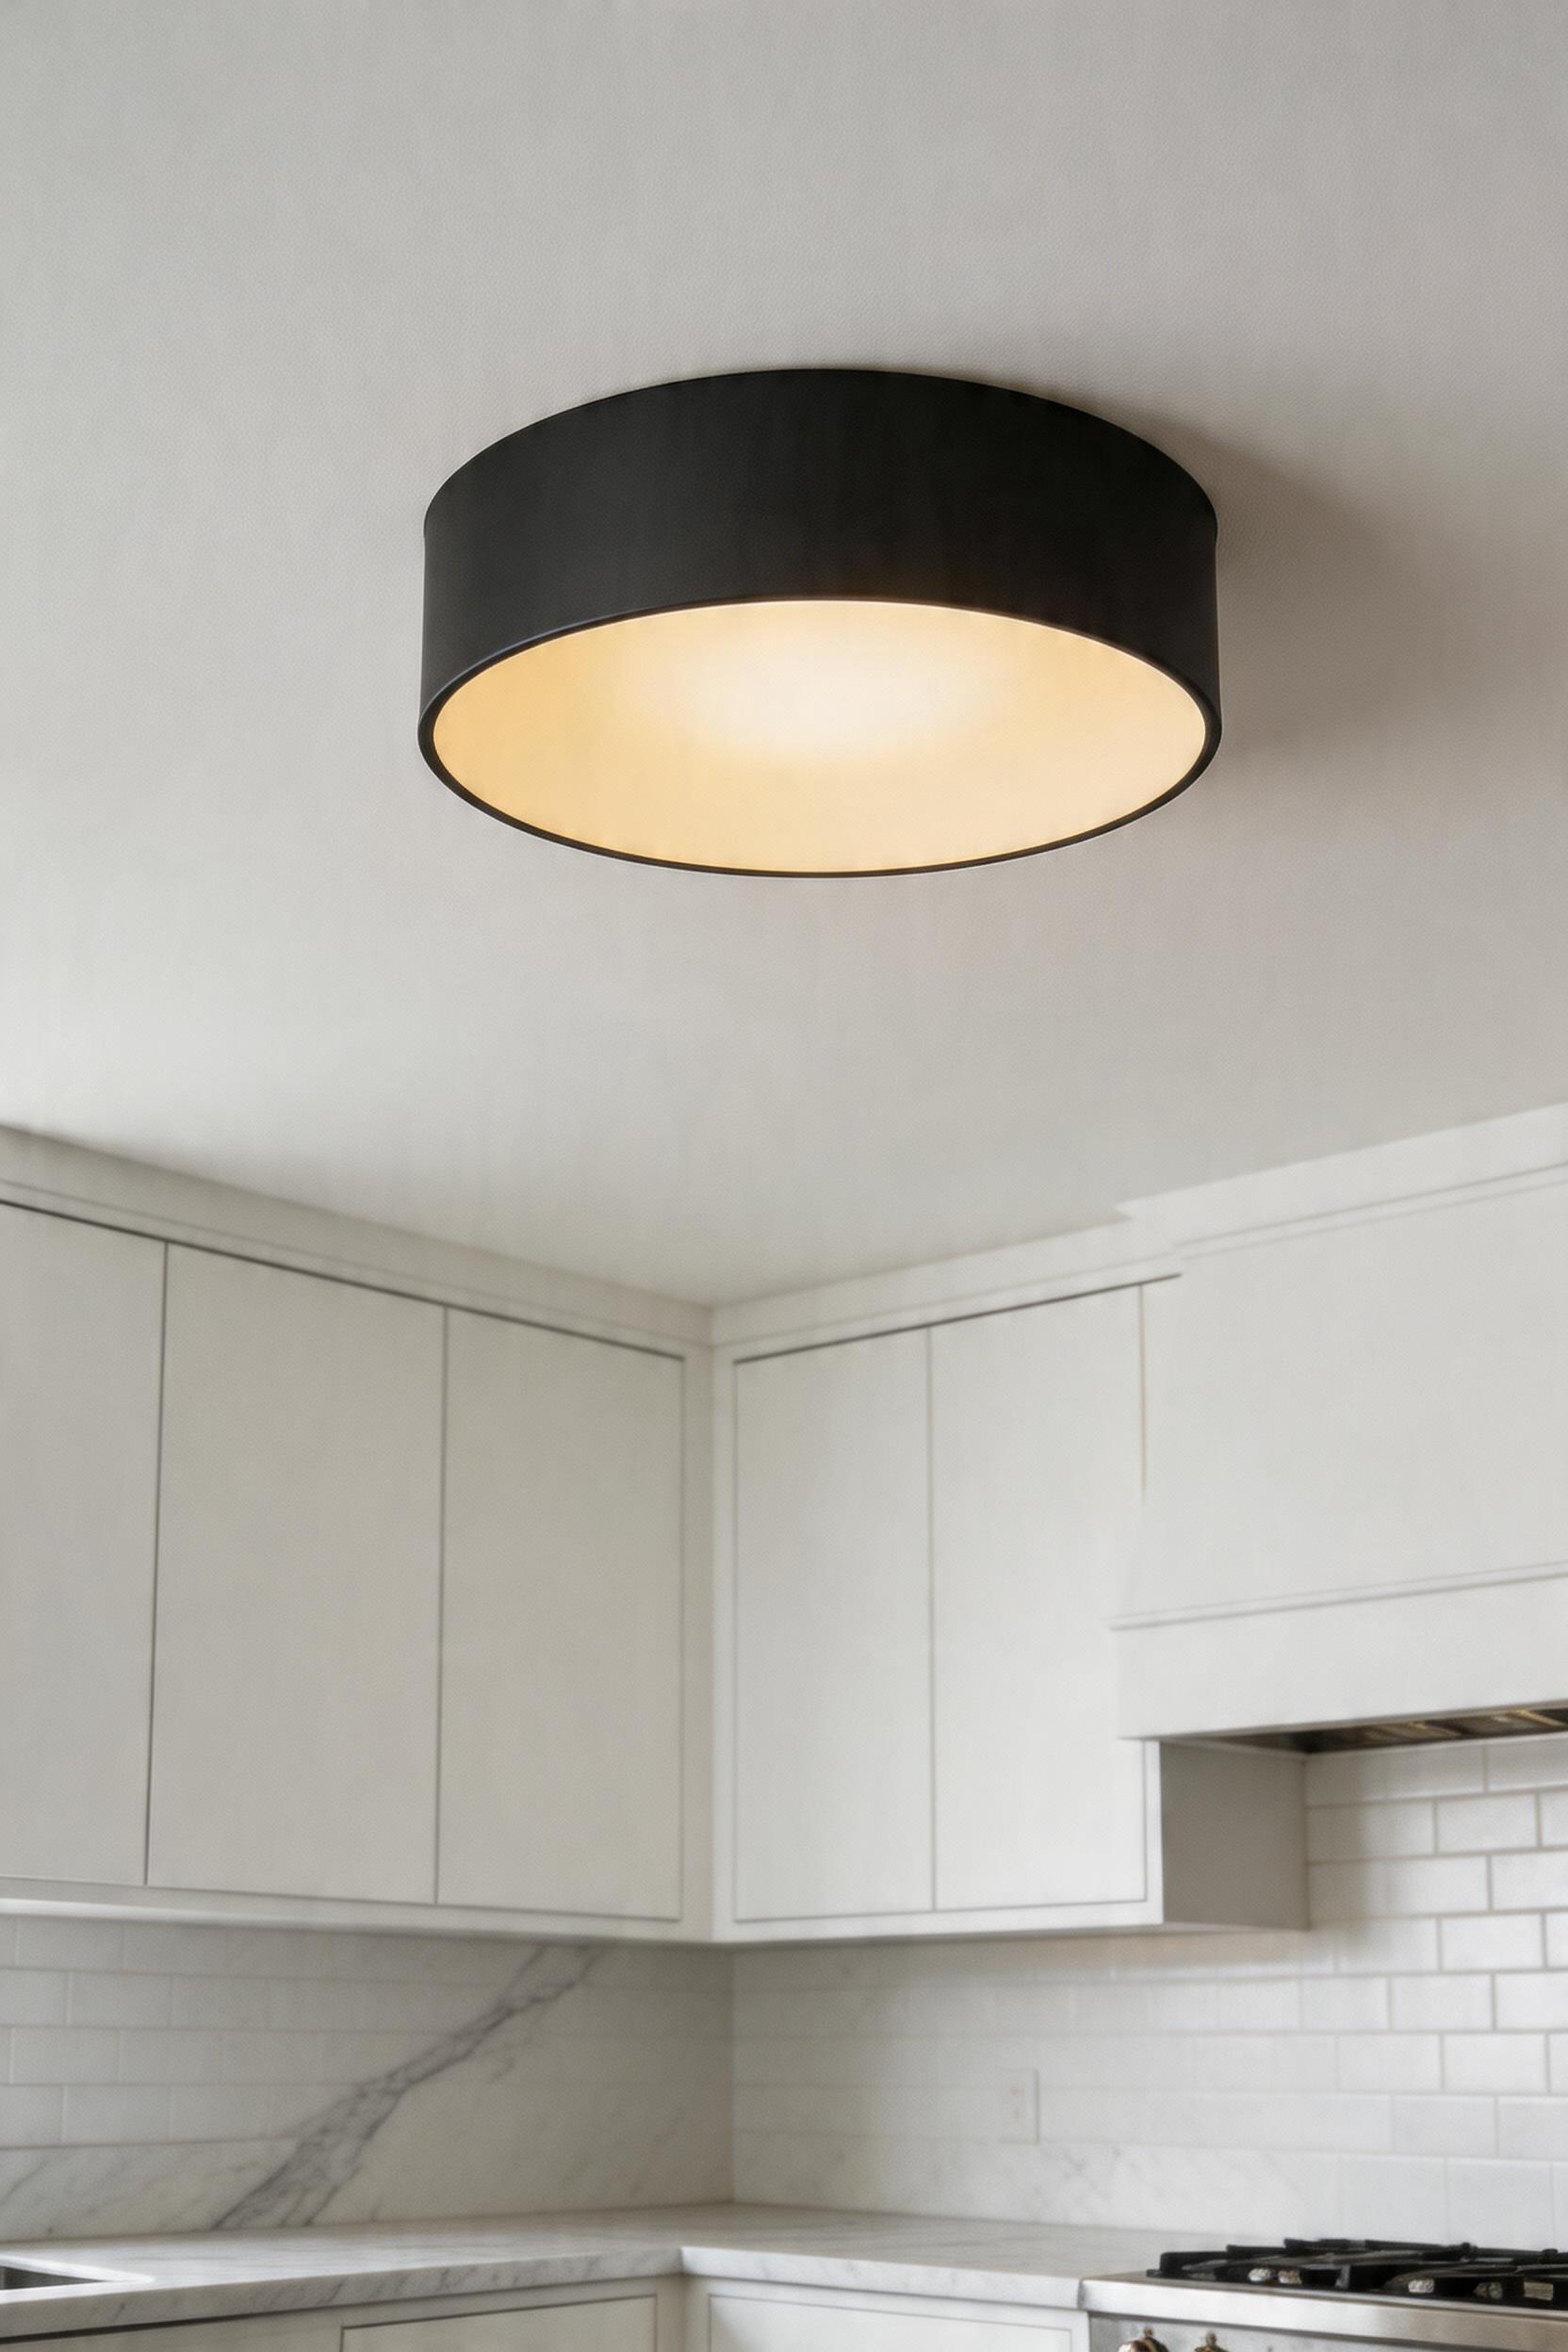
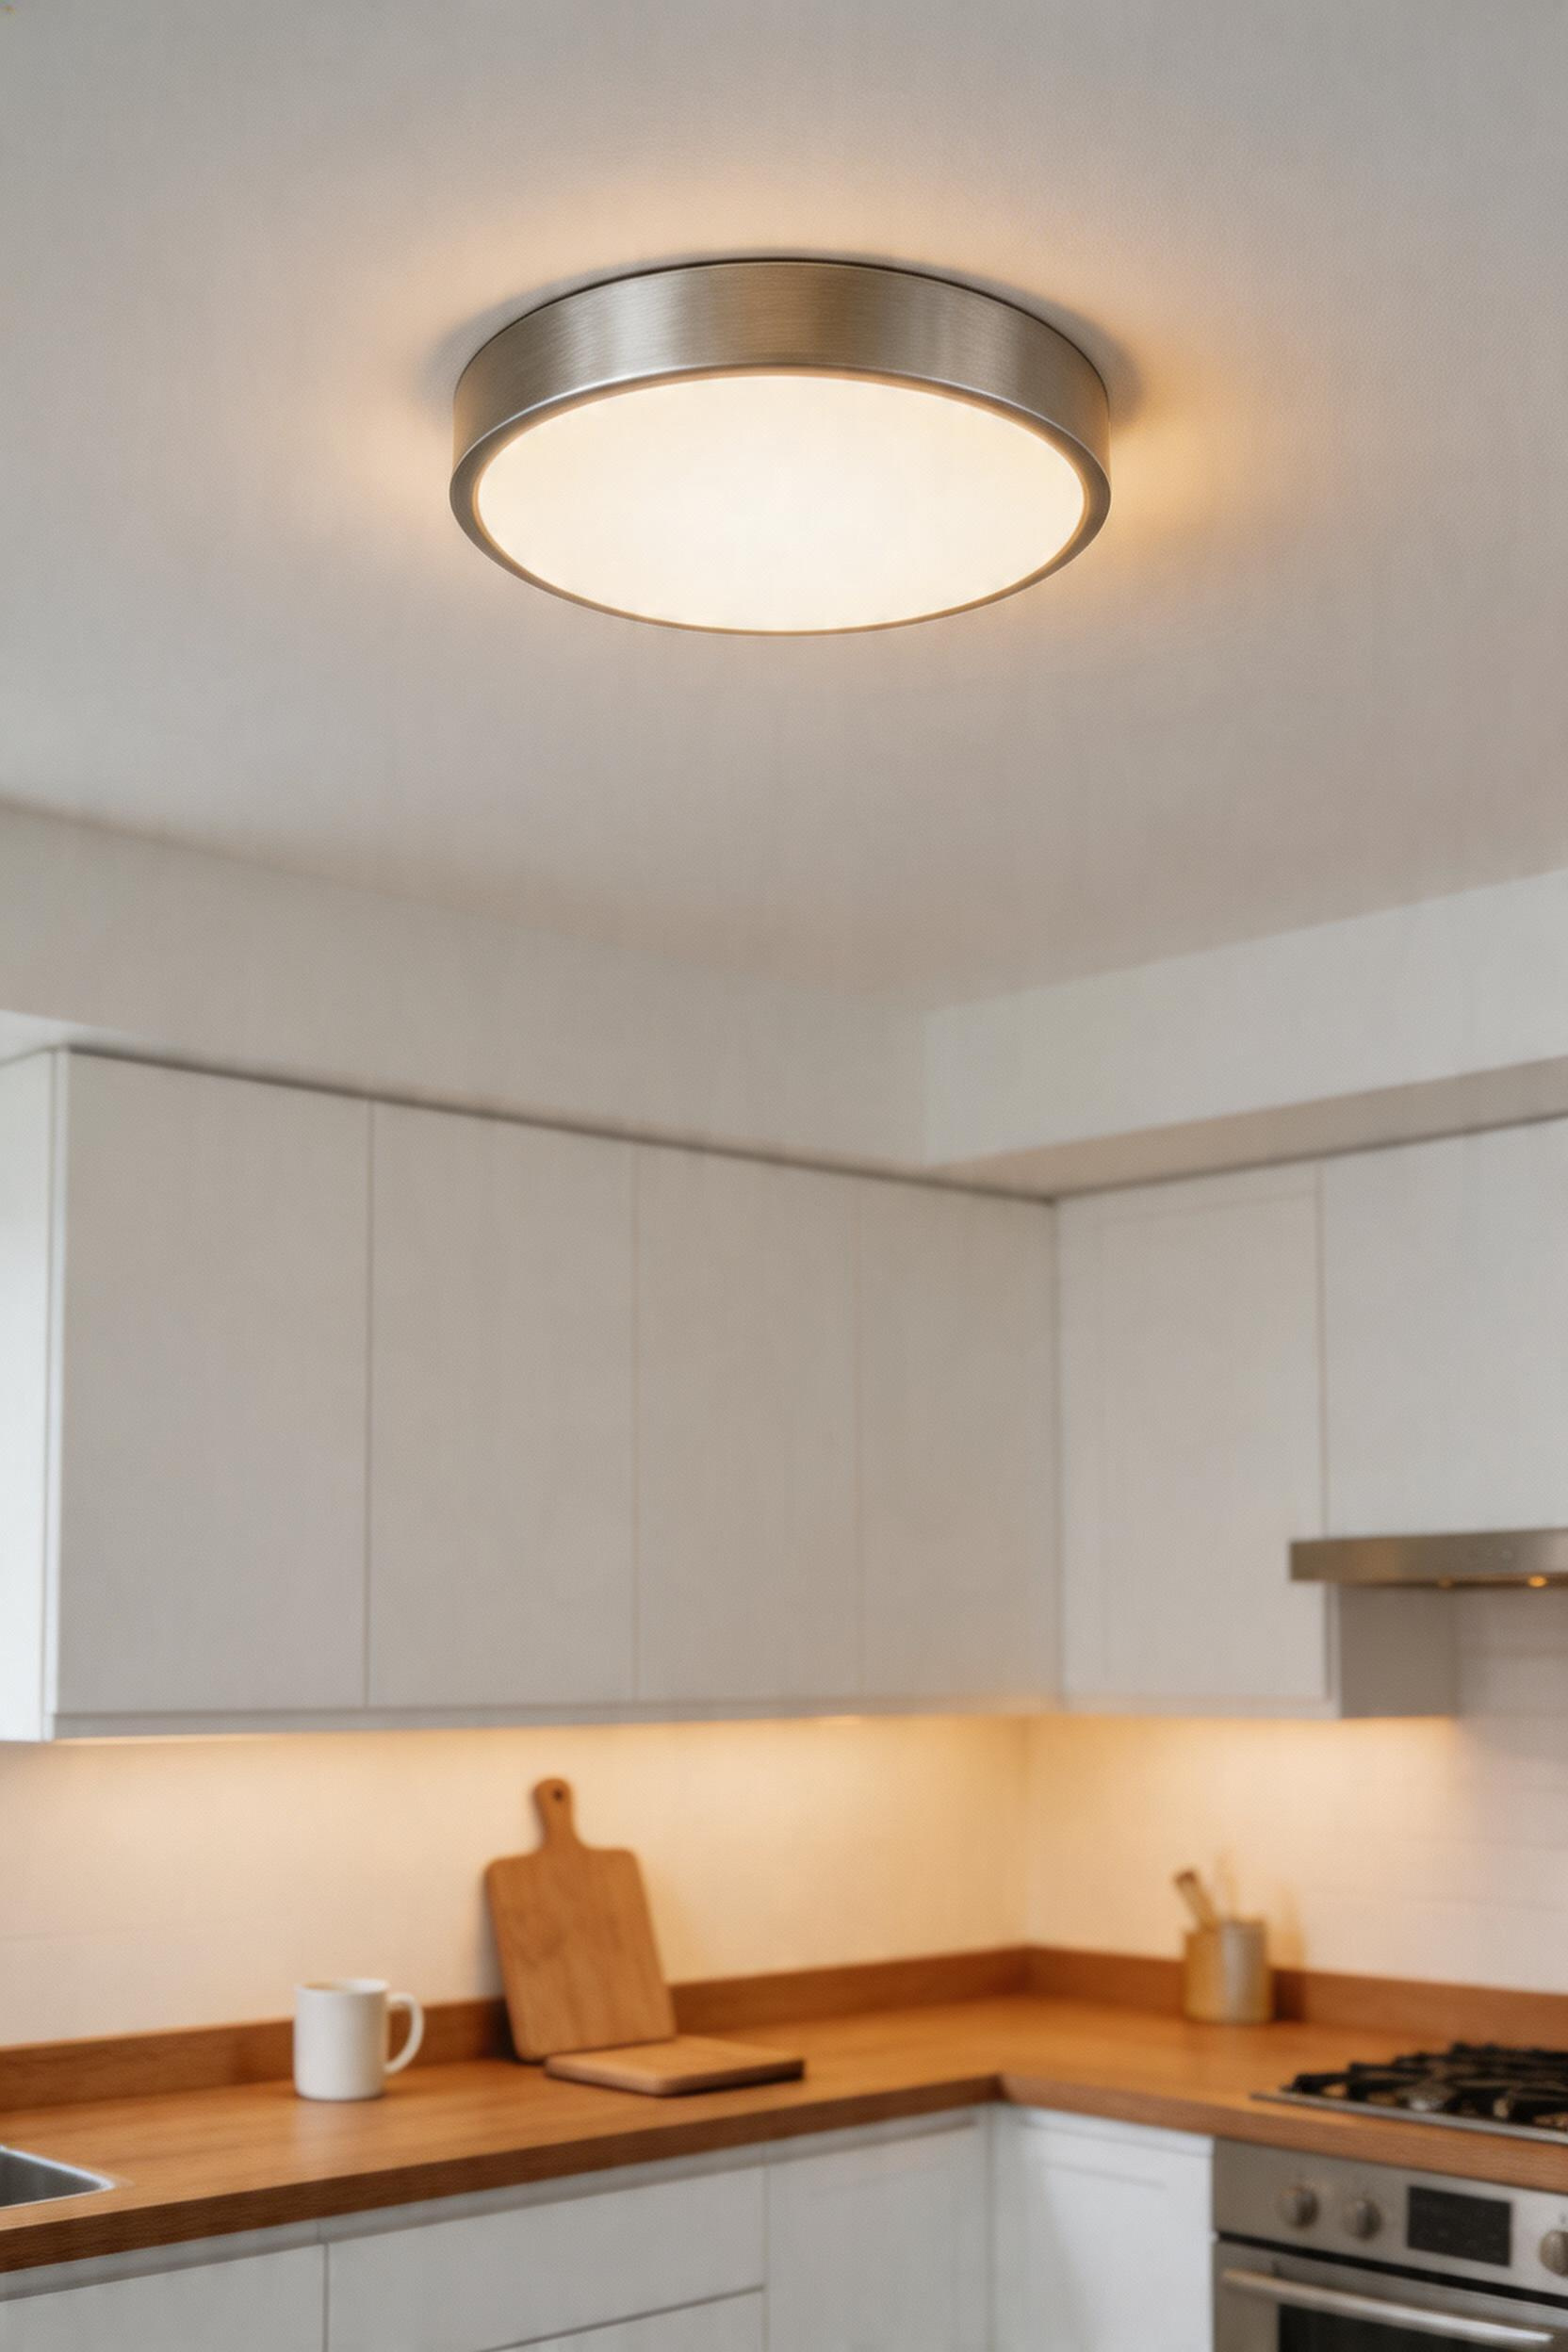
6. Flush-Mount Ceiling Lights for Low-Clearance Kitchens
The 8-foot ceiling threshold is where pendant lights stop being practical and flush-mount fixtures step in. A pendant requiring 12–18 inches of drop on a ceiling with only 8 feet of clearance leaves 6 feet 6 inches of head room — tight for tall occupants and visually oppressive in the space. Flush mounts solve this by sitting directly against the ceiling, sacrificing drop for practicality.
Target 30–40 lumens per square foot ambient. A 200-sq-ft kitchen needs 6,000–8,000 lumens total. Single flush mounts rarely suffice alone, so combine with under-cabinet strips and accents.
Flush-mount styles now include designer options in aged bronze, matte black, frosted glass, and oil-rubbed finishes. Progress and Kichler offer lines that read intentional. CRI 90+ ensures accurate colour rendering.
7. Semi-Flush Fixtures: A Middle-Ground Kitchen Lighting Option for 8–9 Foot Ceilings
Semi-flush fixtures drop 4–8 inches below the ceiling, adding visual depth. For 8–9-foot ceilings wanting more interest than flush mounts but lacking pendant space, semi-flush is ideal.
The sweet spot is 8.5 feet. At this height, a semi-flush with a 6-inch drop still leaves a comfortable 8 feet of clear head height below. The additional drop creates shadow play on the ceiling that makes the fixture look intentional rather than flush-mounted-with-a-stem.
Style categories map cleanly onto kitchen aesthetics. Transitional semi-flush designs (a diffused glass globe on a minimal stem) suit kitchens that blend traditional and contemporary elements. Farmhouse options lean on lantern shapes and wrought iron. Mid-century modern semi-flush designs use sputnik or cone forms. LUXRITE’s lineup includes a 14W, 1,440-lumen option and an 18W, 2,160-lumen version for larger kitchens — both in the $40–70 range and compatible with most standard dimmers.
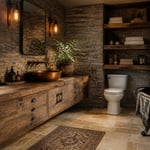
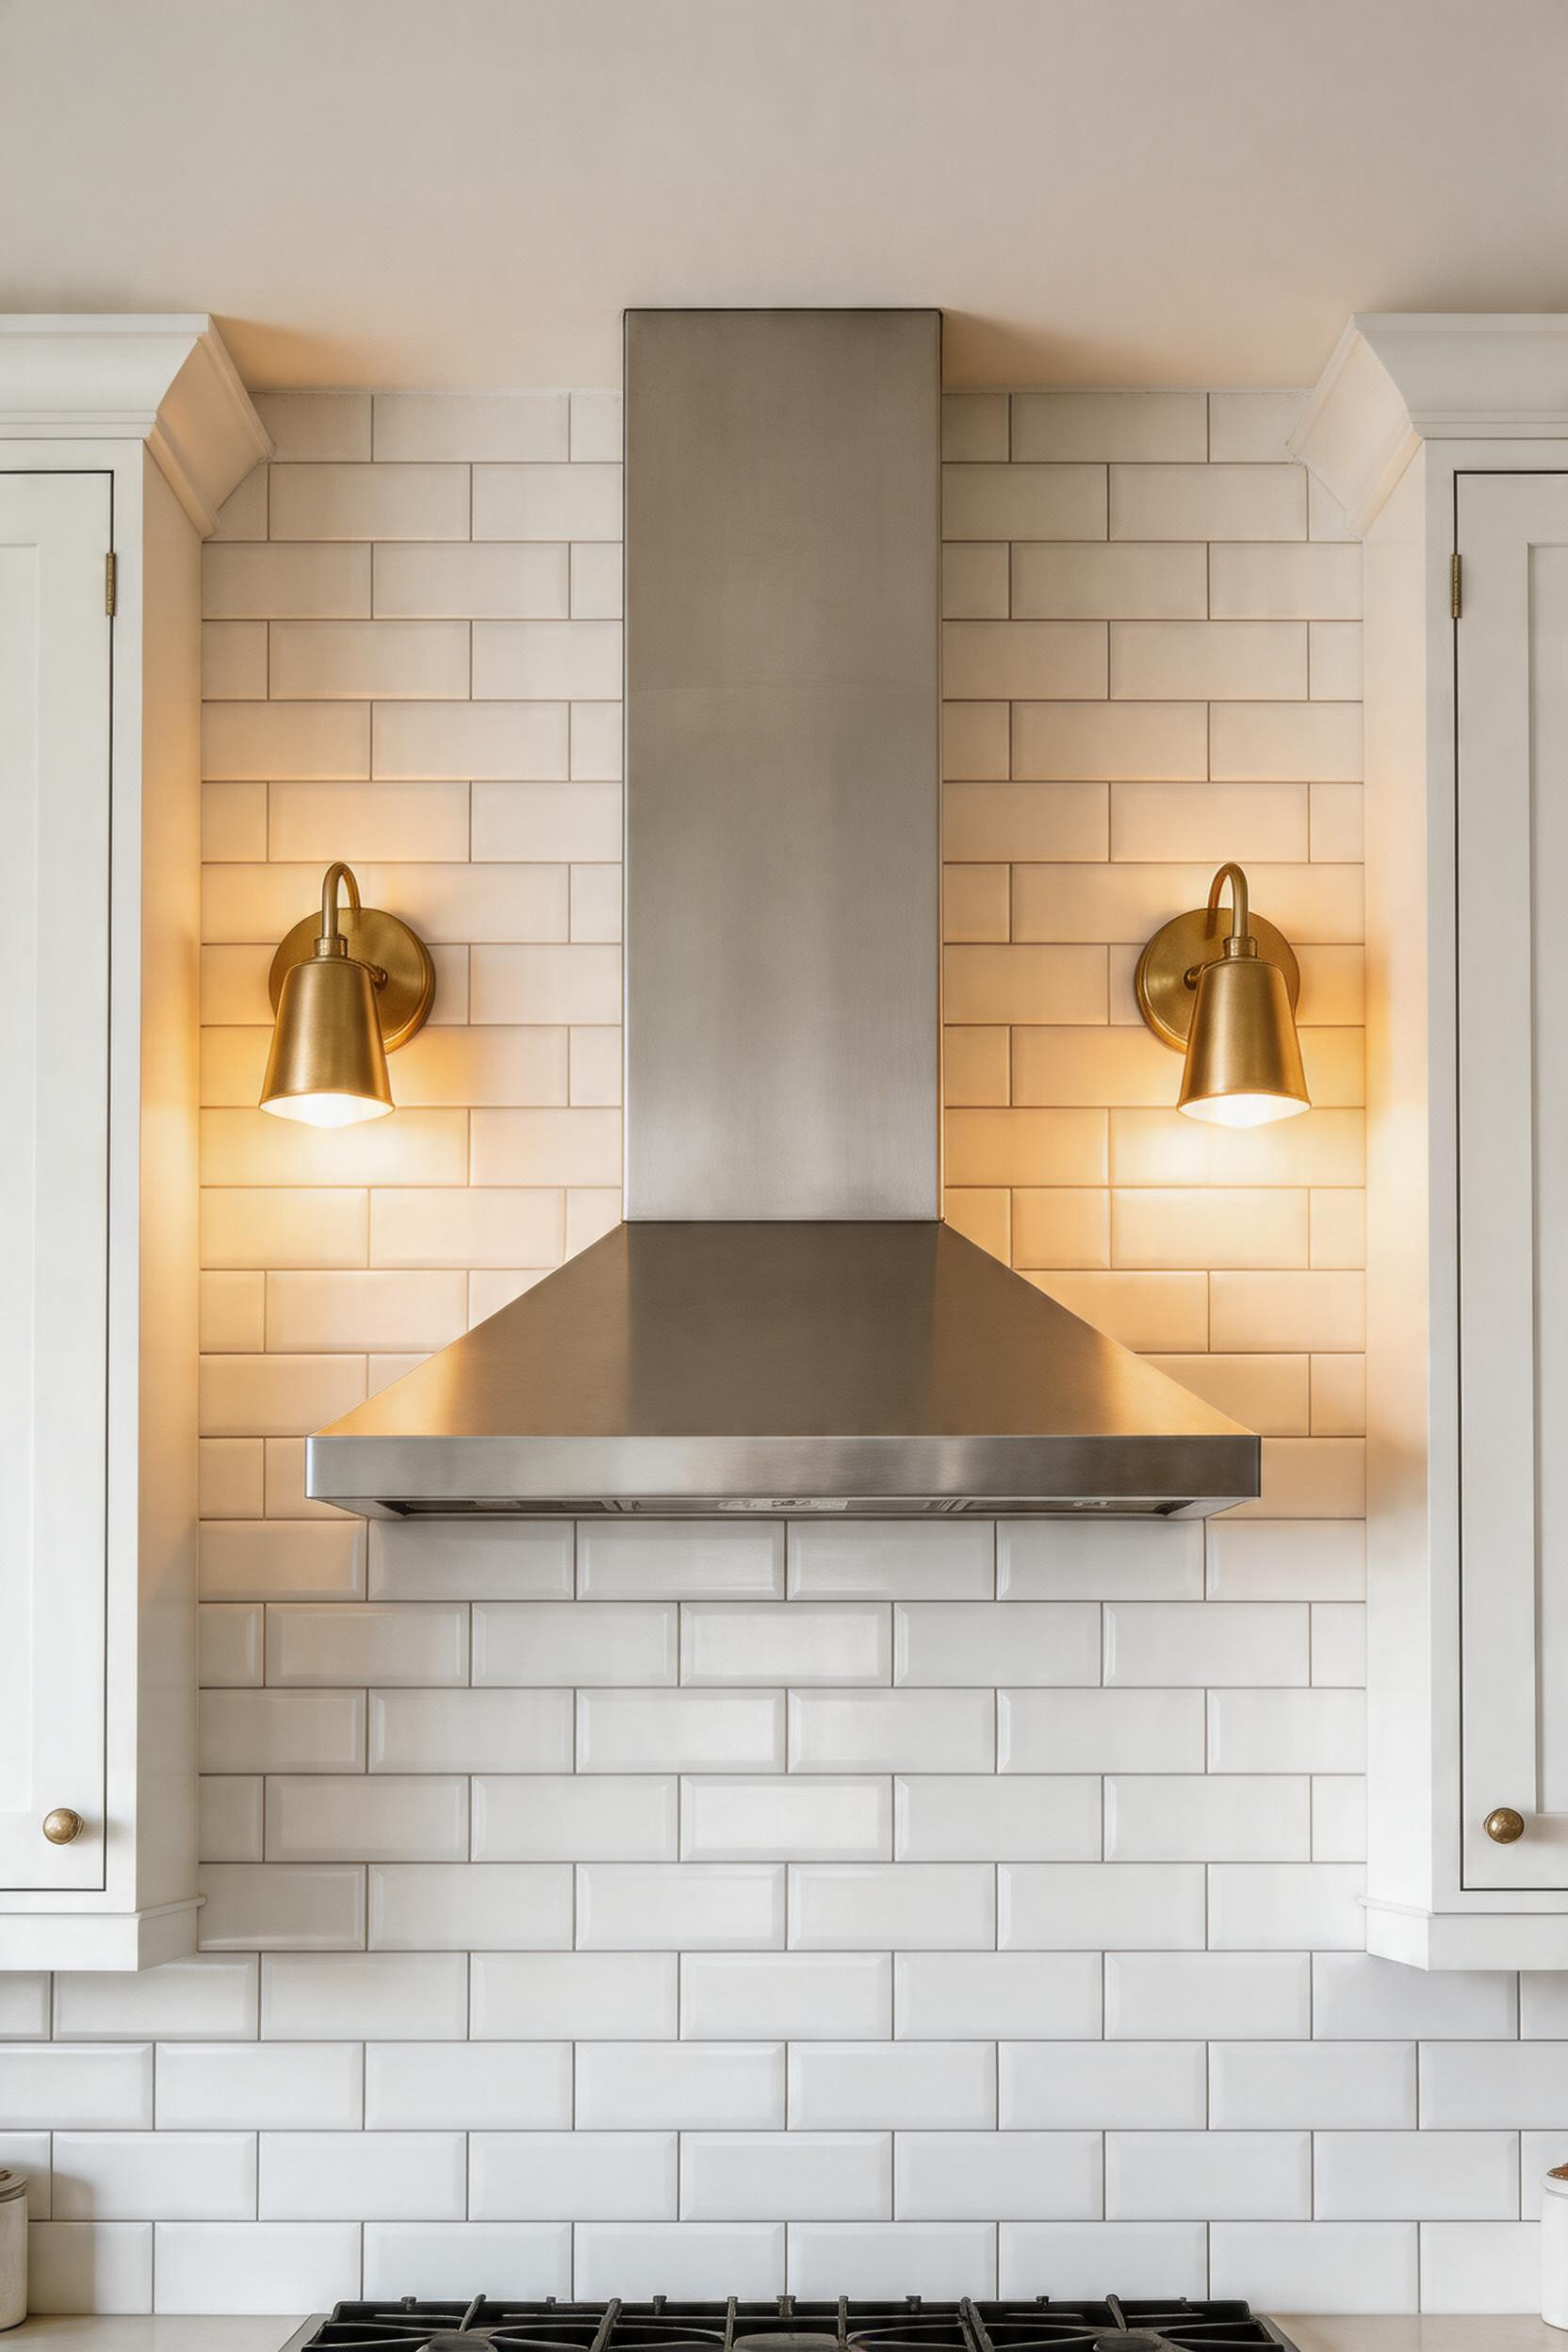
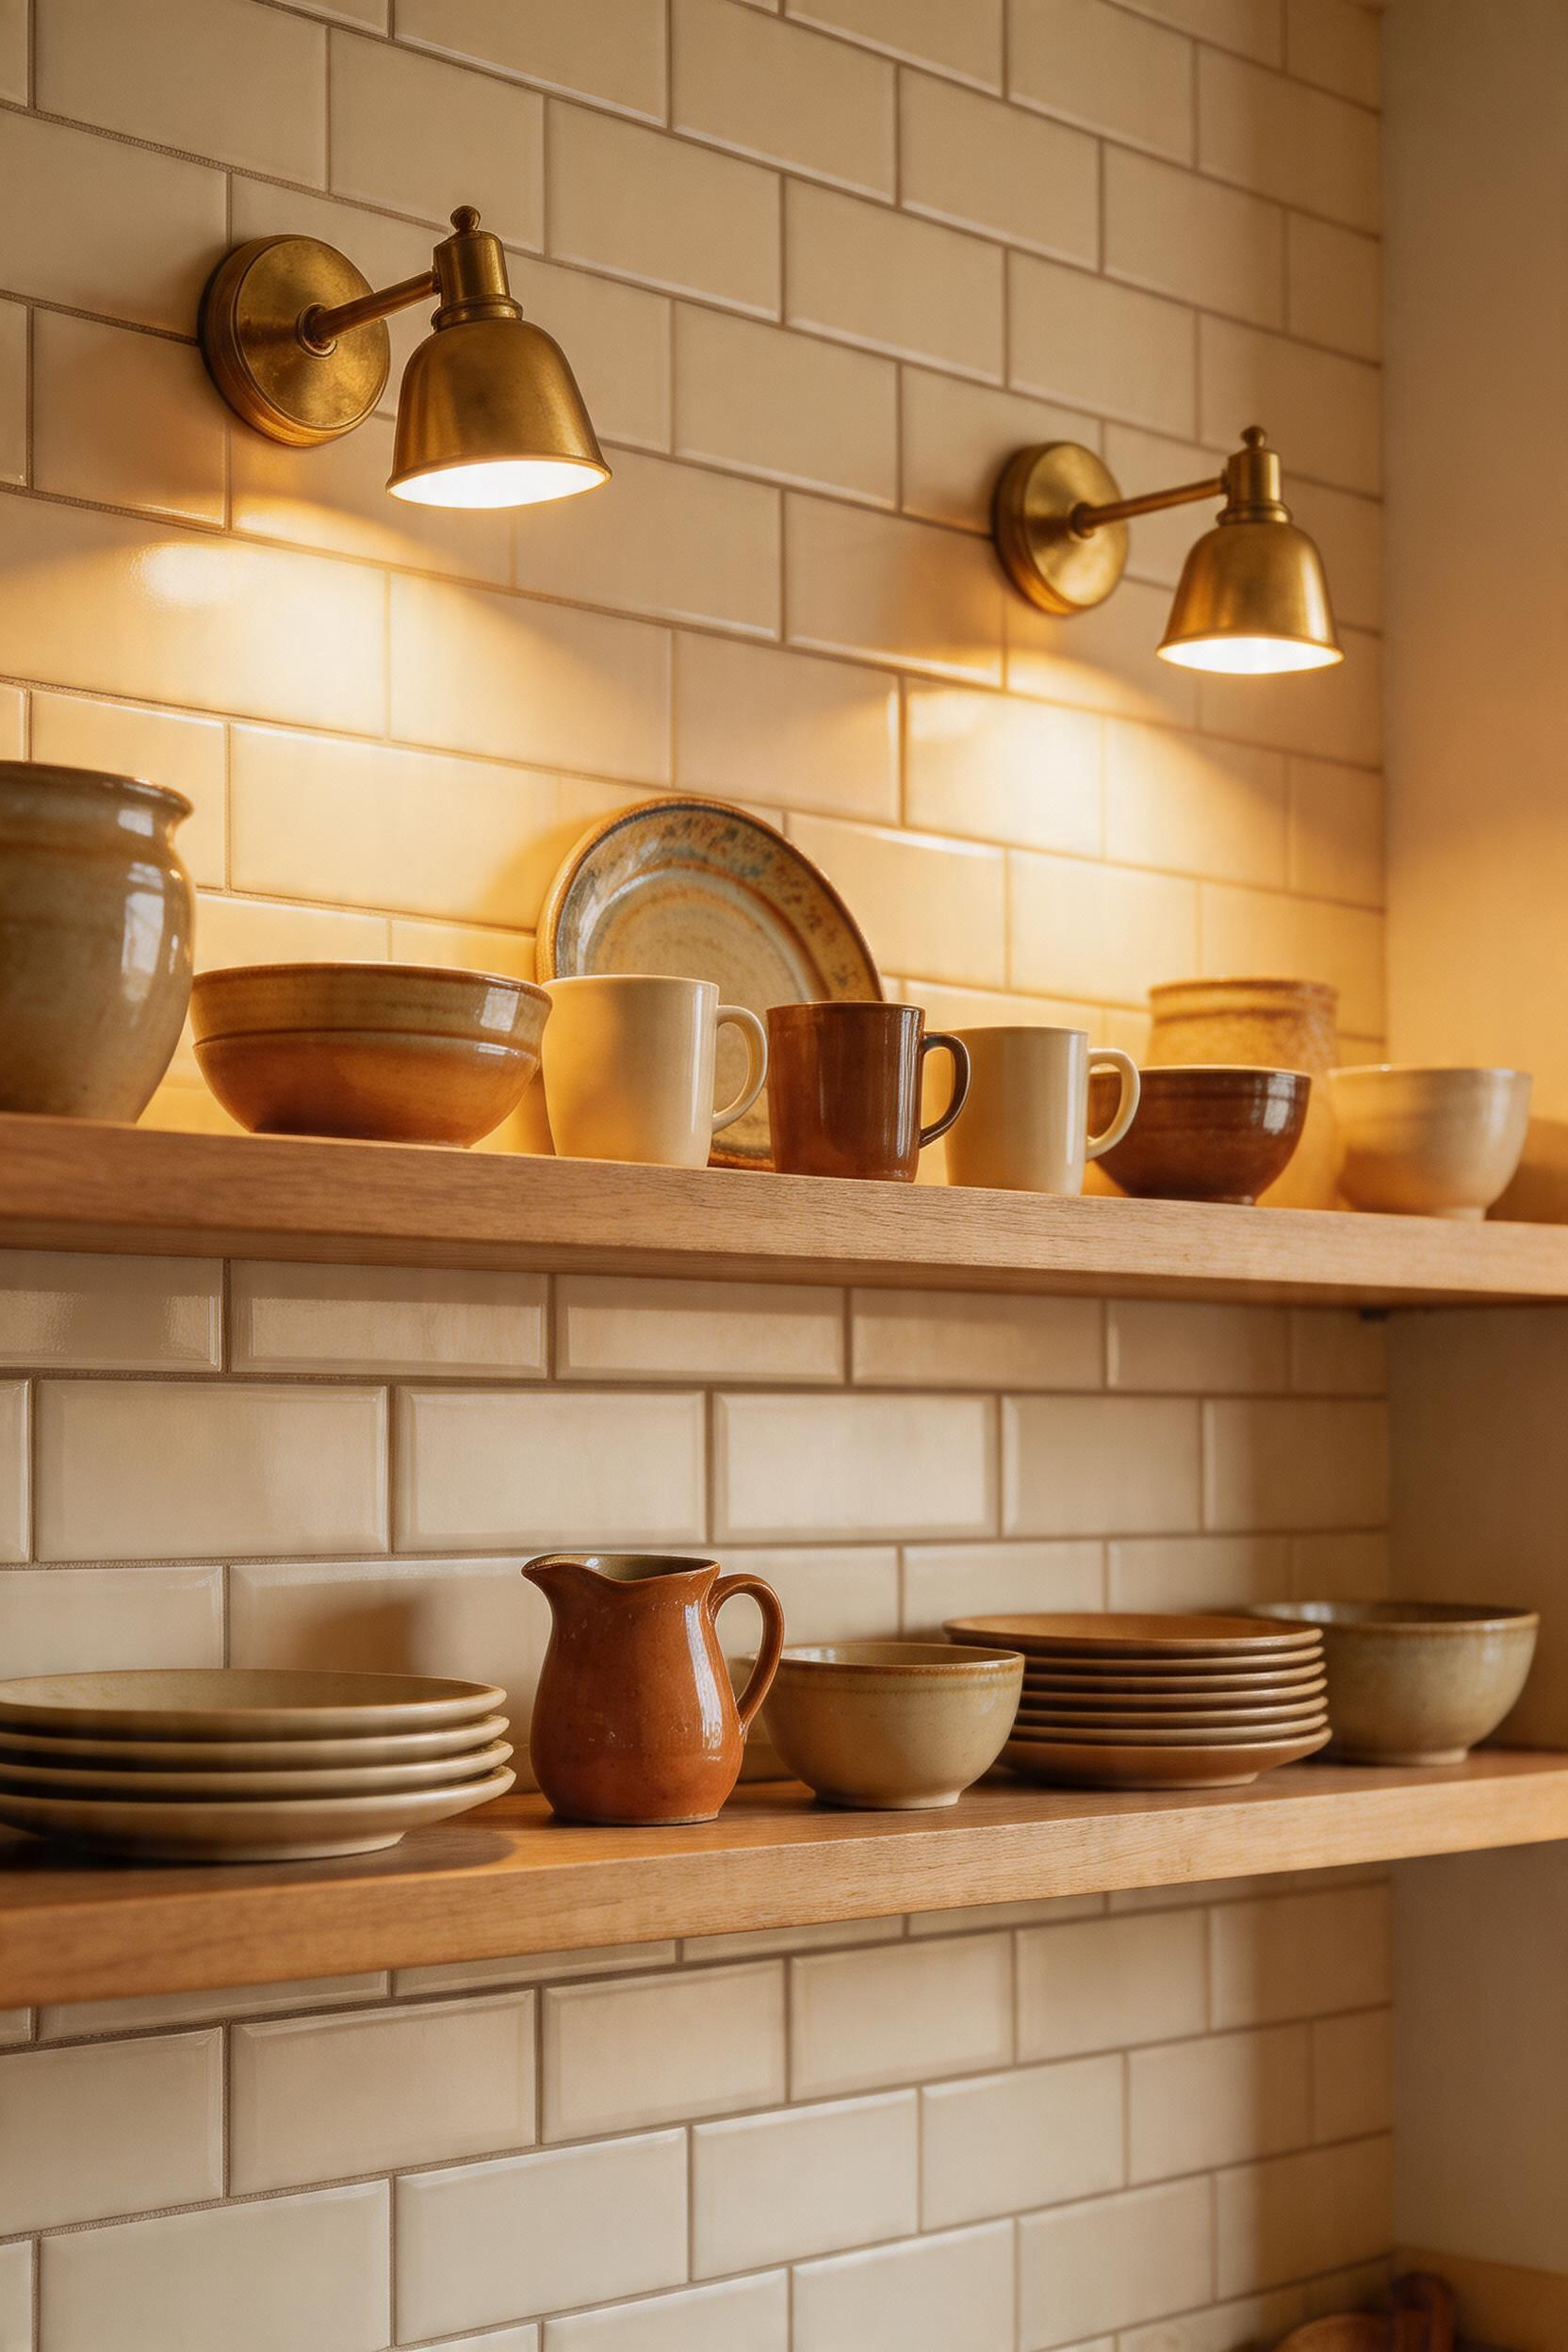
8. Wall Sconces: Kitchen Lighting Fixtures That Add Depth and Dimension
Most kitchens have one circuit controlling everything. Wall sconces break this. They create an independent layer — you can have bright task light at the counter while the overhead dims for dining.
Placement in kitchens requires more thought than in hallways or bedrooms. The most effective kitchen sconce positions are: flanking a range hood (to supplement the hood’s own downlight and eliminate side shadows during cooking), above open shelving (transforming a display area into an actual feature), or beside a kitchen window to balance the natural light source. Mount height runs 60 inches from the floor to the centre of the fixture as a starting default, adjusting for ceiling height and surrounding elements.
The installation question comes down to outlet access. Plug-in sconces are essentially zero-cost to install — you run the cord along the wall or through a cord cover and plug in. Hardwired sconces in kitchens require an electrician, but the finished result is considerably cleaner. If you’re renovating anyway, hardwire them. If you’re adding lighting to an existing kitchen, a well-designed cord cover is a reasonable compromise. Wall sconces have transformed countless kitchens from single-source overhead kitchens to layered lighting fixtures.
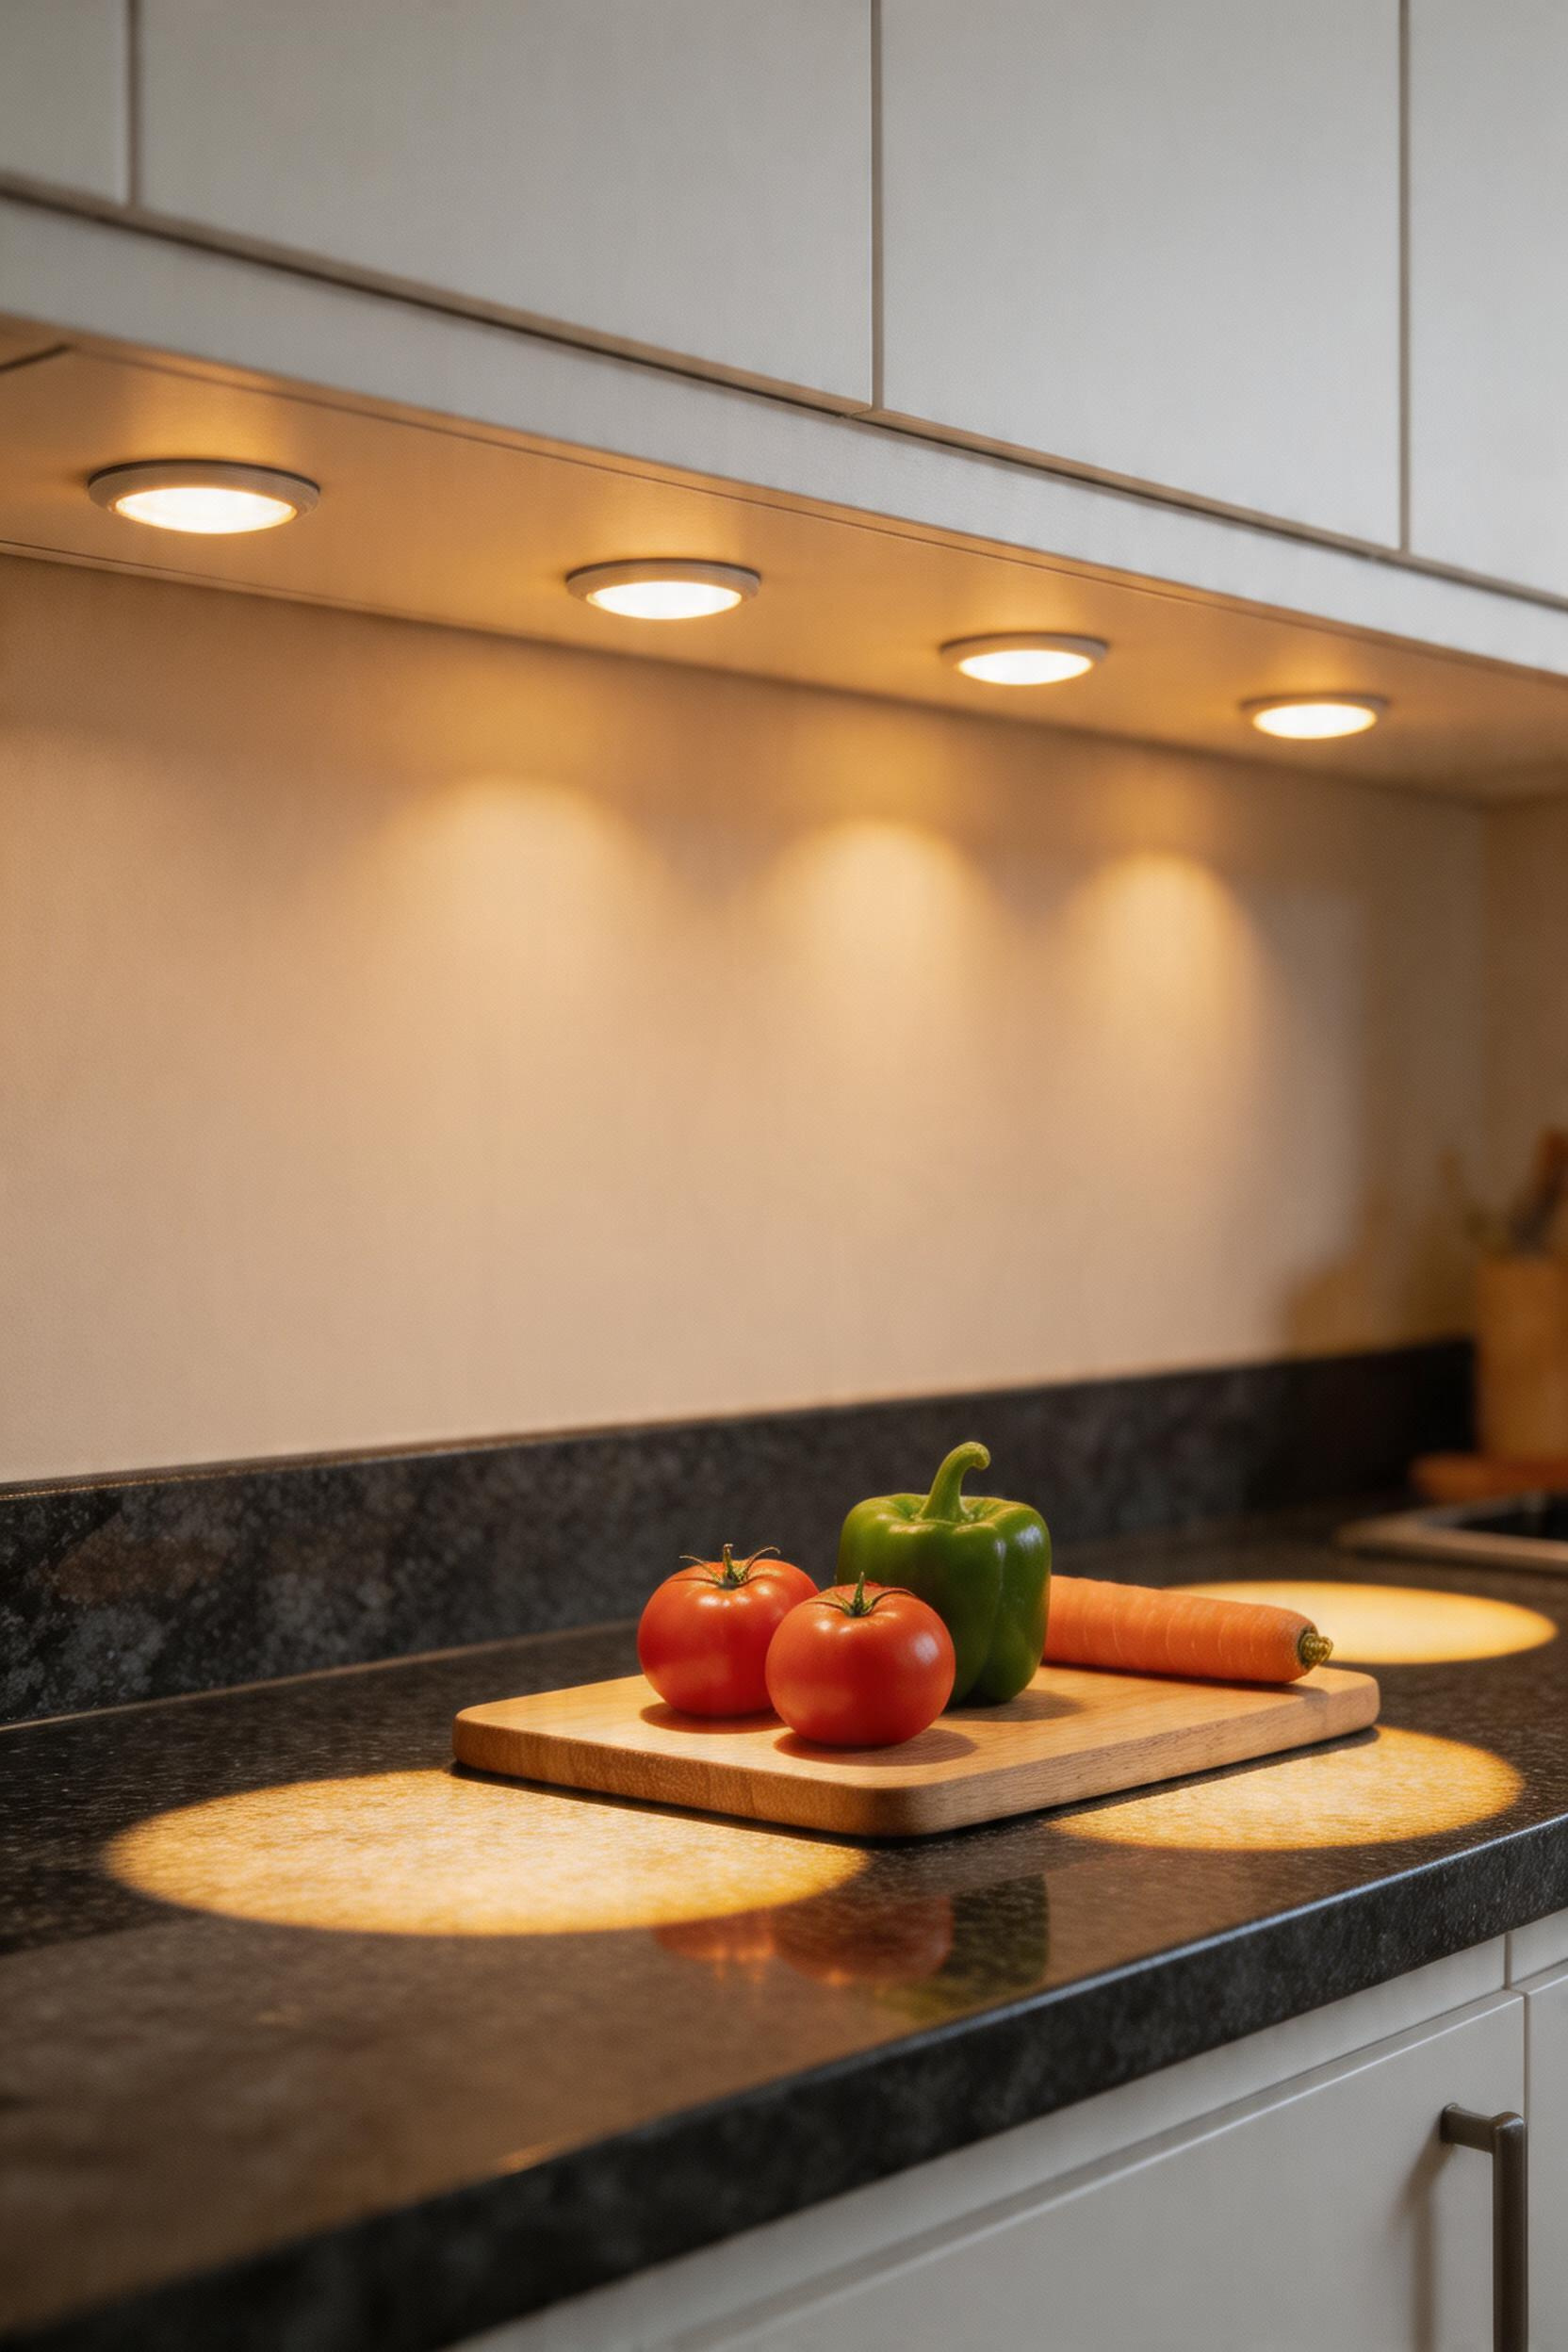
9. Under-Cabinet Puck Lights for Targeted Countertop Illumination
Puck lights are the point-source alternative to strip lights — individual round fixtures spaced along the underside of the cabinet rather than a continuous run. They’re a good option when you need specific, focused pools of light rather than even wash coverage, and they’re considerably simpler to install than hardwired strips.
Single pucks produce cone-shaped pools with sharp edges. Space more than 12 inches apart and you see dark bands (scalloping). Eight inches apart creates overlap. A 30-inch run needs four pucks minimum.
The LED vs. halogen comparison is essentially settled: LED puck lights consume 60–70% less energy, run significantly cooler (halogen pucks generate enough heat to affect items stored in nearby cabinets), and last 10–15 times longer. The only remaining argument for halogen is colour rendering in a few specialty applications — but CRI 90+ LED pucks handle that gap. The colour mismatch problem is more common than you’d think, and it’s completely avoidable. These kitchen lighting fixtures deliver precise, focused illumination for targeted task work.
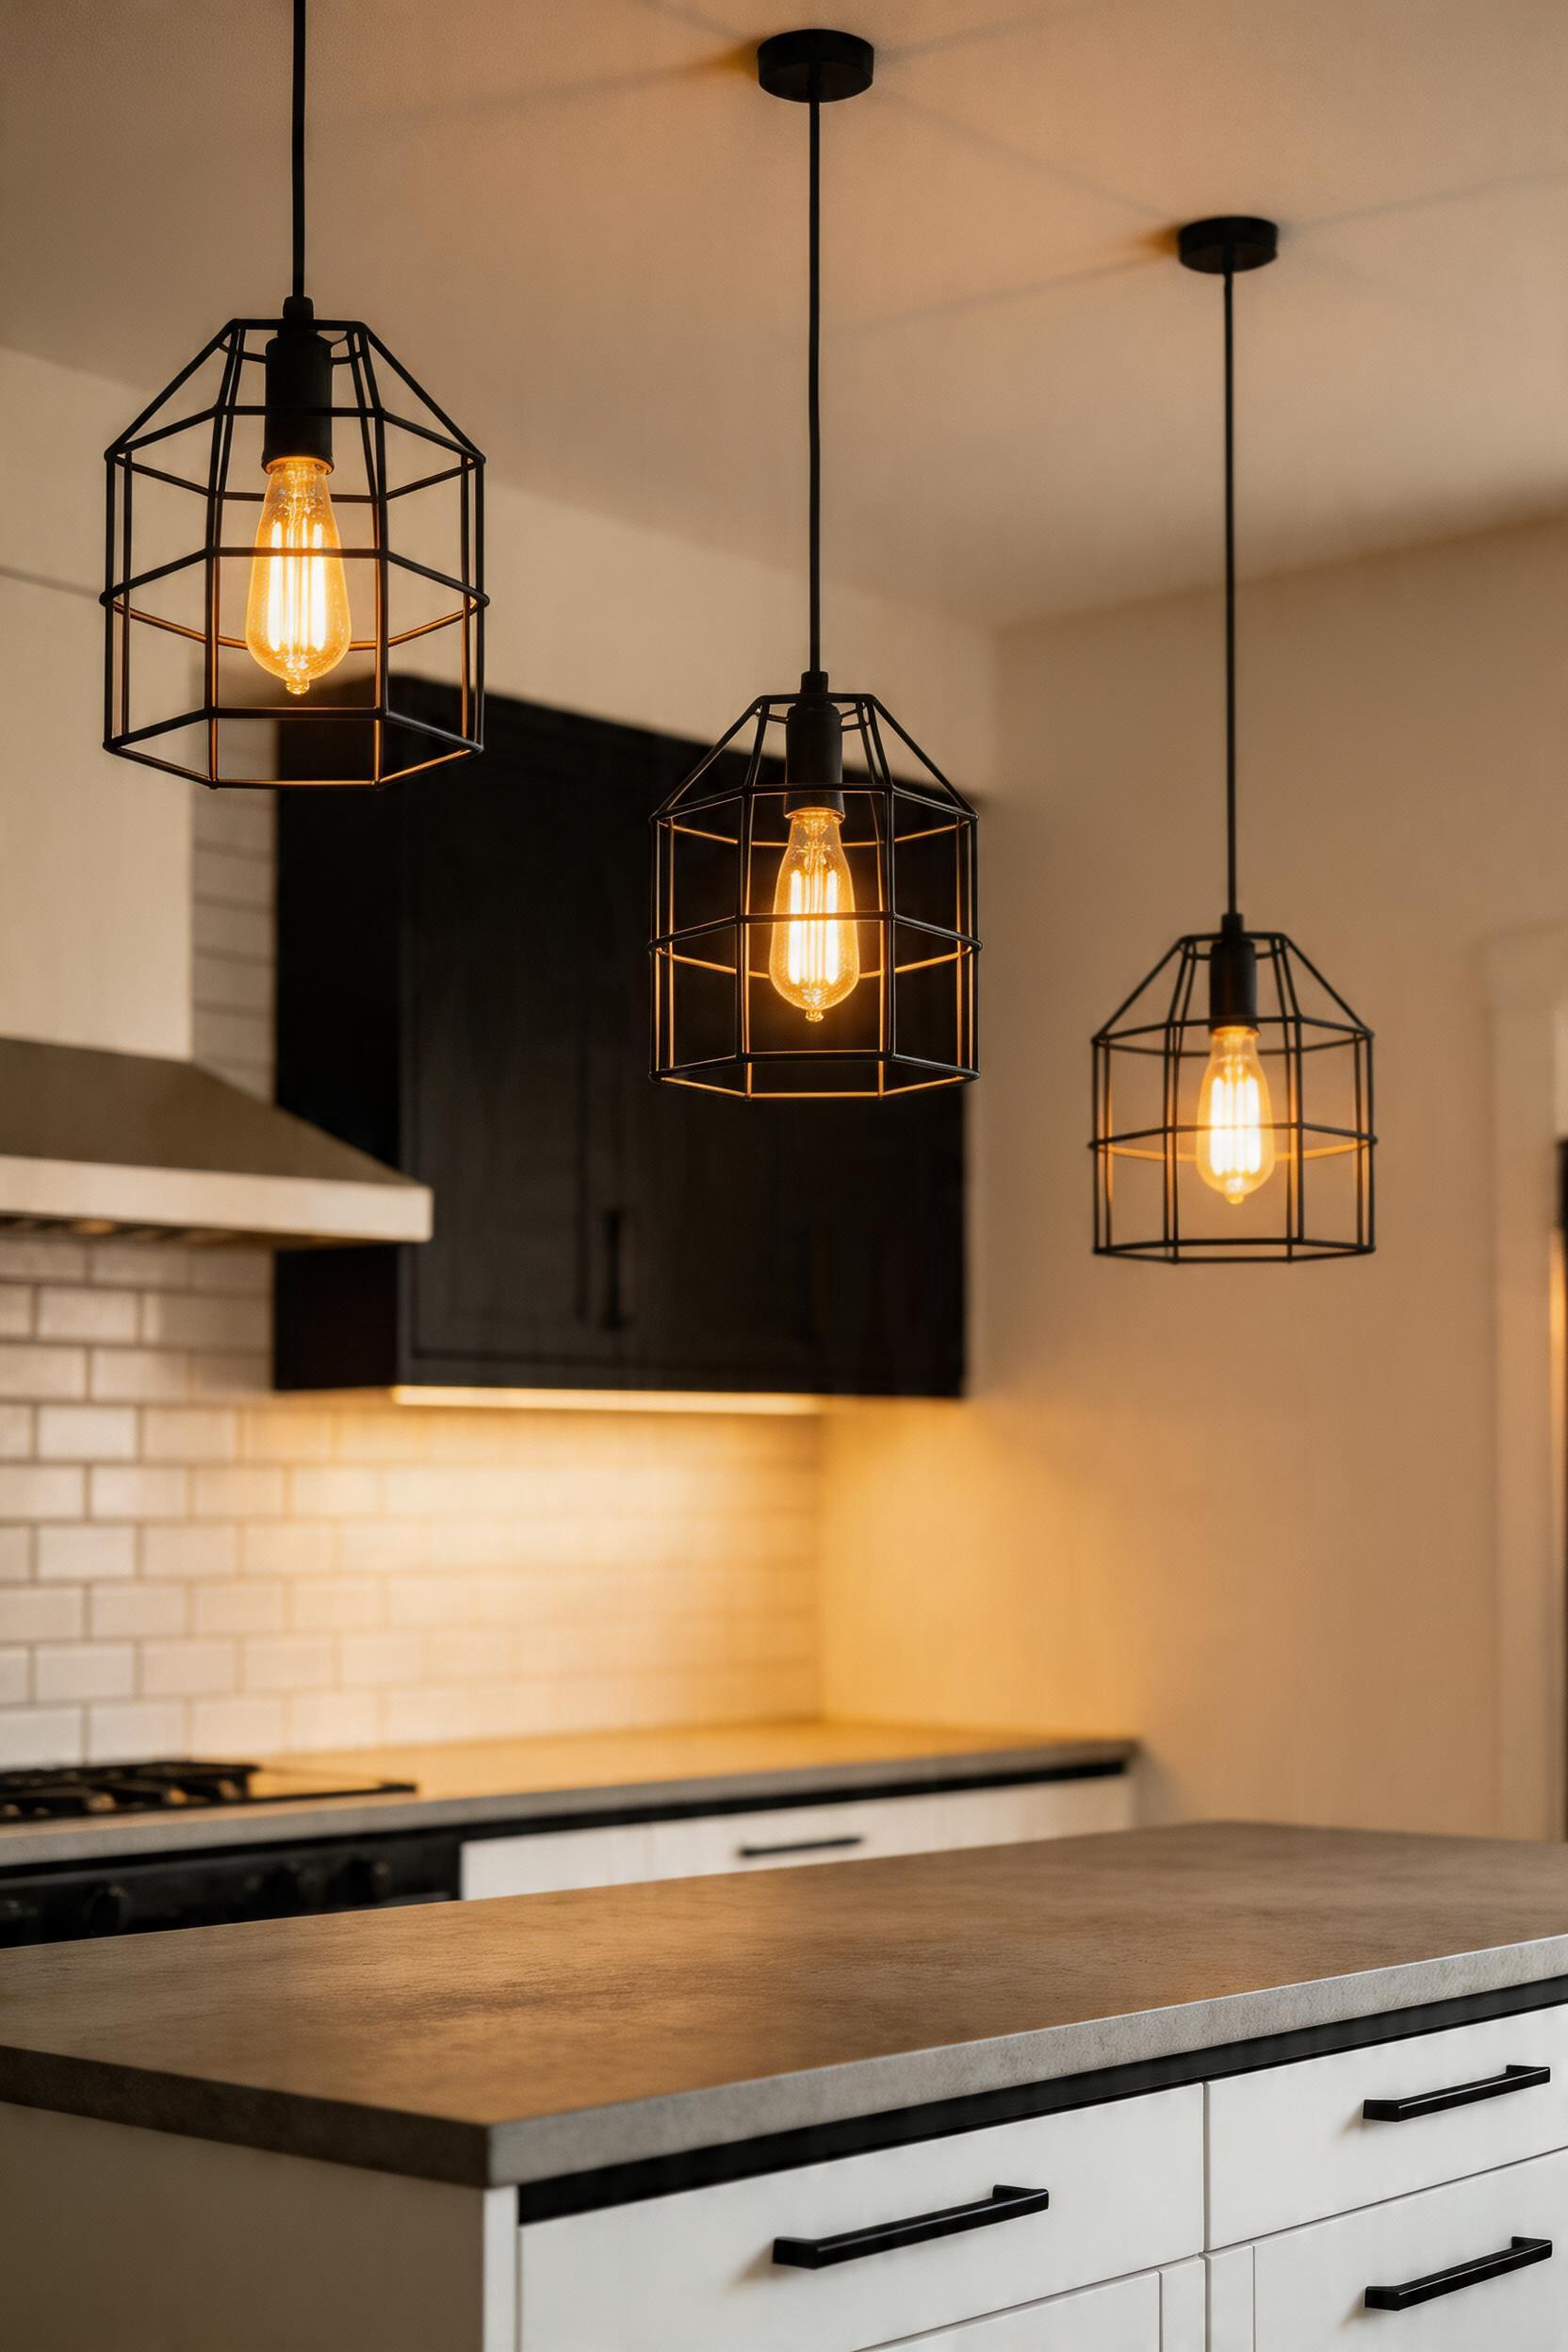
10. Industrial Cage Pendants for Bold Kitchens With Character
Cage pendants with exposed bulbs project light in all directions. In 10-foot-plus ceilings they read as dramatic. In 8-foot ceilings they feel harsh.
Large kitchens with gathering-point islands suit three cage pendants at staggered heights. Small minimal kitchens suit a single 12-inch diameter matte black pendant.
Finish selection deserves a longer look than most buyers give it. Matte black reads as industrial and pairs with concrete countertops and stainless appliances. Raw brass — not polished, which looks dated — brings warmth to a darker kitchen palette and pairs naturally with wood shelving and aged cabinet hardware. Brushed nickel cage pendants sit in the middle, cool-toned enough for contemporary kitchens without committing fully to industrial territory.
Avoid mixing cage pendants with other overly ornamental fixtures in the same space. Cage pendants need visual breathing room — they read best when the surrounding elements (cabinet hardware, range hood, faucet) stay relatively restrained.
11. Lantern-Style Pendants: Timeless Kitchen Lighting Fixtures for Farmhouse Spaces
Lantern-style pendants originated to protect gas flames. The form persists because lanterns suit farmhouse and transitional aesthetics.
Scale matters most. For kitchen islands, 14–18-inch lantern pendants work. Above sinks, 10–12 inches. Breakfast nooks under 42 inches suit 12–15 inches. Drop to 28–34-inch clearance from the surface in all cases.
Glass choice matters more than the frame. Clear glass shows the bulb clearly. Seeded glass (air bubbles) diffuses light softly. Use seeded for decorative fixtures. Amber-tinted glass adds warmth but reduces light.

12. Tunable LED Flush Mounts With Adjustable Colour Temperature
Standard LED fixtures lock you into a single colour temperature for the life of the bulb. Tunable LED fixtures give you a range — typically 2700K through 5000K — that you can adjust by time of day, task, or mood. In a kitchen that handles morning coffee, midday prep, and evening entertaining, that flexibility has real practical value.
2700K is warm, flattering but reduces task clarity. 3000K is the kitchen standard — neutral enough for accurate food colours. 4000K peaks task clarity for cooks prioritising precision.
Tunable white fixtures adjust between warm and cool. RGB colour-changing is for accent, not primary. Smart integration (Lutron, Philips Hue) enables scene programming: morning at 4000K, evening at 2700K. The smart home integration is where tunables separate from standard dimmers.
13. Globe Pendants: Adaptable Kitchen Lighting Fixtures for Contemporary Rooms
Globe pendants are default for contemporary kitchens because the spherical form adapts to statement pieces, background elements, or clusters.
Glass type determines how a globe pendant behaves in a room. Borosilicate glass (lab-grade, clear, with slightly greenish edges) gives globe pendants that clean, artisanal quality. Mouth-blown glass in opal white fully diffuses the light source into an even, shadowless glow — better for spaces where the bulb itself would be a distraction. Tinted or smoked glass adds drama but reduces light output, which means the fixture is doing more visual work than lighting work.
Three or more globes at staggered heights work over long islands (8+ feet). The cluster reads composed. Single placement asserts a focal point — right for smaller islands.
14. Drum Shade Pendants for the Softest Kitchen Lighting Fixtures in the Room
Exposed-bulb pendants project light outward with the source always visible. Drum shades wrap the light, directing it downward while softening output. The result is less glare and more comfortable light.
Linen and cotton absorb kitchen grease and are hard to clean. Metal shades are wipe-clean but read industrial. Glass splits the difference: cleanable, durable, diffuses light well.
Drop height for drum shade pendants follows the same rules as other pendants but deserves extra attention at bar height. Over a 42-inch breakfast bar, drop the pendant to 24–28 inches of clearance from the surface. Over a 30-inch dining table in an eat-in kitchen, 28–34 inches is standard. Going above these clearances lets the pendant drift visually upward and lose its connection to the surface; going below puts the shade in sightline from across the table. The pendant lighting placement rule applies universally regardless of shade type.
15. Picture Light and Display Shelf Fixtures for Kitchen Accent Lighting
Accent lighting is the layer most homeowners skip. Ambient and task handle function; accent handles depth. Use it to highlight backsplash, shelving, or art.
The tool for shelf accent work is either a dedicated picture light or a discreet LED strip tucked behind the front edge of the shelf. Picture lights give directional beam control — their adjustable heads let you target specific items on the shelf rather than washing the whole surface uniformly. Beam angle is the key spec: 8–15 degrees is a narrow spot for a single focal object; 25–40 degrees is a medium flood for a shelf run; 60 degrees produces a wide wash that approximates LED strip output. For a tile backsplash, grazing light from a strip at counter level (angled back toward the wall at roughly 30 degrees) brings out the texture of the tile in a way that overhead lighting completely misses.
Accent lighting earns its place as the third leg of the three-layer lighting model. Kitchen ambient, task, and accent layers working together create a space that can perform at full brightness for prep work and dial back to atmosphere for entertaining — a range no single kitchen lighting fixture type can provide alone.
16. Layered Lighting Plans That Combine Kitchen Lighting Fixtures for Maximum Effect
Every kitchen lighting problem I’ve diagnosed has the same root cause: the kitchen was designed with a single lighting type and expected it to do the work of three. Recessed lights alone make kitchens feel like waiting rooms. A statement pendant with no under-cabinet support looks dramatic and fails functionally. A great task lighting setup with no dimming capability means you’re stuck at 100% brightness while you’re trying to eat dinner.
The three-layer model — ambient, task, and accent — solves this systematically. Ambient light (30–40 lumens per square foot) provides the baseline. Task light (70–80 lumens per square foot at the work surface) handles food prep, reading recipes, and dishwashing. Accent light (5–20 lumens per square foot, directional) creates depth and visual interest. Each layer operates on its own control, which is what gives you the range from bright-work kitchen to atmospheric dining space without changing a single bulb.
Zone Mapping Before You Buy
Zone mapping before you buy anything is the step that prevents expensive mistakes. Stand in the kitchen and identify every functional zone: the primary prep counter, the cooking surface, the sink, the island (prep vs. dining side), and any display areas. Map what each zone needs in terms of light intensity and control. A zone that handles both food prep and casual dining needs dimming capability. A zone that’s purely functional doesn’t. This map tells you what fixture types you need and how many circuits — before a single fixture is purchased.
The most common layered lighting mistakes designers fix in existing kitchens: not enough recessed cans to provide even ambient coverage, under-cabinet lighting on the same switch as the overhead (so you can’t control them independently), and pendant lights that are the visual focus of the room but provide almost no usable light. Each of these is a planning failure, not a fixture failure. This is the upgrade I’d start with before anything else.
Choosing the Right Kitchen Lighting Fixtures for Your Home
Start with an honest audit of what you have and what’s missing. Stand in your kitchen at night with only your current overhead lighting on. Where are the shadows? Where does the counter feel dim? Is the space comfortable to cook in, or does it feel institutional and flat? These specific observations tell you which layer — ambient, task, or accent — is most underserved, and that’s where to invest first.
For most kitchens, under-cabinet task lighting delivers the highest functional return for the investment. It’s the layer homeowners most consistently lack, and the one that makes the most immediate difference to daily use. Start there, set it on its own switch, and live with the improvement for a few weeks before tackling the next layer. The installation is genuinely simple — I’ve seen homeowners finish it in 90 minutes.
The order matters because each layer changes how the others read. Adding under-cabinet strips often reveals that the ambient light you thought was fine is actually too dim — the task layer sets a new standard. Accent lighting added after both ambient and task are dialled in shows you exactly what’s worth highlighting and what isn’t, which prevents wasted fixtures.
Good kitchen lighting fixtures aren’t individually expensive — it’s the combination and the planning that most people shortchange. A well-designed layered system built from modest fixtures will outperform an expensive single-source system every time.