Can we talk about something that drives me absolutely bonkers? It’s when I see these gorgeous, magazine-worthy vintage bathroom remodels that have completely forgotten about the most important family members: our pets. You see a slick, beautiful floor that’s a deathtrap for an old dog’s hips, or a stunning clawfoot tub that’s totally inaccessible for bathing a muddy golden retriever. It’s like designing a family kitchen without thinking about kids. Our animals are family, and their safety, comfort, and happiness should be woven into the very fabric of our homes, not tacked on as an afterthought.
So, when my friend asked for my take on this, I knew I had to set the record straight. You don’t have to choose between a chic, historically-inspired bathroom and a safe, functional space for your furry, feathery, or scaly companions. In fact, when you design with them in mind, the result is always warmer, more thoughtful, and filled with more love. Let’s walk through how to create a stunning vintage bathroom that works for everyone on two legs and four.
Laying the Foundation: Essential Planning & Assessment for Your Vintage Vision (Part 1)
Before you pick out a single tile or swoon over a pedestal sink, we need to do the groundwork. This is the part that isn’t glamorous, but I promise it saves you headaches, heartache, and a whole lot of money down the line. It’s about getting clear on your vision, your budget, and the reality of the space you’re working with, all through the lens of a loving pet parent.
1. Define Your Era
First things first, what “vintage” are we talking about? The opulent, detailed look of the Victorian era? The clean, geometric lines of Art Deco? The pastel-and-chrome fun of Mid-Century Modern? Each era has its own distinct personality, and picking one will keep your design from looking like a cluttered antique shop. I have a client with a boisterous Labrador, and we steered clear of a super-ornate Victorian design because we knew his happy tail would knock delicate decor off every surface.
But beyond just aesthetics, think about your pets. Art Deco and Mid-Century designs often feature smoother lines and less fussy details, which can be easier to clean (hello, shedding season!) and less tempting for a teething puppy to chew on. Your goal is to create a cohesive story, and that story should include a happy ending for your pets.
2. Master Your Budget
Let’s get real about money. A vintage remodel can get expensive, especially when you’re hunting for authentic pieces. It’s so easy to blow your budget on a stunning clawfoot tub and forget you still need plumbing, tile, and labor. Write everything down—every single fixture, every can of paint, and a big, fat 20% contingency fund for the inevitable surprises hiding in your walls.
And when you’re making that list, add a line item for “pet-friendly upgrades.” This is where the magic happens. Maybe it’s budgeting for non-slip, heated flooring to soothe your arthritic cat’s joints. Or perhaps it’s splurging on a durable, scratch-proof vanity countertop instead of porous marble that could be stained by muddy paws. I learned this the hard way after my rescue, Barnaby, decided a vintage wicker hamper was his personal chew toy. Now, I always budget for beautiful and indestructible accessories.
3. Assess Current Conditions
I know you’re excited to start demolition, but please, please have a professional look at what’s going on behind your walls and under your floors first. Older homes are notorious for hiding secrets like outdated plumbing, decaying floor joists, or my personal nemesis—mold. From my vet tech days, I can tell you that hidden mold and mildew can be seriously harmful to a pet’s respiratory system, which is far more sensitive than ours.
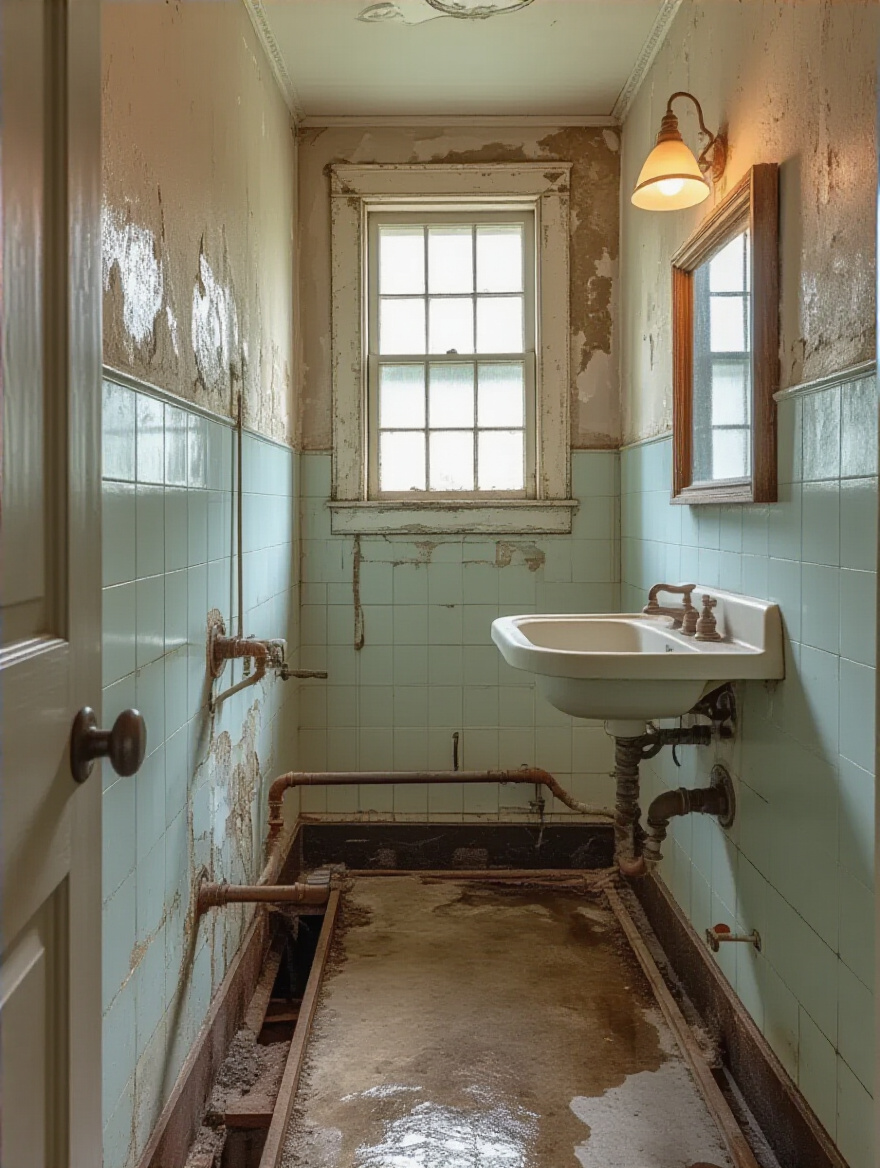
Have a plumber and a structural engineer do a thorough inspection. Are the floor joists strong enough to support that 400-pound cast-iron tub you have your eye on? Is there any sign of water damage or pests? Identifying these problems early is the difference between a small, planned expense and a budget-destroying emergency that brings your project to a screeching halt.
4. Research Period Materials
This is the fun part of the research! Dive deep into the materials of your chosen era. Was it all about classic subway tile and polished nickel, or terrazzo floors and warm wood tones? Sourcing these materials is a treasure hunt. Check out architectural salvage yards—they’re goldmines for authentic old doors, sinks, and hardware with a story to tell.
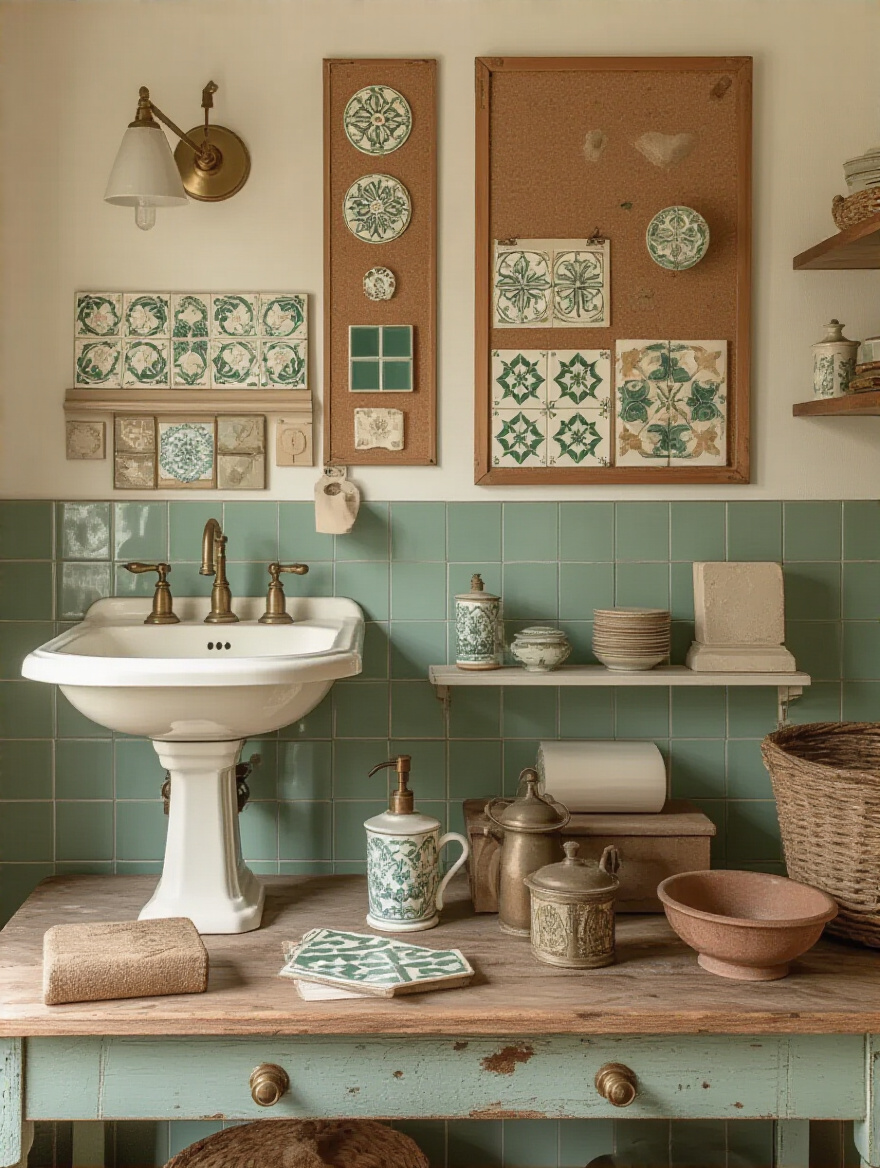
But while you’re hunting, put on your vet tech hat. Some vintage materials just aren’t practical for pets. Porous stone like unsealed marble can stain easily and harbor bacteria. I once had a client who loved the look of an antique reclaimed wood floor, but her cat had a habit of missing the litter box. We opted for a high-quality wood-look porcelain tile instead. It gave her the same warm, rustic vibe but was non-porous, waterproof, and a breeze to disinfect.
Laying the Foundation: Essential Planning & Assessment for Your Vintage Vision (Part 2)
Okay, you’ve done your homework. You know your era, your budget, and the bones of your bathroom. Now it’s time to take all those ideas swirling around in your head and turn them into a concrete, visual plan. This is how we ensure the final room is as beautiful in reality as it is in your imagination.
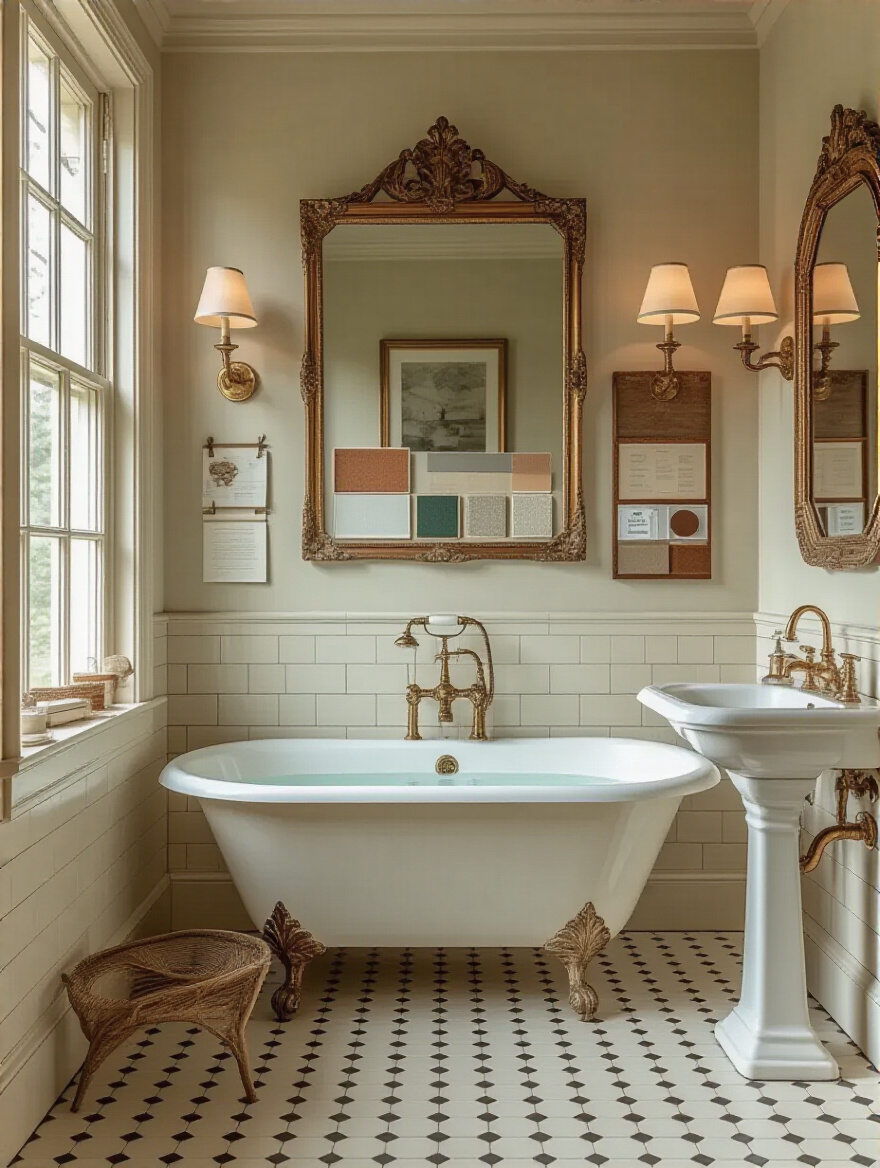
5. Create a Mood Board
I used to think mood boards were just for professional designers. I was wrong. A mood board is your single most important tool for creating a cohesive look. It’s your visual roadmap. Whether you use Pinterest or a physical corkboard, gather images of everything: tile patterns, paint colors, fixtures, lighting, and even the textures of towels you like.
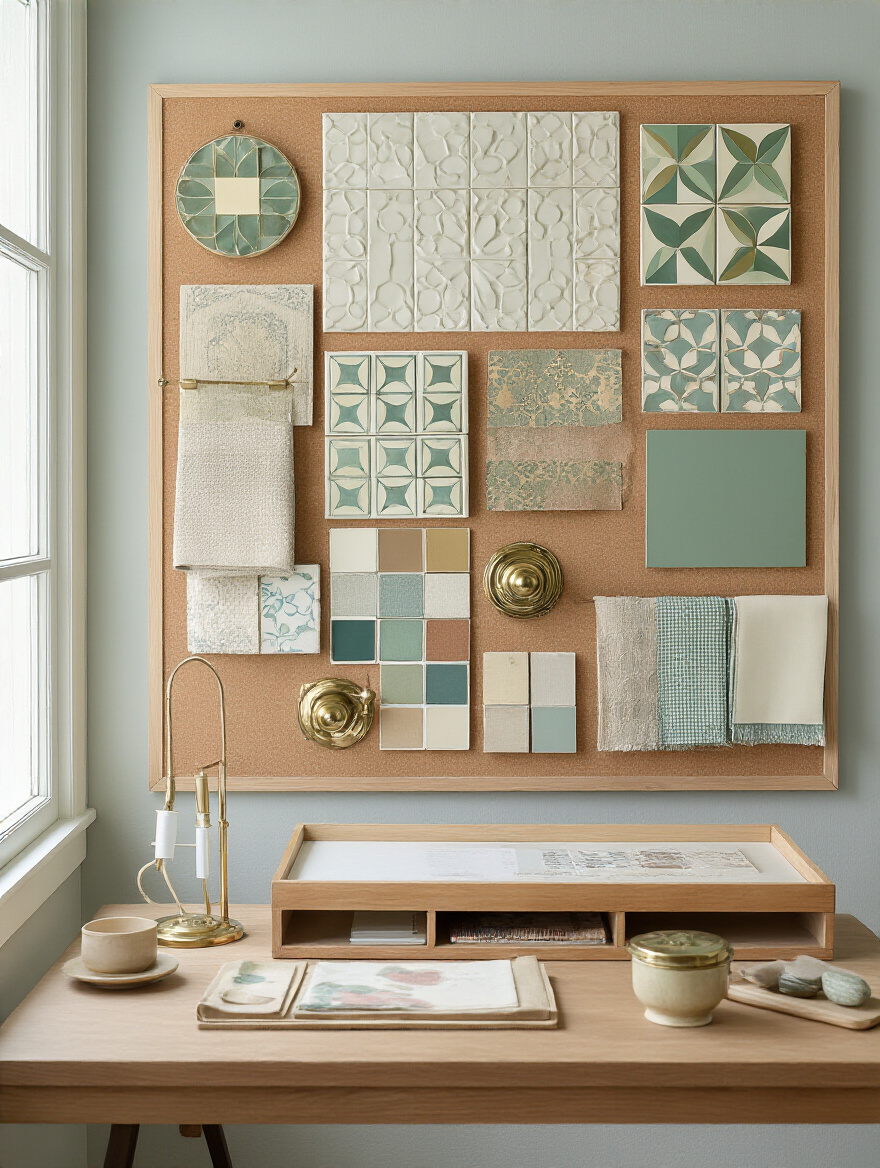
And here’s my pro-Piper tip: add pictures of your pets to the mood board. Put a photo of your golden retriever next to that white hex tile. Will her dark fur be a constant battle? Is that deep gray grout going to hide dirt or just look dirty? Seeing all the elements together—including your furry family members—helps you visualize the space as a whole, ensuring it’s a harmonious home for everyone.
Bringing it to Life: Key Selections & Installation for Period Accuracy (Part 1)
With a solid plan in hand, we can finally start shopping. This stage is all about selecting the big, foundational pieces that will define your vintage bathroom. These are the anchors of your design, and getting them right is crucial for both historical accuracy and everyday pet-friendly living.
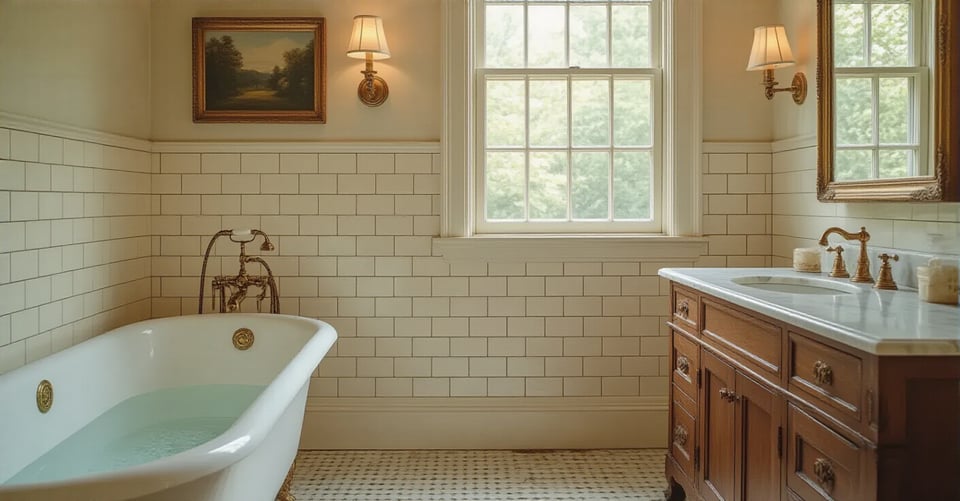
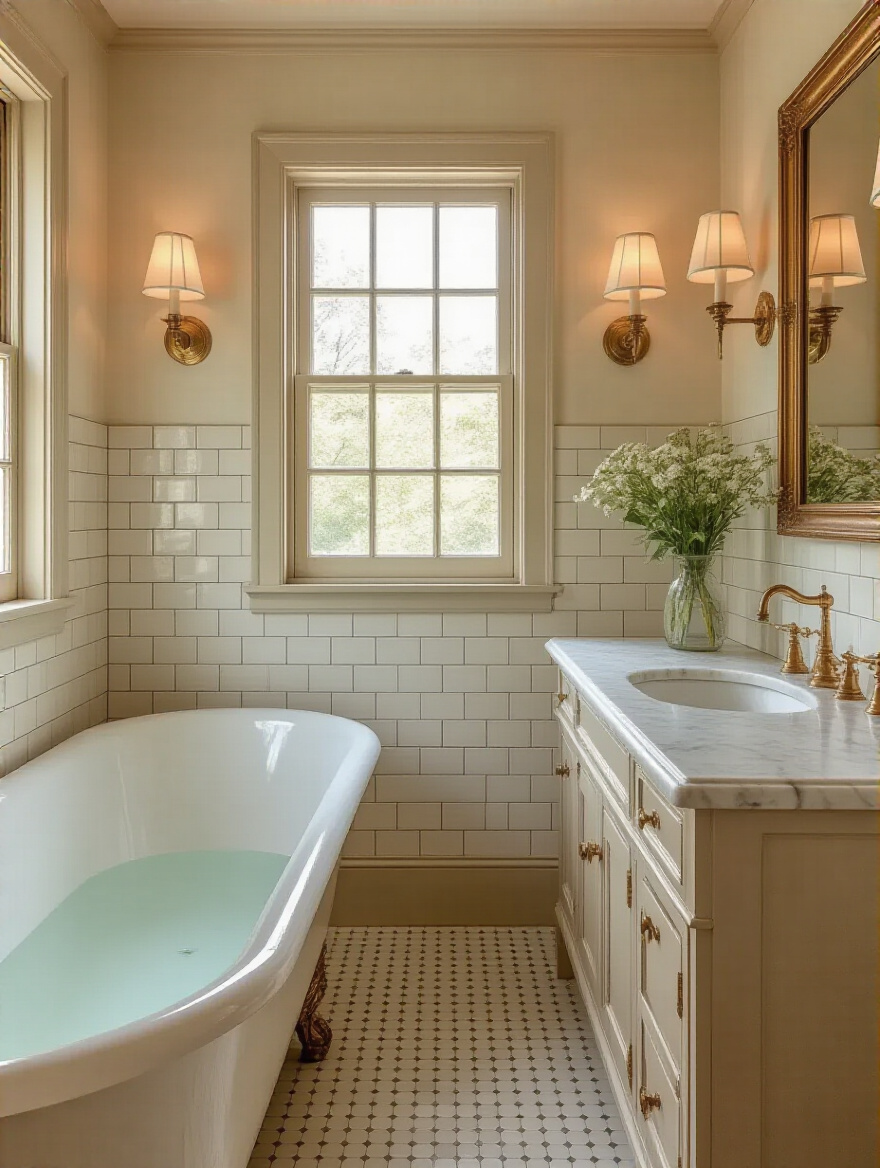
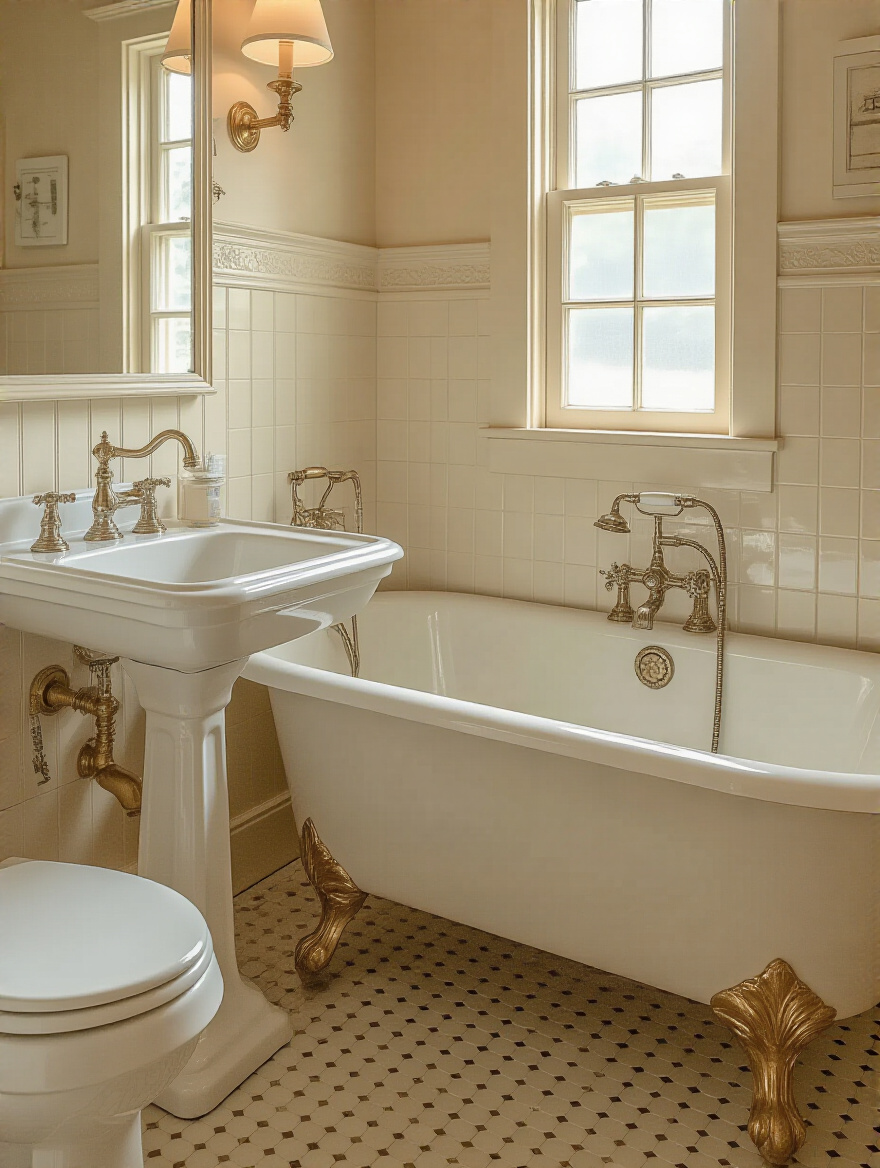
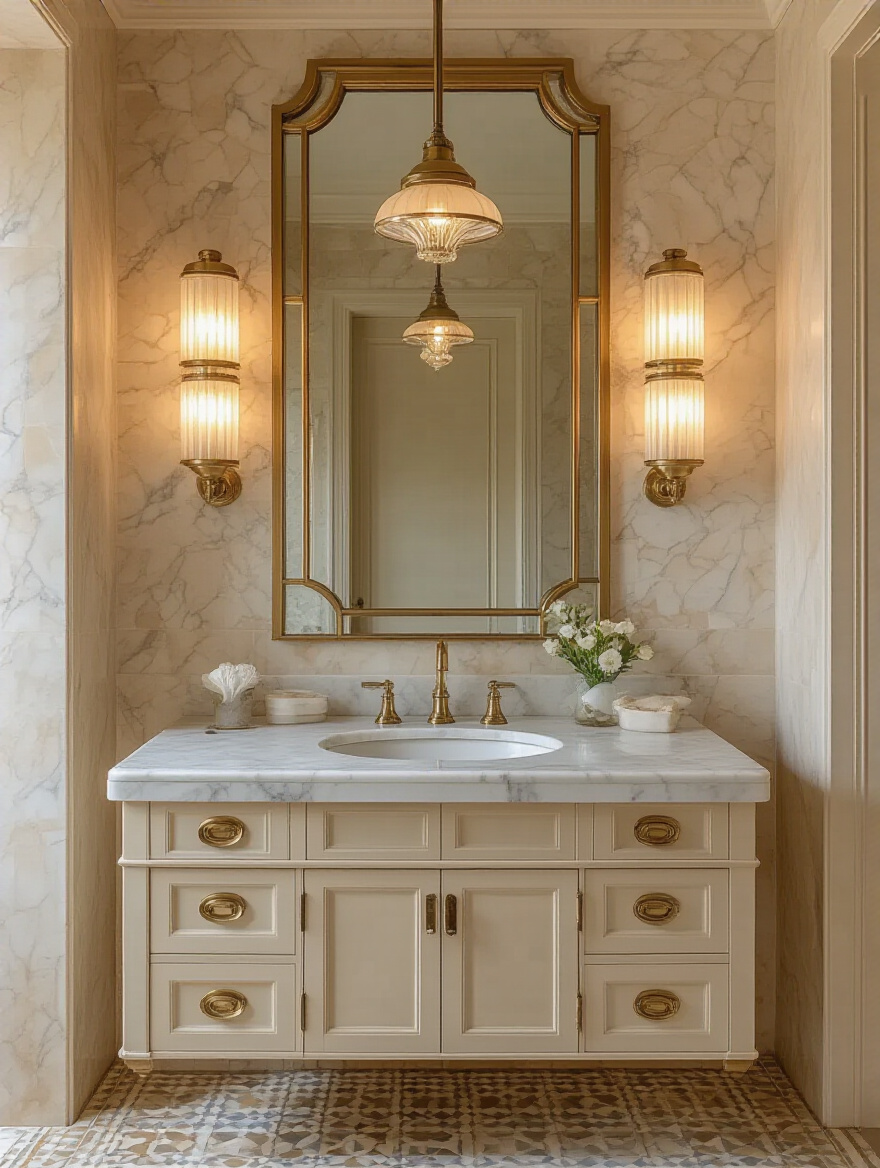
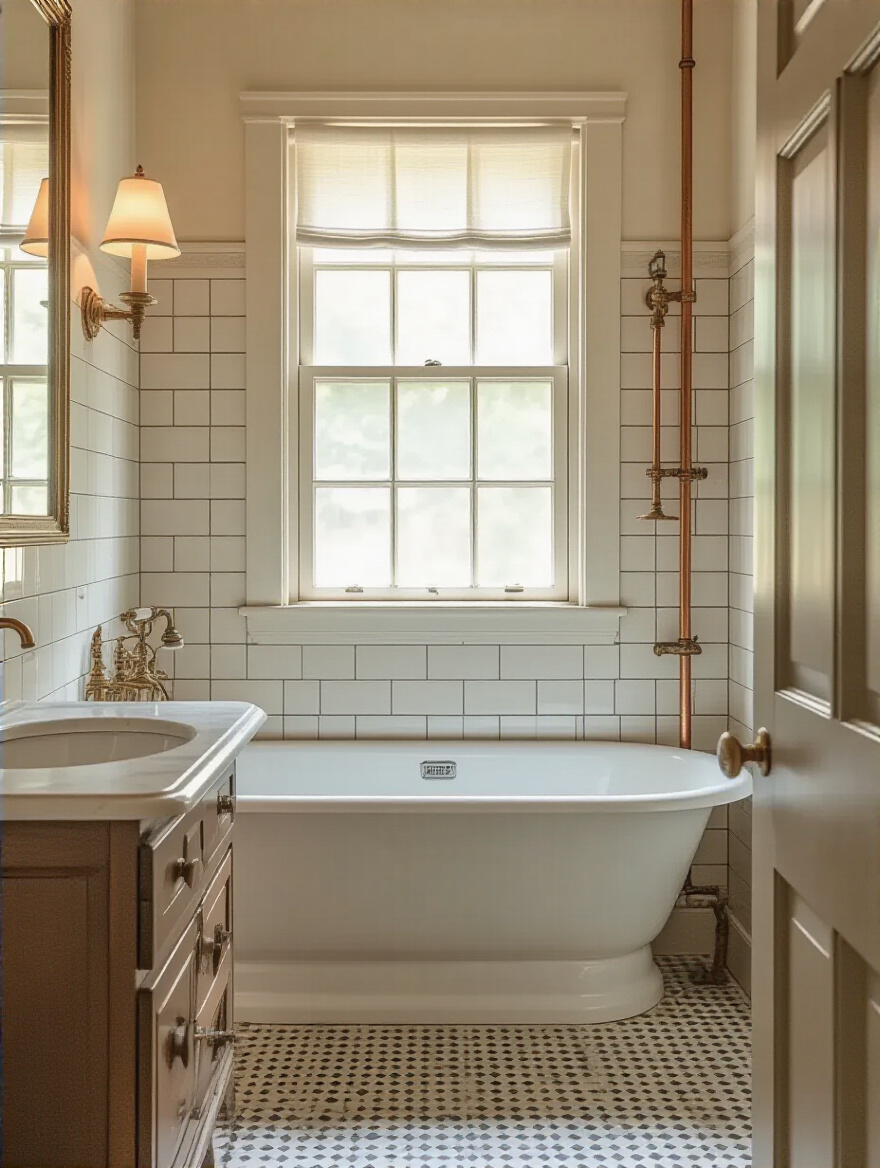
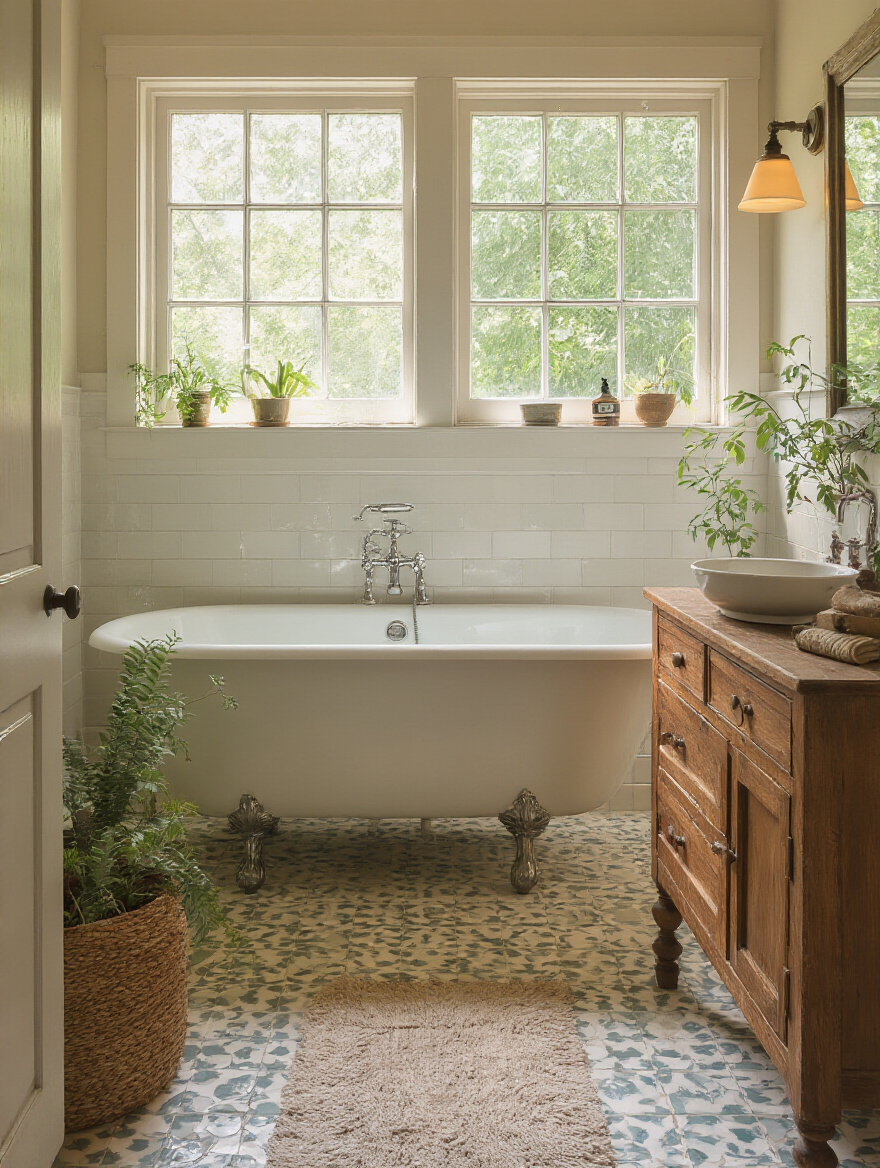
6. Choose Timeless Flooring
Your bathroom floor is the biggest surface, so it has a massive impact on the vintage feel. Classics like black-and-white checkerboard, tiny hexagon tiles, or intricate basketweave patterns are always winners. They are timeless and instantly signal a specific era. And please, use dark grout! It’s period-accurate and a lifesaver for hiding dirt.
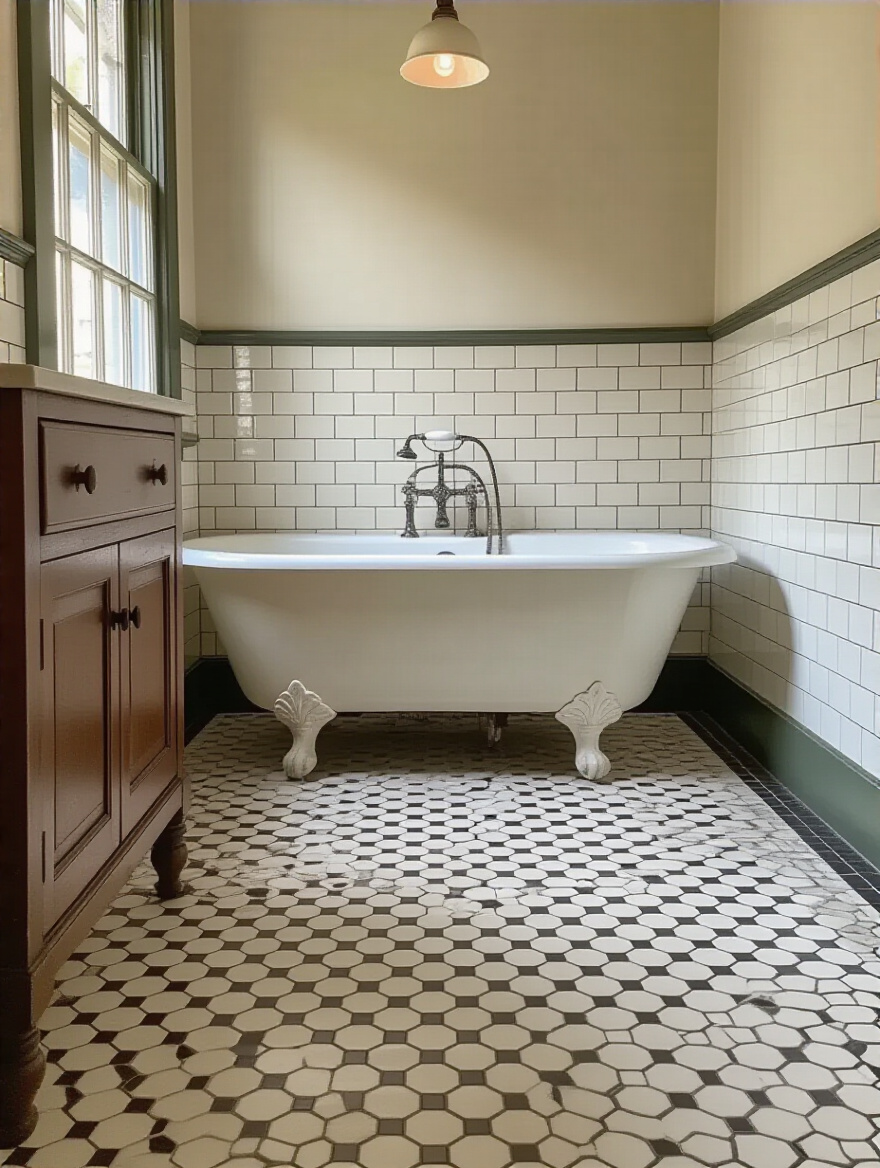
But from a pet perspective, the material and finish are everything. High-gloss, slippery tile is a hazard for any pet, especially seniors or those with joint issues. I always recommend matte or honed finishes, which provide better traction. Look for porcelain tiles with a high DCOF (Dynamic Coefficient of Friction) rating. They’re durable against claws, waterproof for spills (or accidents), and give your pets the stable footing they need to feel secure.
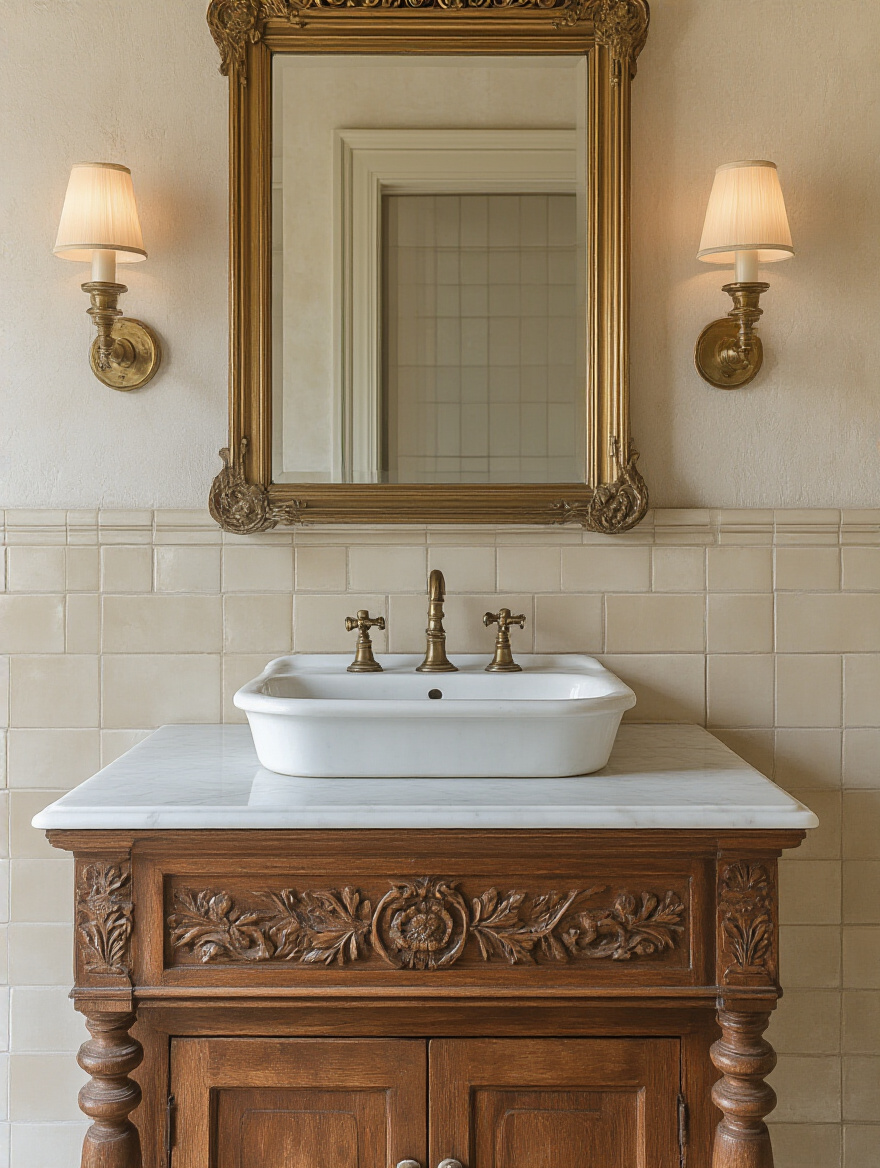
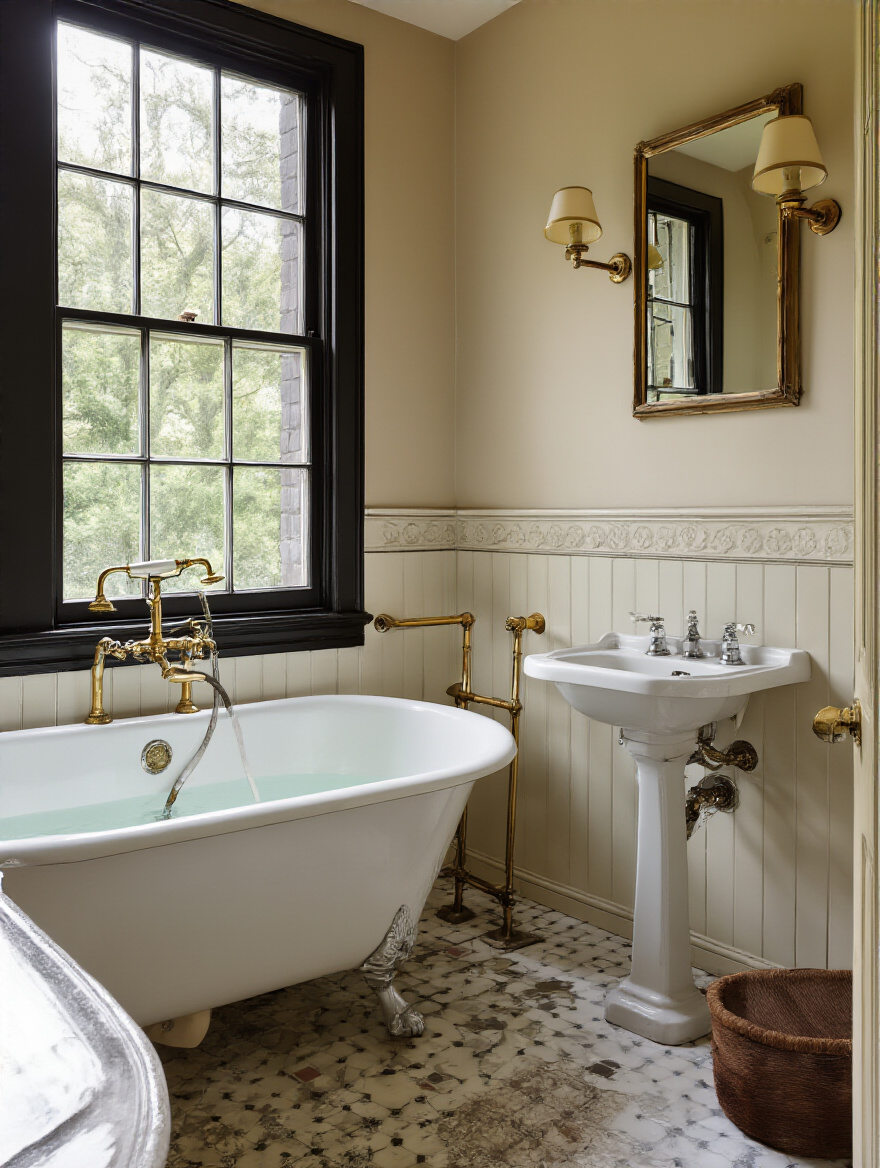
7. Select Classic Plumbing Fixtures
This is where the vintage romance really comes in: pedestal sinks, clawfoot tubs, high-tank toilets. They are the jewelry of the bathroom. A beautiful clawfoot tub can be the star of the show, but have you ever tried hoisting a 70-pound dog with arthritis into one? It’s a back-breaker for you and terrifying for them.
This doesn’t mean you have to give up on the look. You could create a walk-in shower with beautiful vintage-style tile and an exposed pipe shower system. It gives you that gorgeous industrial-era vibe while being completely accessible. Or, if your heart is set on a tub, place it next to a built-in bench or sturdy steps to make getting in and out a breeze for your four-legged friend.
8. Incorporate Period-Appropriate Lighting
Lighting sets the mood, and in a vintage bathroom, it should be soft and atmospheric. Sconces flanking a mirror are a classic choice, as are simple globe lights or even a small, dramatic Art Deco chandelier if you have the ceiling height. Look for fixtures in finishes like polished nickel, aged brass, or oil-rubbed bronze to match your other hardware.
Just be mindful of your pets. That beautiful beaded chandelier might look like a tempting new cat toy. Ensure any dangling fixtures are well out of reach. I also recommend putting all your lights on a dimmer. You can create a soft, gentle glow in the middle of the night, which is much less jarring for you and for any anxious pets who might get startled by sudden, bright light.
9. Implement Vintage Wall Treatments
The walls are another opportunity to infuse major vintage character. Subway tile wainscoting is a classic for a reason—it’s clean, durable, and historically perfect for early 20th-century looks. Beadboard is another fantastic choice that adds texture and cottage charm, perfect for a Victorian or farmhouse aesthetic. It’s also incredibly durable and can stand up to the occasional bump or rub from a passing pet.
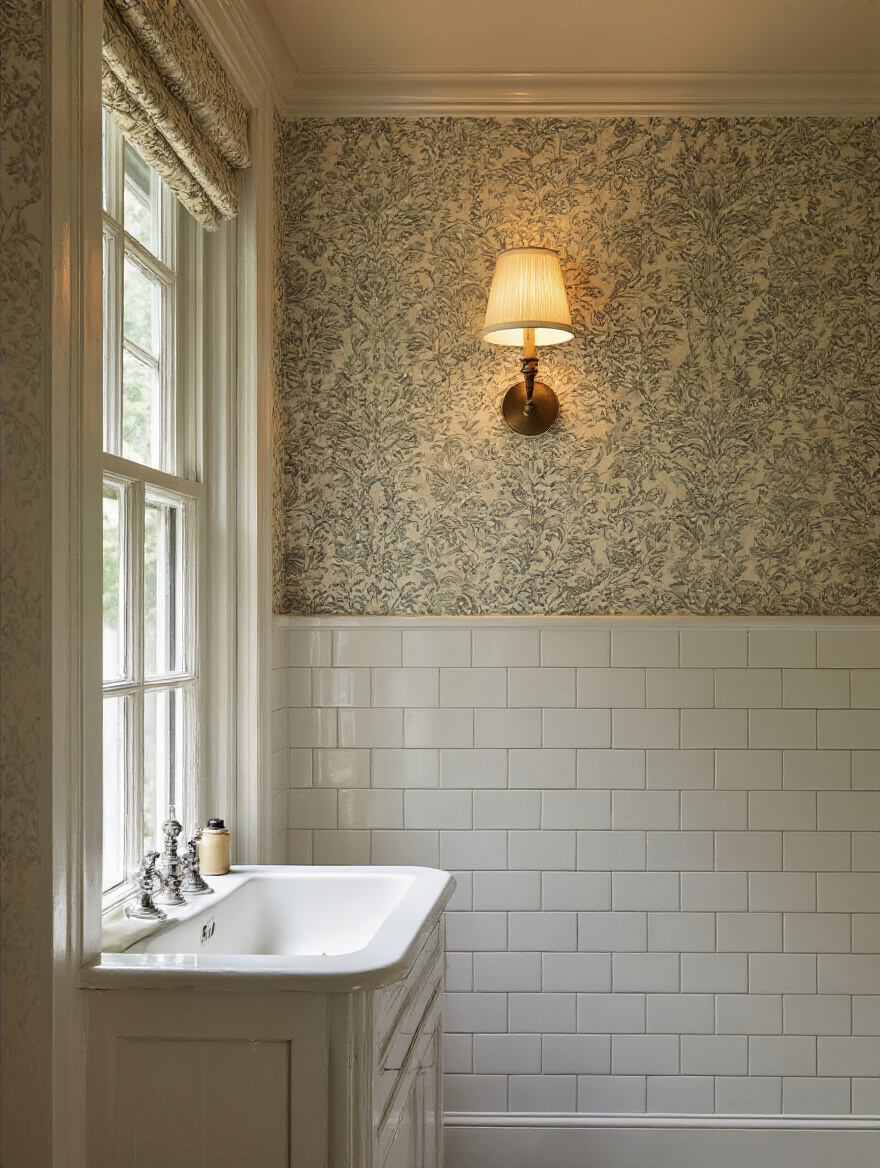
While vintage-inspired wallpaper is stunning, be realistic about your bathroom’s ventilation and your pet’s habits. In a high-moisture environment, wallpaper can peel. And if you have a cat who thinks walls are scratching posts, it’s a definite no-go. A good compromise can be tiling the bottom half of the wall (the “splash zone”) and using a fabulous wallpaper on the top half, well out of reach.
Bringing it to Life: Key Selections & Installation for Period Accuracy (Part 2)
We’ve covered the big surfaces and major fixtures. Now, let’s zoom in on the critical details that truly pull the room together. These are the elements that blend function and style, ensuring your bathroom is as practical and safe as it is beautiful.
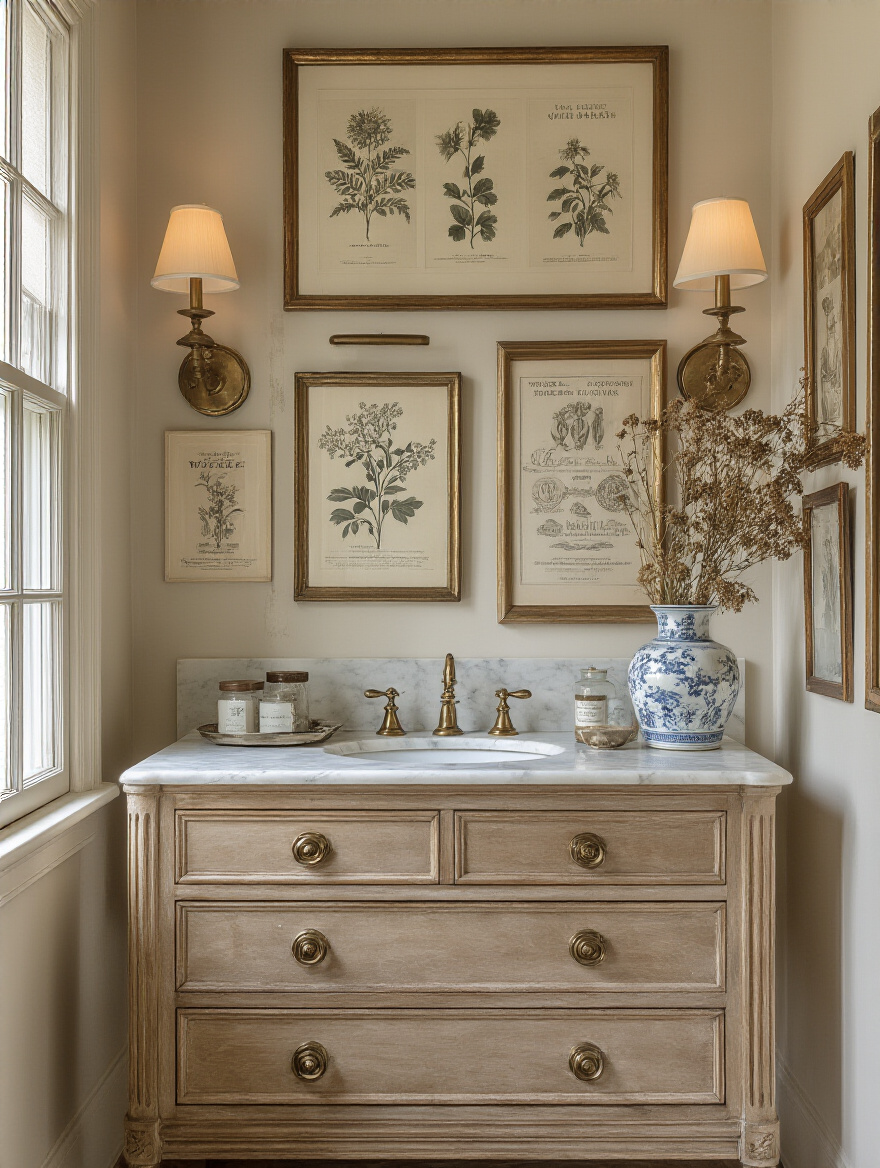
10. Select Historically Accurate Vanities or Console Sinks
Pedestal and console sinks are hallmarks of vintage design. They’re elegant and make a small bathroom feel much more open and airy. But where does the litter box go? Or the extra towels and pet shampoo? I had a client with two cats who was devastated to give up her pedestal sink dream until we found a gorgeous freestanding vintage-style cabinet to place next to it, which perfectly concealed the litter boxes.
If you need storage, there are tons of beautiful options. Look for furniture-style vanities that resemble antique dressers. They offer ample storage for human and pet supplies alike. You can even find ones with open shelving at the bottom, perfect for tucking away a cozy pet bed so your companion can hang out with you while you get ready.
11. Upgrade Plumbing and Electrical Safely
This is non-negotiable. Even if your old wiring and pipes seem to be working fine, a remodel is the time to bring everything up to modern safety codes. Old wiring can be a major fire hazard, and leaky pipes behind a new wall are a nightmare. Hire licensed professionals and don’t cut corners here.
From a pet-safety standpoint, this is critical. All outlets should be GFCI-protected, especially any near a water bowl or tub. Make sure all wiring is properly secured and inaccessible to curious chewers. I once consulted on a case where a puppy was seriously injured from chewing an exposed wire behind a vanity. It’s a preventable tragedy.
12. Source Authentic or Reproduction Hardware
The little things are the big things. Knobs, drawer pulls, hinges, and faucets are the finishing touches that make a space feel complete and authentic. Crystal or porcelain knobs for a 1920s look, simple chrome pulls for a mid-century feel—these details matter immensely.
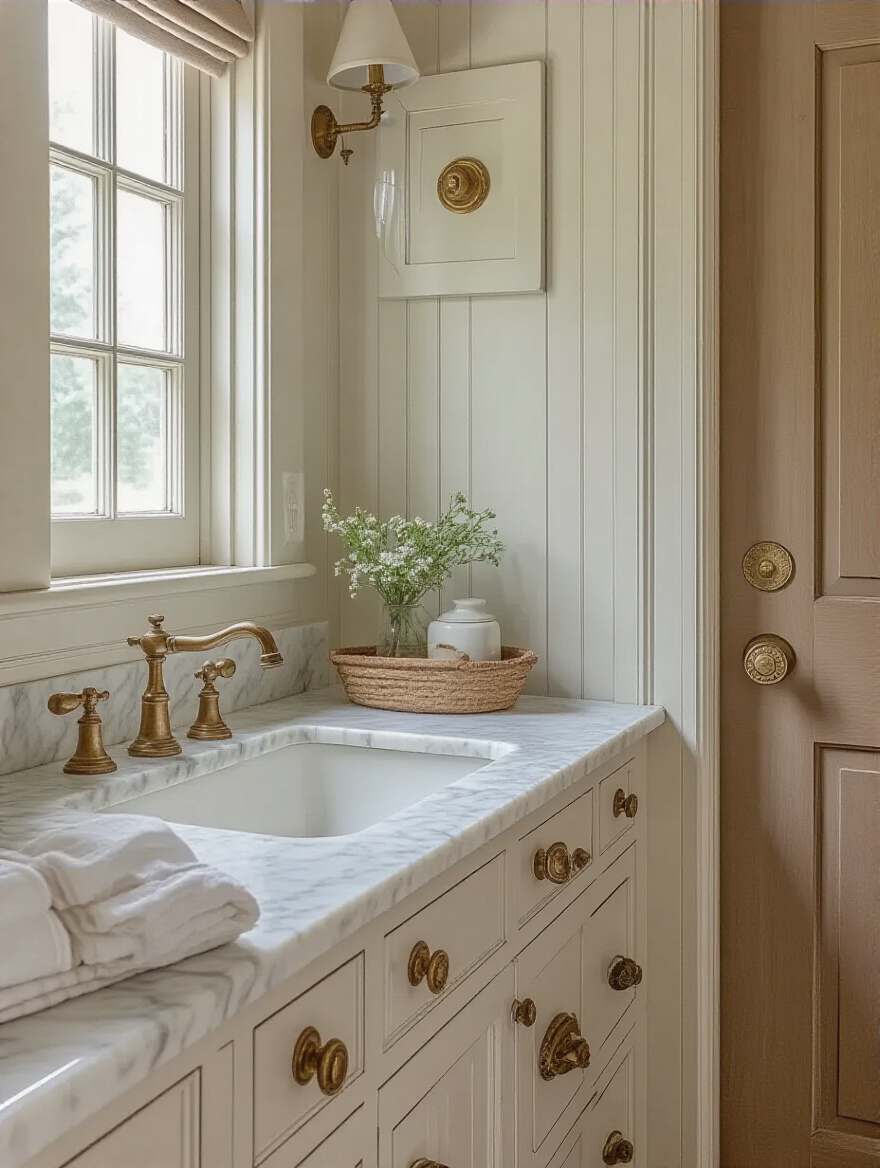
When selecting hardware, think about safety and durability. Avoid tiny knobs that could be a choking hazard if they came loose and were found by a curious pet. Choose sturdy, solid metal pieces over plated ones that can chip or wear over time. This is a place where investing in quality, whether it’s a restored antique or a high-end reproduction, really pays off.
Adding Character: Styling & Enhancements for an Authentic Vintage Feel (Part 1)
The bones of your bathroom are in place. Now for the soul. This is where we layer in the colors, textures, and accessories that tell your story and make the space feel warm, personal, and genuinely vintage.
13. Choose a Vintage-Inspired Color Palette
Color is one of the fastest ways to set a vintage mood. You could go with the soft, sanitary-era pastels—think mint green, butter yellow, or blush pink. Or embrace the drama of Art Deco with high-contrast black and white, perhaps with a jewel-toned accent like emerald or sapphire.
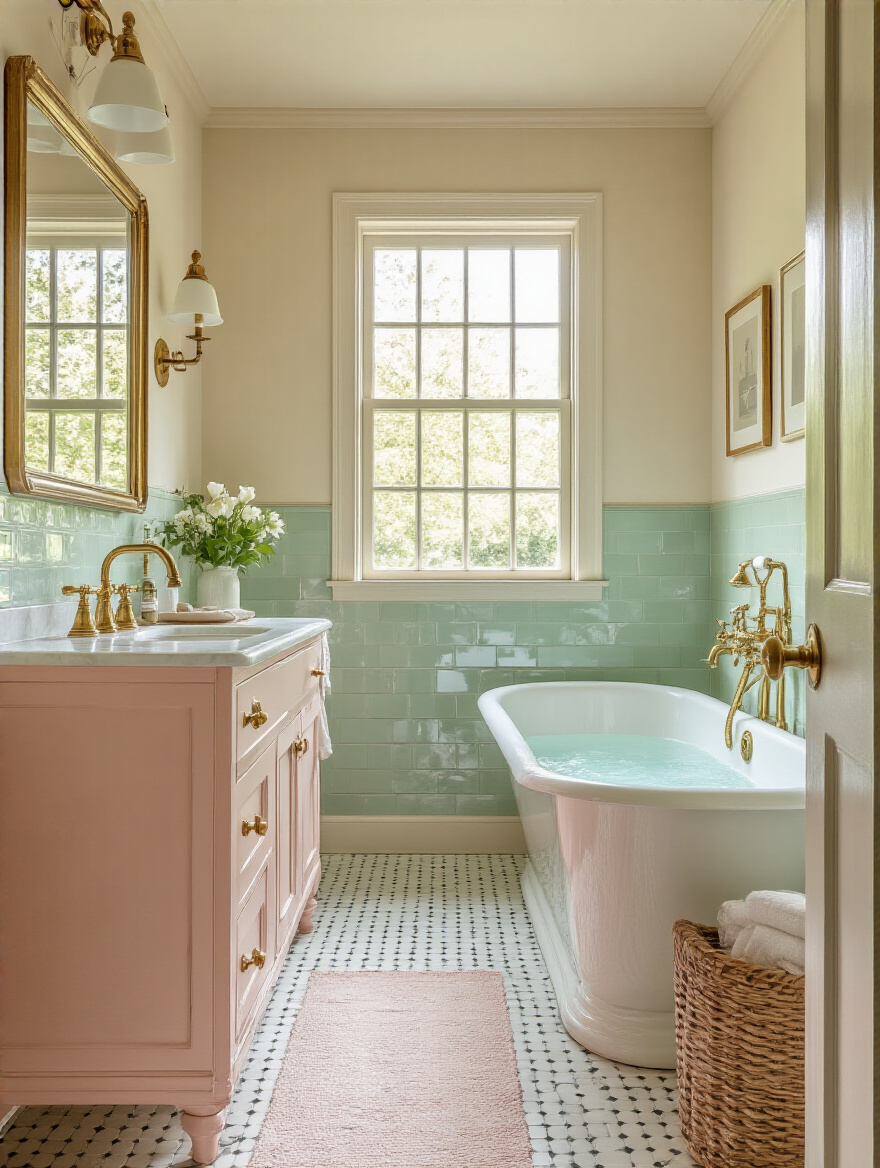
When choosing, remember that our pets can be sensitive to their environment. A calming, cohesive color palette can create a more serene space for an anxious animal. Softer hues often work wonderfully. Whatever you choose, be sure to use low-VOC or zero-VOC paint, which is much healthier for the air quality and the sensitive noses of your furry family.
14. Install Decorative Wall Mirrors
Forget the boring, frameless slab of glass. A vintage bathroom demands a mirror with personality. An oval or arched mirror can soften the hard lines of a tiled room, while a chunky wood-framed mirror can add warmth and rustic character. The frame is another chance to echo the finish of your lighting and hardware.
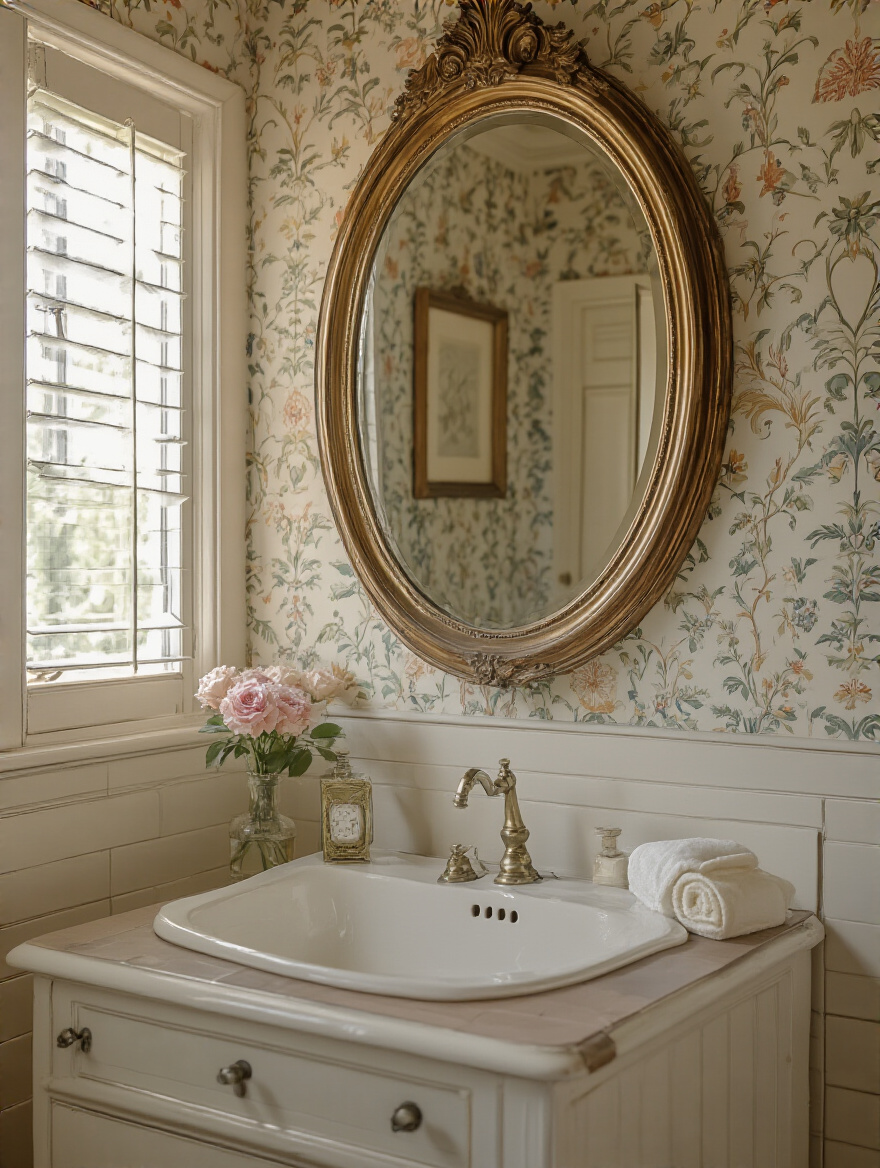
My only rule here is to mount it securely. Really securely. If you have a cat like my old boy Jasper, who loved to leap onto the vanity for a drink from the tap, the last thing you want is a wobbly mirror. Use proper wall anchors designed for the weight of your mirror and check that it’s completely solid.
15. Select Period-Appropriate Accessories
This is where the room truly comes to life. Think ceramic soap dishes, polished nickel towel racks, and classic robe hooks. Hunt for authentic pieces at flea markets or invest in quality reproductions. Consistency in finish and style across these small items is what creates that polished, intentional look.
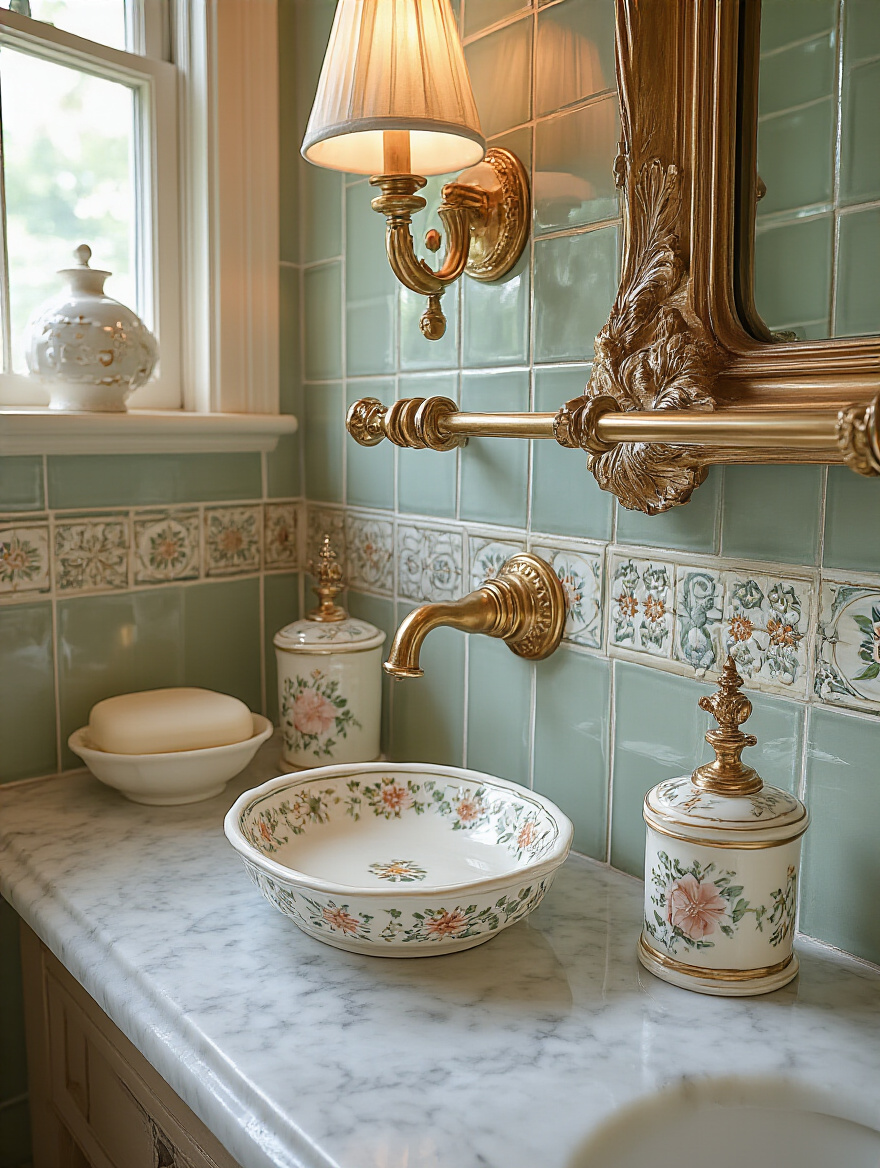
From a practical standpoint, choose sturdy accessories that can withstand the chaos of family life. A flimsy towel bar won’t survive a big, wet dog shaking himself dry next to it. I always opt for wall-mounted soap dishes and toothbrush holders to keep countertops clear and prevent items from being knocked over by a curious snout or swishing tail.
16. Integrate Textiles and Linens
Textiles are what make a bathroom feel cozy and inviting. For a clawfoot tub, a beautiful, full shower curtain on a wrap-around rod is a must. On the floor, a patterned rug in a classic floral or geometric design adds softness and a pop of color. And don’t forget a stack of fluffy towels with an embroidered monogram for a touch of old-world luxury.
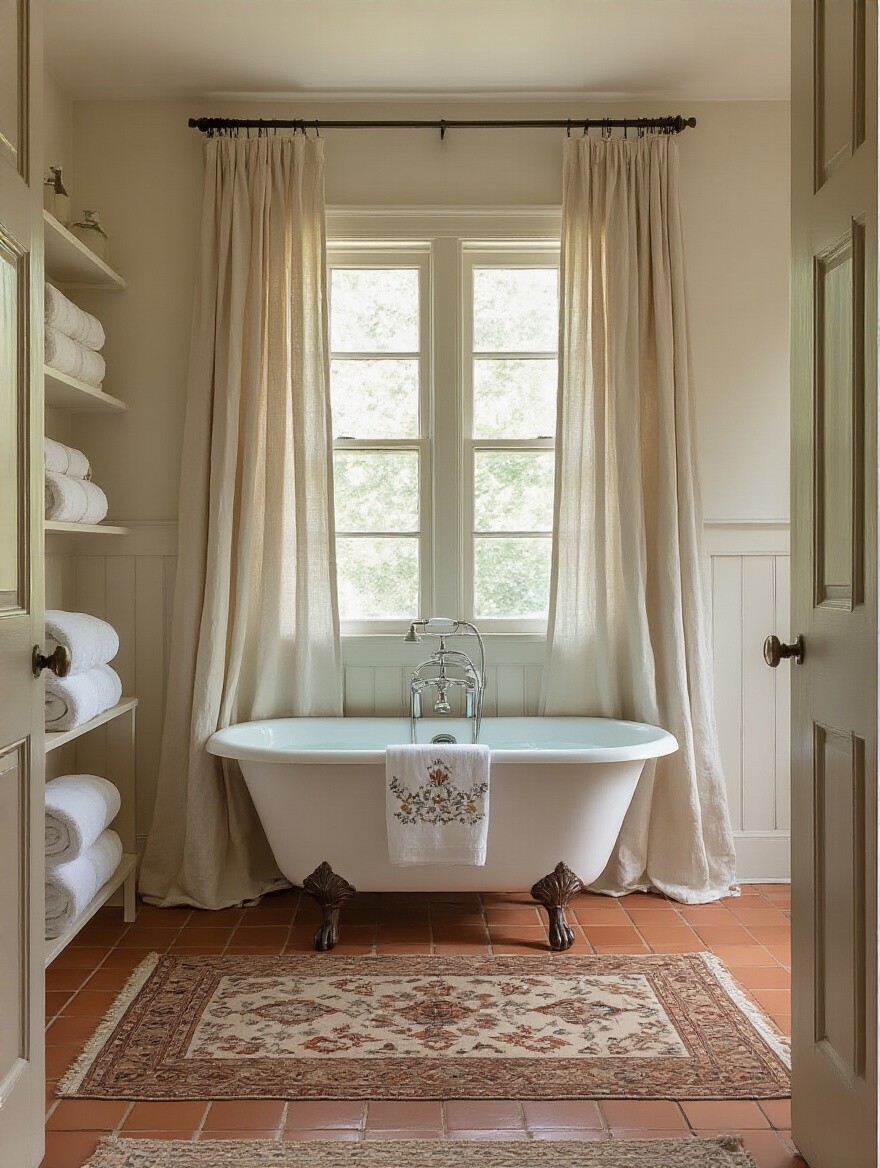
For homes with pets, choose durable and washable materials. A wool rug is a great choice as it’s naturally water-resistant and durable, but make sure it has a non-slip pad underneath! This is crucial for preventing slips and falls for both humans and pets, especially elderly dogs who can have trouble on slick surfaces.
Adding Character: Styling & Enhancements for an Authentic Vintage Feel (Part 2)
We’re in the home stretch! These final touches are all about adding layers of personality and solving those last few practical challenges. This is how you make your beautiful vintage bathroom a truly functional and joyful part of your home.
17. Incorporate Vintage Art and Decor
Don’t leave the walls bare! A vintage bathroom is the perfect place for a curated collection of art and decor. Framed botanical prints, old advertisements, or even a small collection of antique perfume bottles on a shelf can add so much character and make the space feel uniquely yours.
Just be thoughtful about placement. Anything precious or breakable should be well out of reach of a swishing tail or a high-jumping cat. And when it comes to plants, always double-check that they are non-toxic to your pets. Many common houseplants, like lilies, are extremely dangerous for cats. The ASPCA has a fantastic online database you can check.
18. Optimize Storage with Retro Cabinets or Shelving
Even the most beautiful bathroom isn’t functional without good storage. A vintage-style recessed medicine cabinet is a classic that provides hidden storage without taking up space. Open glass shelving can hold pretty towels and jars, adding to the vintage feel.

This is also your chance to be clever with pet-related storage. I absolutely love designing custom vanities that incorporate a hidden nook for a litter box with a discrete side entrance. It keeps it out of sight while still being easily accessible for your cat. Storage cabinets are also essential for safely storing medications and cleaning supplies away from curious pets.
Preserving the Past: Advanced Touches & Long-Term Vintage Care
You’ve built your dream bathroom, and now the goal is to make sure it stays beautiful for years to come. This means being smart about both modern efficiencies and the old-fashioned art of proper care and maintenance.
19. Prioritize Eco-Friendly Choices
Being “vintage” doesn’t mean you have to be inefficient. You can get the classic look with modern performance. Look for toilets and faucets with the WaterSense label—they use significantly less water, which is good for the planet and your utility bills. There are many fantastic reproduction fixtures that meet these standards.
Sustainability also means salvaging what you can. That original cast-iron tub? Have it reglazed! It’s incredibly eco-friendly compared to manufacturing and shipping a new one. And as I mentioned before, always use low-VOC or zero-VOC paints, sealants, and caulks. These products are better for the environment and infinitely better for the Indoor air quality your entire family, pets included, breathes every day.
20. Master Routine Care
Finally, let’s talk cleaning. Vintage finishes are often more delicate than modern ones. Abrasive cleaners can scratch porcelain glazes, damage unlacquered brass patina, and dull marble. From my vet tech perspective, many common cleaners are also toxic to pets who might lick their paws after walking on a freshly-mopped floor.
My go-to cleaning kit is simple: gentle dish soap, baking soda, white vinegar, and a lot of soft microfiber cloths. These can handle almost any cleaning task safely and effectively. For every cleaner you buy, read the label to ensure it’s pet-safe. A little gentle, consistent care will preserve the beauty of your vintage finds for decades, creating a safe, sparkling haven for you and your beloved animals.
Conclusion
There you have it. Creating a stunning vintage bathroom is about so much more than just picking old-looking stuff. It’s about thoughtfully weaving together history, style, and the practical needs of your modern life. And for us animal lovers, that life joyfully includes our pets. By planning with their comfort and safety in mind, you’re not making a sacrifice—you’re creating a space that’s richer, warmer, and more full of love.
So go ahead and dream of that clawfoot tub, that perfect hex tile, that charming antique mirror. You can have it all. Armed with these tips, you can create a timeless sanctuary that tells a story, functions beautifully, and honors every single member of your family—especially the ones with tails.


