You know the question I get all the time? People show me a picture on their phone—usually some stark, all-white bathroom with a single, artfully placed orchid—and ask, “How do I get this?” But what they’re really asking is, “How do I get the feeling of this? The calm, the quiet, the sense that everything is in its perfect place?” Because let’s be honest, that picture-perfect bathroom often looks like nobody actually lives there.
The secret isn’t about having less stuff, necessarily. It’s about having smarter systems. As someone who builds custom cabinetry and organizes spaces for a living, I’ve seen it all. The real magic isn’t in hiding your clutter; it’s in creating an intentional space where everything has a home and a purpose. This guide is my real-world take—no corporate speak, just the stuff that actually works to turn your high-traffic, often-chaotic bathroom into a place you genuinely love to be in.
Laying the Minimalist Foundation: Mindset & Initial Steps
Before we talk about tile or faucets, we have to start here. This is the bedrock. A minimalist bathroom isn’t something you buy; it’s something you create through a series of intentional decisions. Skip this part, and you’ll just have an expensive, newly-cluttered room.
1. Execute a Ruthless Declutter to Eliminate Unnecessary Items
Can we talk about why everyone gets this wrong? People buy beautiful new bins and organizers and then try to stuff their old clutter into them. That’s not organizing. That’s just shuffling chaos. The only way to begin is with a ruthless, take-no-prisoners declutter. I’m talking about emptying every single thing from every cabinet, drawer, and shelf onto the floor. Yes, all of it. This is the moment of truth. You have to see the sheer volume of stuff to understand the problem.
Once it’s all out, you become the bouncer. Be brutally honest. Do you use it weekly? Is it expired? Do you have three of them? Ditch the “just in case” travel-sized products from that hotel three years ago. I once worked with a client who had what I called a “Product Graveyard” under her sink—dozens of half-used bottles she felt too guilty to toss. We got rid of 90% of it, and she said she could finally breathe in the room. This isn’t about tidying; it’s about curating.
With a clean slate, you can finally see the space for what it is. Now we need to figure out what truly belongs here.
2. Define Your Core Needs for Essential Personal Care Products
After the great purge, the goal is to prevent the clutter from creeping back in. This step is about defining your actual, real-life routine. Not your aspirational “I’ll-start-using-face-masks-every-night” routine. What do you actually use every single day? What about once a week? Those are your core needs. Everything else is a guest, and guests can’t live here permanently.
Make a list of your true essentials: one face wash, one moisturizer, one type of toothpaste. If you find a product that can do two jobs—like a cleansing oil that removes makeup—you’ve struck gold. This isn’t about deprivation; it’s about efficiency. When you know exactly what you need, you stop buying things impulsively. You’ll save money, produce less waste, and—most importantly—your morning and evening routines will become faster and calmer.
Now that we know what’s staying, we can decide what the room itself will look like.
3. Embrace a Neutral Color Palette for Timeless Serenity
People think neutral means boring. It doesn’t. It means calm. A neutral palette of soft whites, gentle grays, and warm beiges creates a quiet backdrop that lets your mind rest. Bright, loud colors and busy patterns are a form of visual noise. When your goal is a sanctuary, you want to eliminate as much noise as possible. It also has a practical benefit: neutral colors make small spaces feel bigger and brighter because they don’t chop up the room visually.

The key to keeping a neutral palette from feeling sterile or clinical is texture. This is where you can have some fun. Think about a vanity made of a light, grainy wood. Or large tiles with a subtle, concrete-like finish. Or a soft, waffle-knit linen towel. These materials add warmth and depth without adding color. You’re creating interest for the eye, but in a way that feels sophisticated and calm.
With the mood set, it’s time to get practical about the physical space.
4. Assess Your Current Layout to Optimize Space Usage Efficiently
Before you even think about buying a new vanity, grab a tape measure and a notepad. Most people just accept the layout they inherited, even if it’s terribly inefficient. I want you to walk through your daily routine and notice the friction. Do you bump your elbow on the shower door when you’re at the sink? Is there a dead corner that just collects dust? Where does the “stuff” always pile up?
Here’s a shortcut I use with clients, the “Red Marker Test.” Sketch a rough floor plan of your bathroom and draw red lines for every path you walk, every door that swings open, and every drawer that pulls out. The areas with a mess of overlapping red lines are your problem zones. Identifying these helps you see opportunities. Maybe a swinging door can be replaced with a pocket door. Maybe that bulky vanity can be swapped for a slim, floating one. It’s not about a total renovation; it’s about smart adjustments that make the space flow better.
Smart Storage & Organization: Concealing Clutter Creatively
Okay, this is my favorite part. Once you have a good layout and know what you need to store, you can design a system. Great storage isn’t about having a ton of it; it’s about having the right kind of it, in the right places.
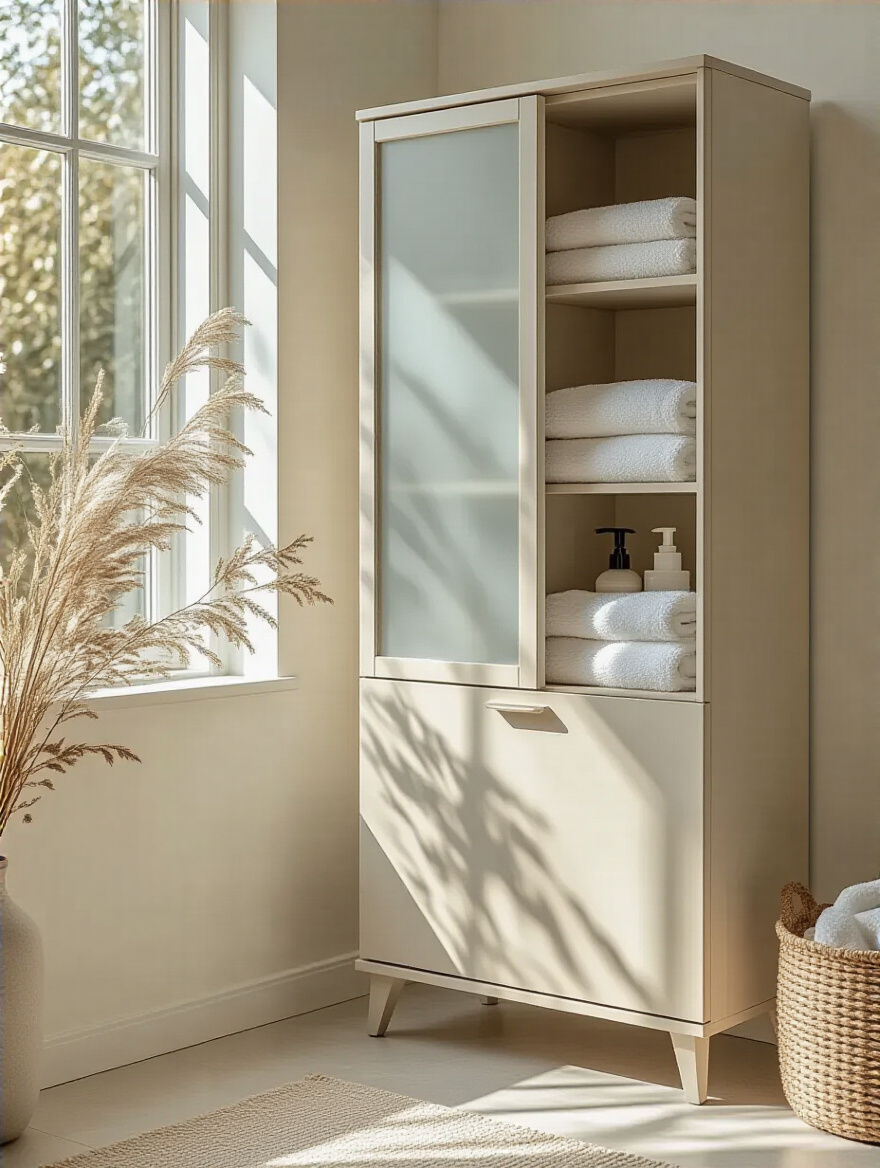
5. Integrate Hidden Storage to Conceal Clutter Effortlessly
The ultimate goal of a minimalist bathroom is to have clear, uncluttered surfaces. The only way to achieve that is with smart, hidden storage. I’m not just talking about a vanity. I’m talking about using the space inside your walls. A recessed medicine cabinet is a classic for a reason—it gives you a ton of storage without jutting out into the room.
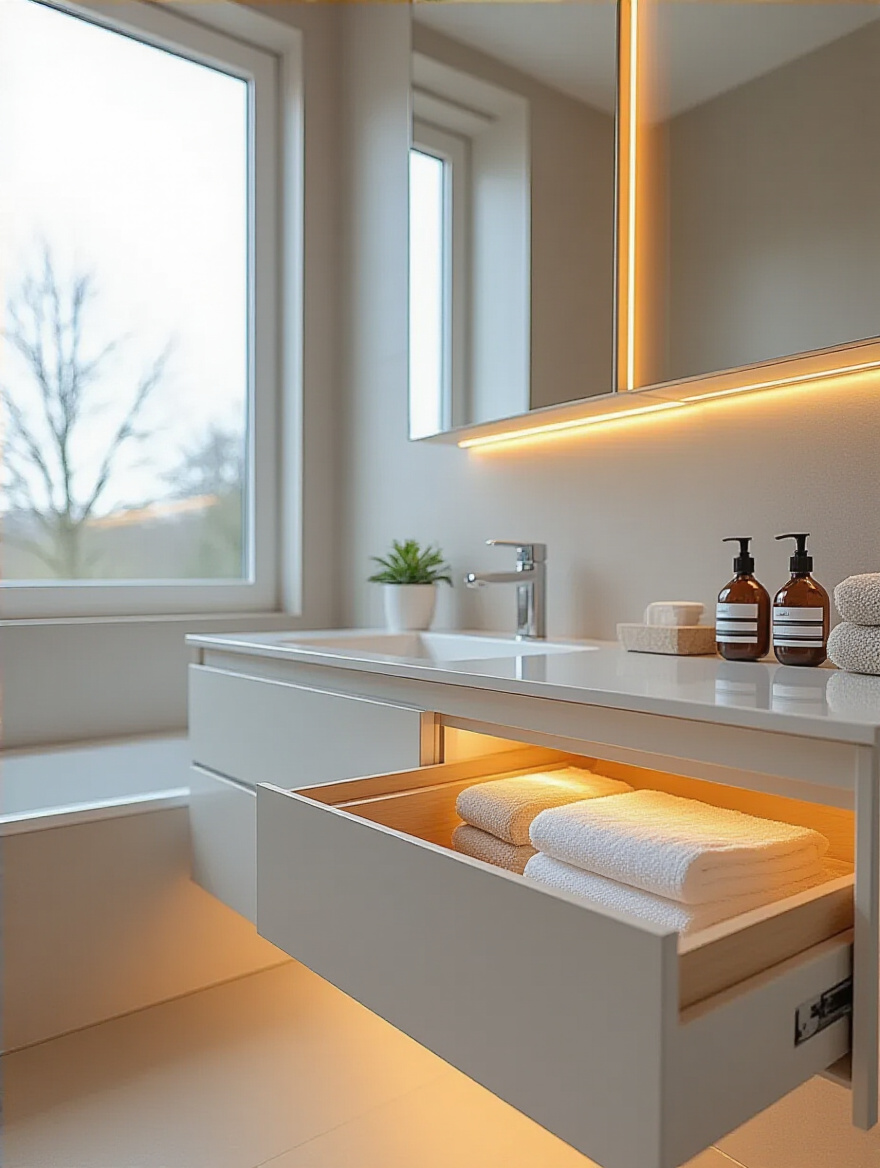
Think vertically. Can you add a recessed niche in your shower wall for shampoo bottles? This eliminates the need for a rusty shower caddy. My background is in cabinetry, and one of my favorite tricks is the toe-kick drawer—a shallow drawer hidden in the base of a vanity, perfect for storing a scale or extra bath mats. These solutions feel custom and luxurious, but they’re really just about using overlooked space efficiently.
Once your main storage is in place, you can add selective open elements.
6. Install Wall-Mounted Shelving for a Floating, Open Feel
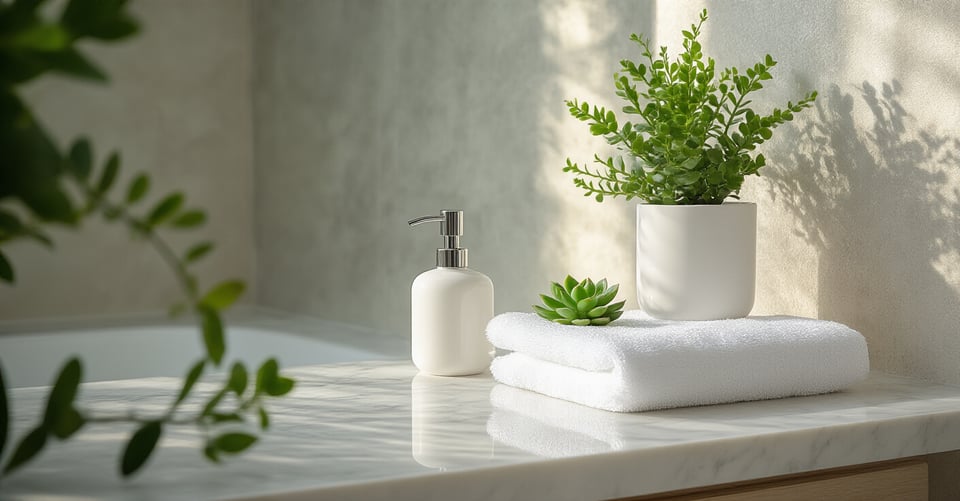
Here’s where people go wrong with floating shelves: they treat them like a museum display for random knick-knacks. In a minimalist bathroom, wall-mounted shelves have a specific job. They should hold things that are both functional and beautiful. Think a neat stack of plush, white towels, a beautiful bottle of hand soap in a uniform container, or a small, hard-to-kill plant in a simple pot.
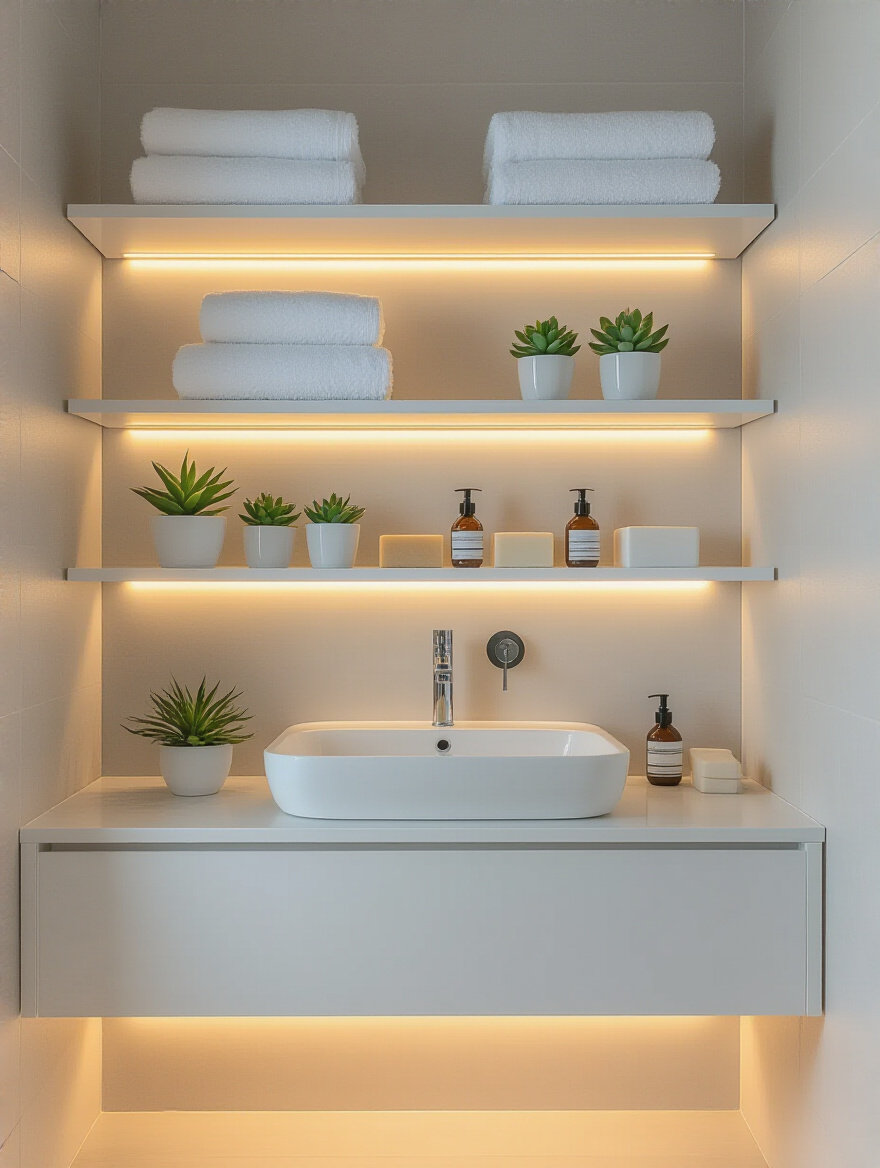
The point of “floating” shelves is to create an open, airy feeling by keeping the floor clear. So don’t clutter them up! Use the “Rule of Three.” Group items in odd numbers, like three small items or one larger one. This styling trick keeps the shelf from looking like a storage shelf and more like an intentional design element. Keep it simple, keep it functional, and keep it clean.
Of course, the most important organization happens where no one can see it.
7. Utilize Drawer Dividers to Neatly Organize Small Essentials
I can’t say this enough: the peace a minimalist bathroom promises is earned inside the drawers. You can have the most beautiful, sleek floating vanity, but if you open a drawer and it’s a jumble of loose cotton swabs, old razors, and tangled hair ties, the illusion is shattered. Your system has failed. This is where drawer dividers become your best friend.
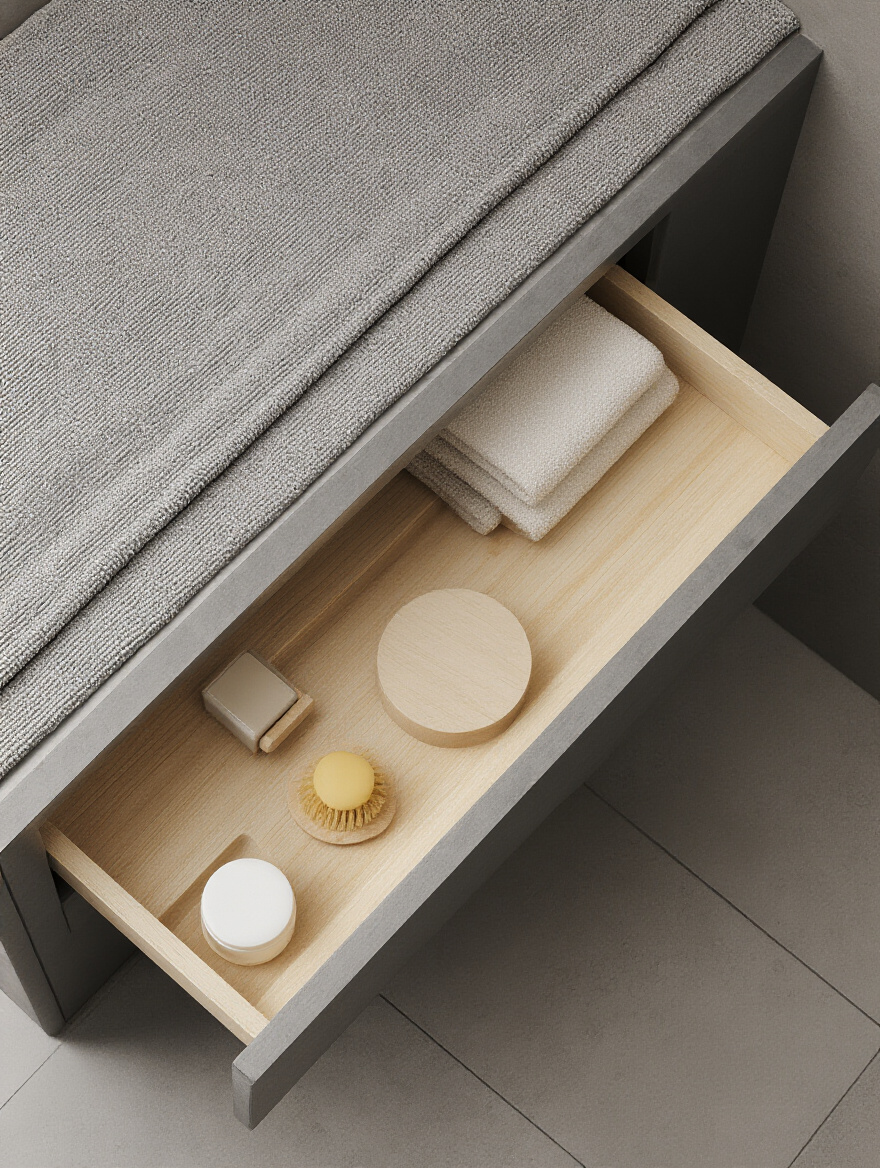
Don’t just buy a generic plastic tray. Measure your drawers and create a custom system. I love using adjustable bamboo or clear acrylic dividers to create dedicated compartments for every little thing. Toothpaste goes here. Floss goes there. Makeup brushes in this section. When everything has a designated home, you’re not just organized—you’re efficient. You can grab what you need without thinking, and putting it away is just as easy.
And for the items that do sit out, they need to play by the rules.
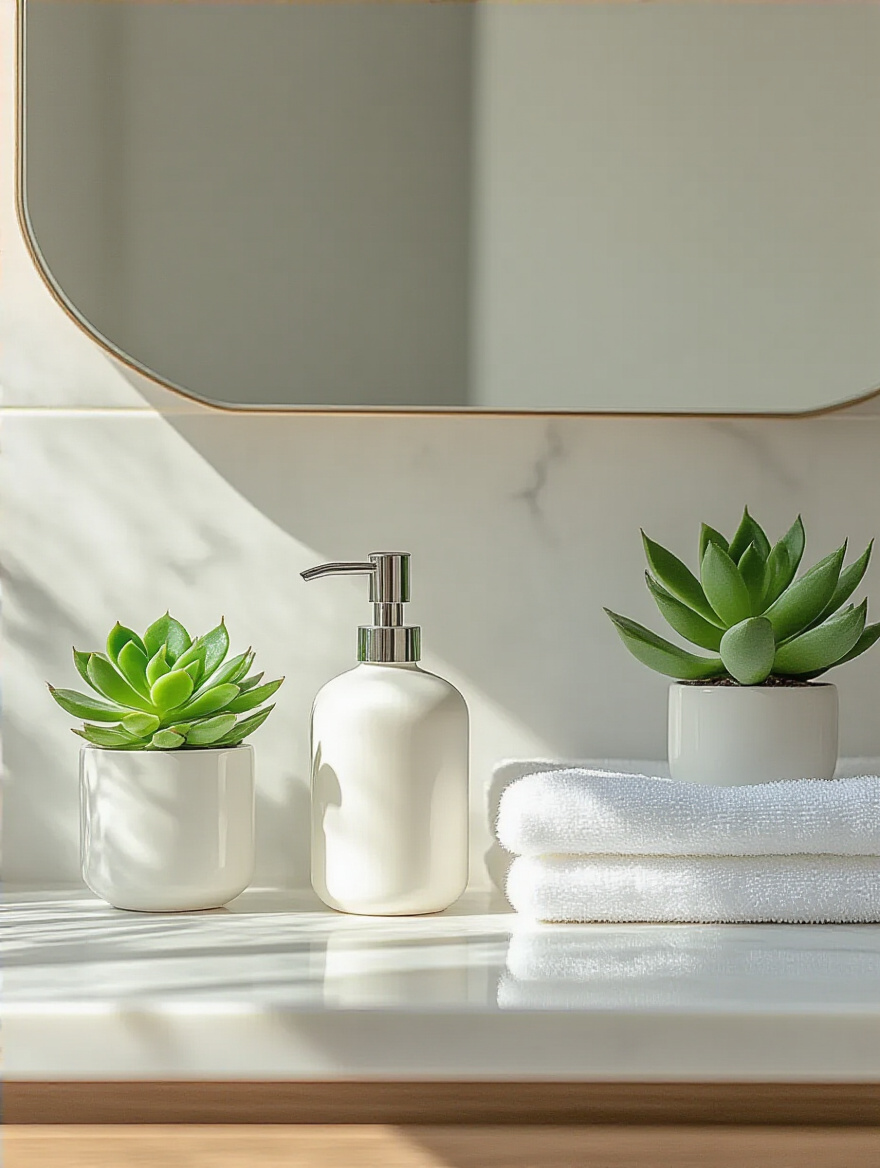
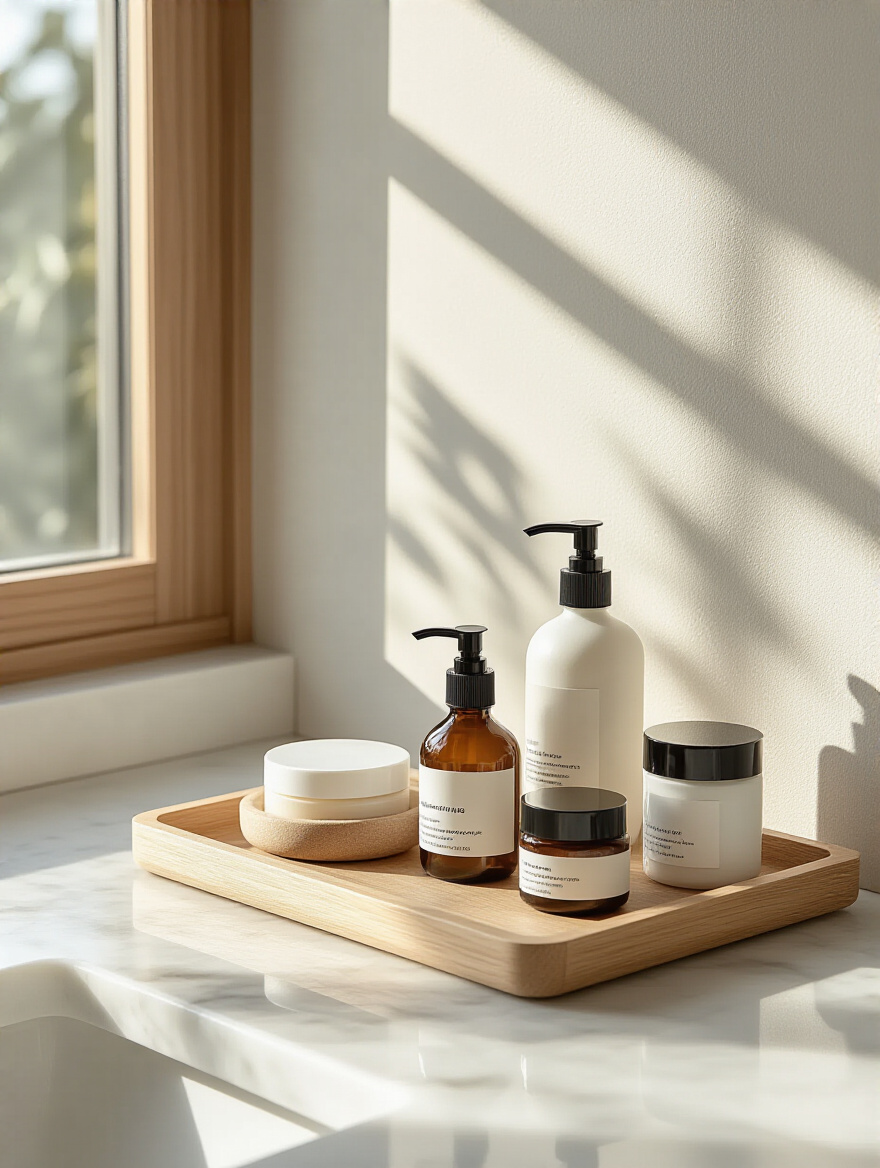
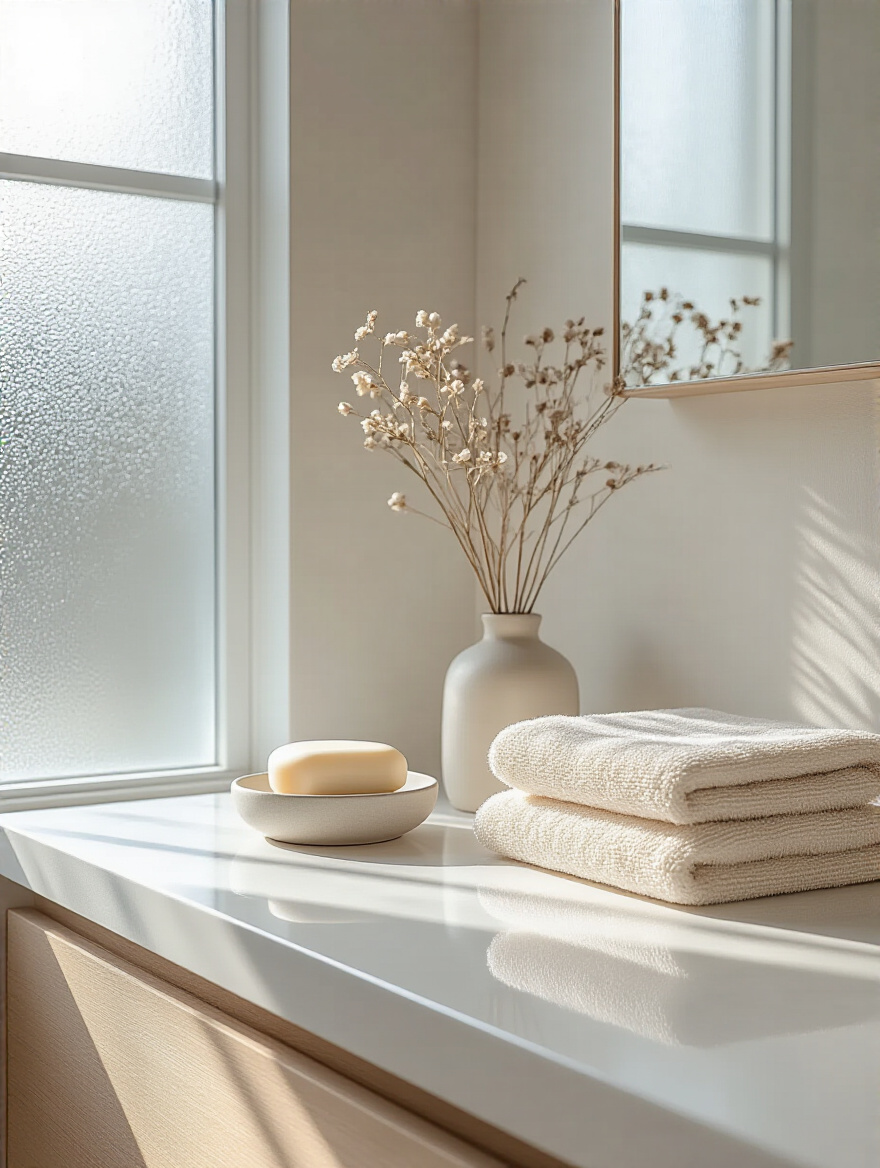
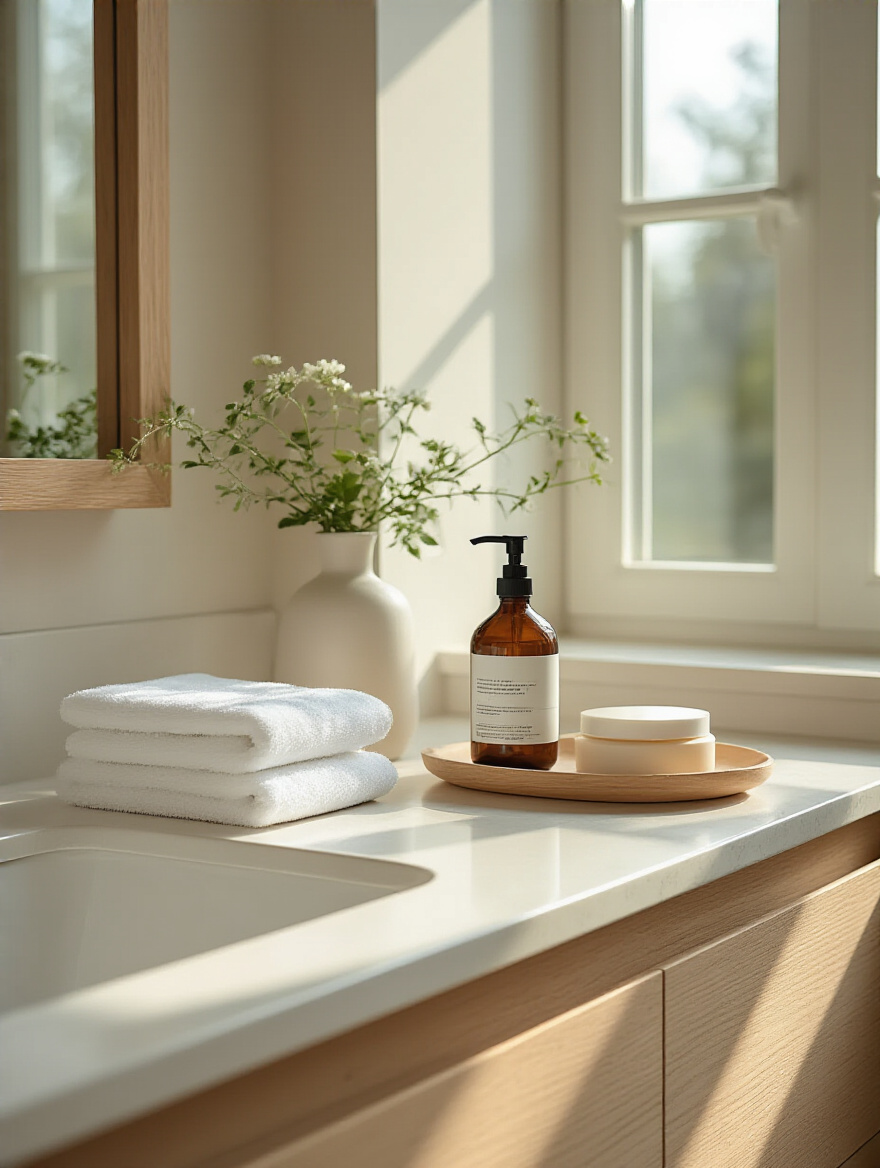
8. Opt for Uniform Containers to Enhance Visual Harmony
Take a look at your shower or countertop right now. You’re probably being visually assaulted by a mishmash of clashing brand labels, loud colors, and different-sized bottles all screaming for your attention. This is a huge source of visual clutter. The solution is simple: decant your everyday products into uniform containers.
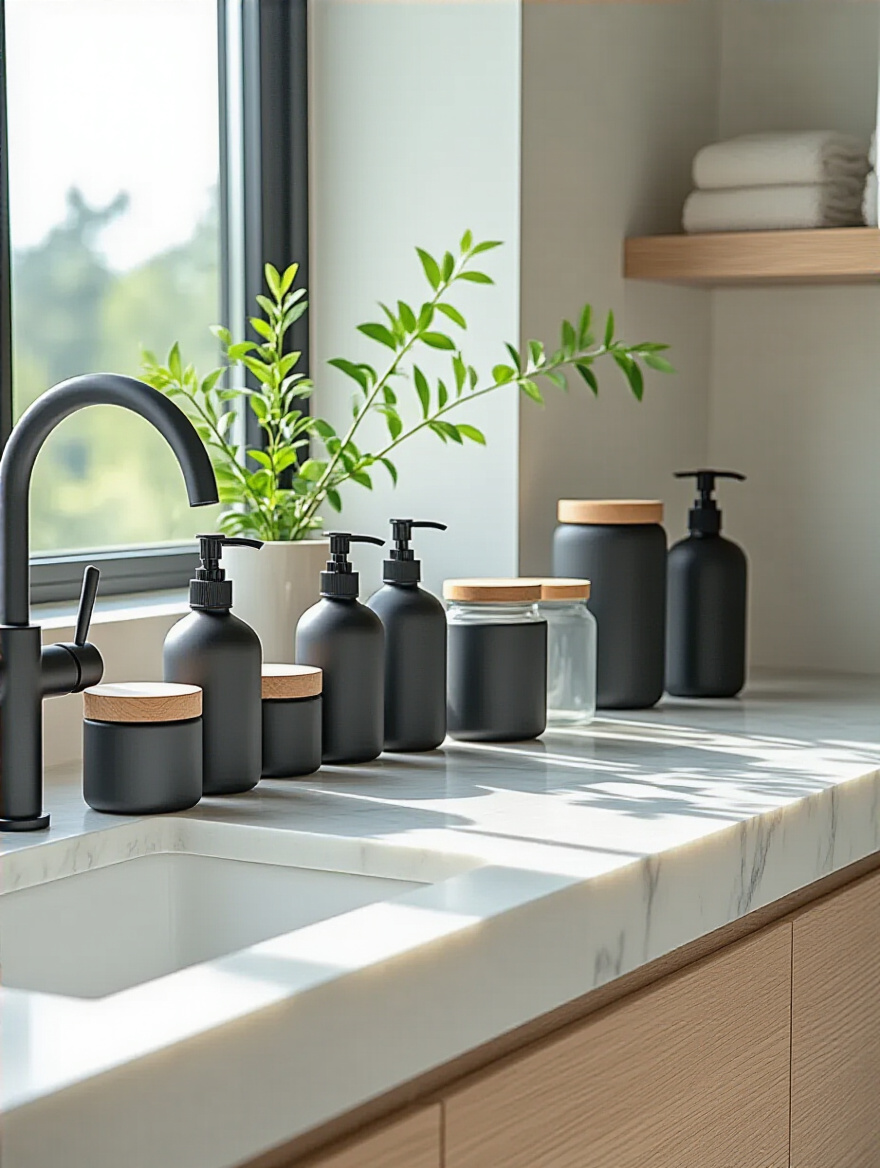
Get a set of matching refillable bottles—amber glass, matte black, or clear plastic—for your shampoo, conditioner, body wash, and hand soap. Use simple, waterproof labels to identify them. Do the same for things like cotton balls and Q-tips with matching jars. Suddenly, your collection of necessities looks like a cohesive, spa-like set. The shortcut here is to buy your products in bulk or from refill shops to reduce both plastic waste and cost.
Next up, let’s look for storage opportunities in overlooked spaces.
9. Leverage Vertical Space with Slim Cabinets or Hampers
Most people think about storage horizontally, but in small bathrooms, the real estate is vertical. Look around your bathroom. Is there a narrow slice of wall between the door and the shower? A tight corner next to the toilet? These are prime locations for tall, slim storage towers or elegant, vertically oriented laundry hampers.
These pieces give you a ton of storage without eating up valuable floor space. A slim linen tower can hold all your extra towels and toilet paper, completely hidden from view. A vertical hamper with separate compartments for whites and colors streamlines your laundry system. This is what I mean by maximizing every inch. You’re creating storage out of thin air simply by looking up.
Finally, let’s address one of the most common sources of bathroom mess.
10. Mount Towel Bars or Hooks Strategically to Reduce Clutter
A damp towel slung over the shower door or piled on the floor is a system failure. It looks messy, it doesn’t dry properly, and it creates a humid environment. The solution is strategic placement of bars or, my personal favorite, hooks. Hooks are a minimalist’s dream—they take up almost no visual space and are incredibly functional.
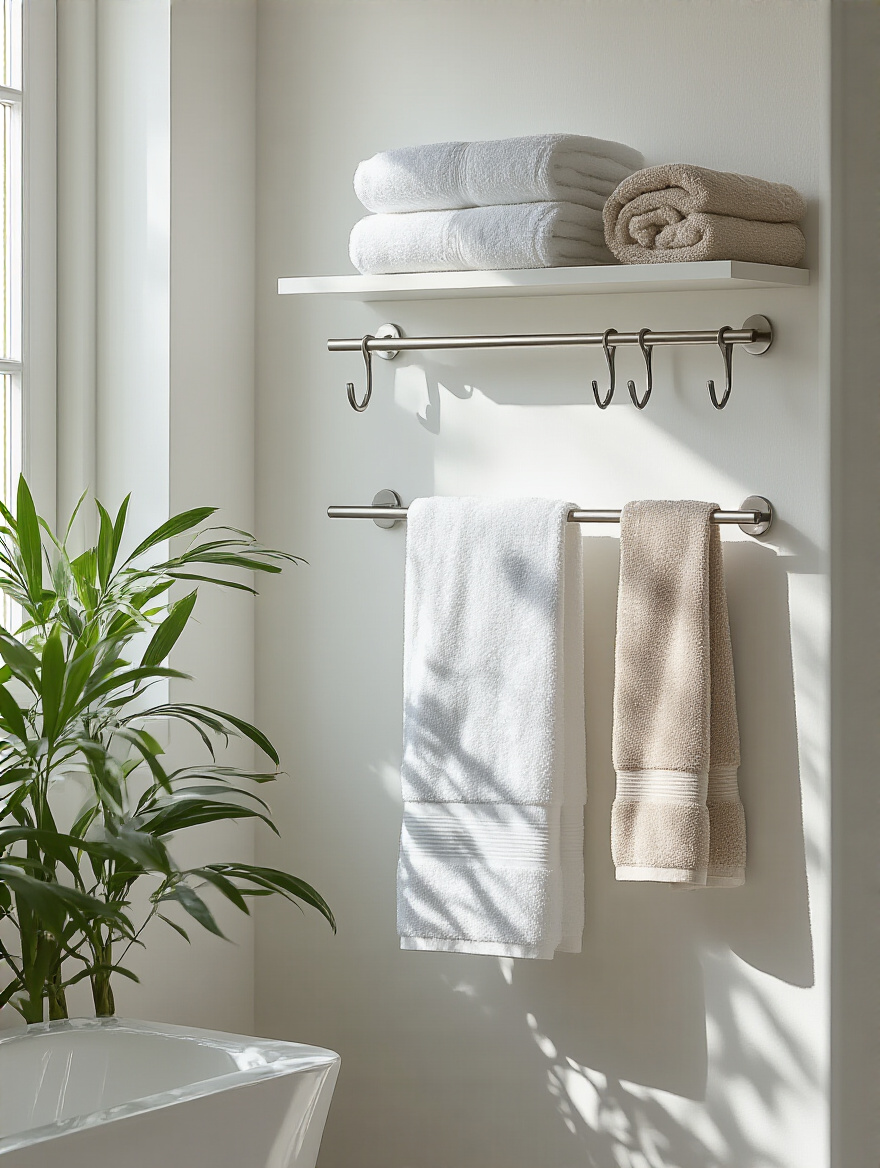
Assign one hook to each person in the household. It gives them ownership and ensures there’s always a spot for their towel to hang and dry completely. For hand towels, a simple bar or ring next to the sink is perfect. Consider the placement carefully—it should be convenient, but not in a high-traffic path where you’ll constantly bump into it. And choose hardware that matches the other finishes in your bathroom for a cohesive look.
Streamlined Design Elements: Aesthetic Simplicity
With the clutter managed, now we can focus on the materials and fixtures that will create that serene, high-end feel. Every element you choose should be simple in form and beautiful in its own right.
11. Choose Large-Format Tiles to Reduce Grout Lines and Simplify
This is one of my biggest recommendations for anyone aiming for a clean, minimalist look. The fewer grout lines you have, the larger and more seamless your space will feel. Grout lines are visual clutter. They create a grid that chops up your walls and floors. Large-format tiles—think 24×48 inches or even bigger—create a smooth, almost continuous surface.
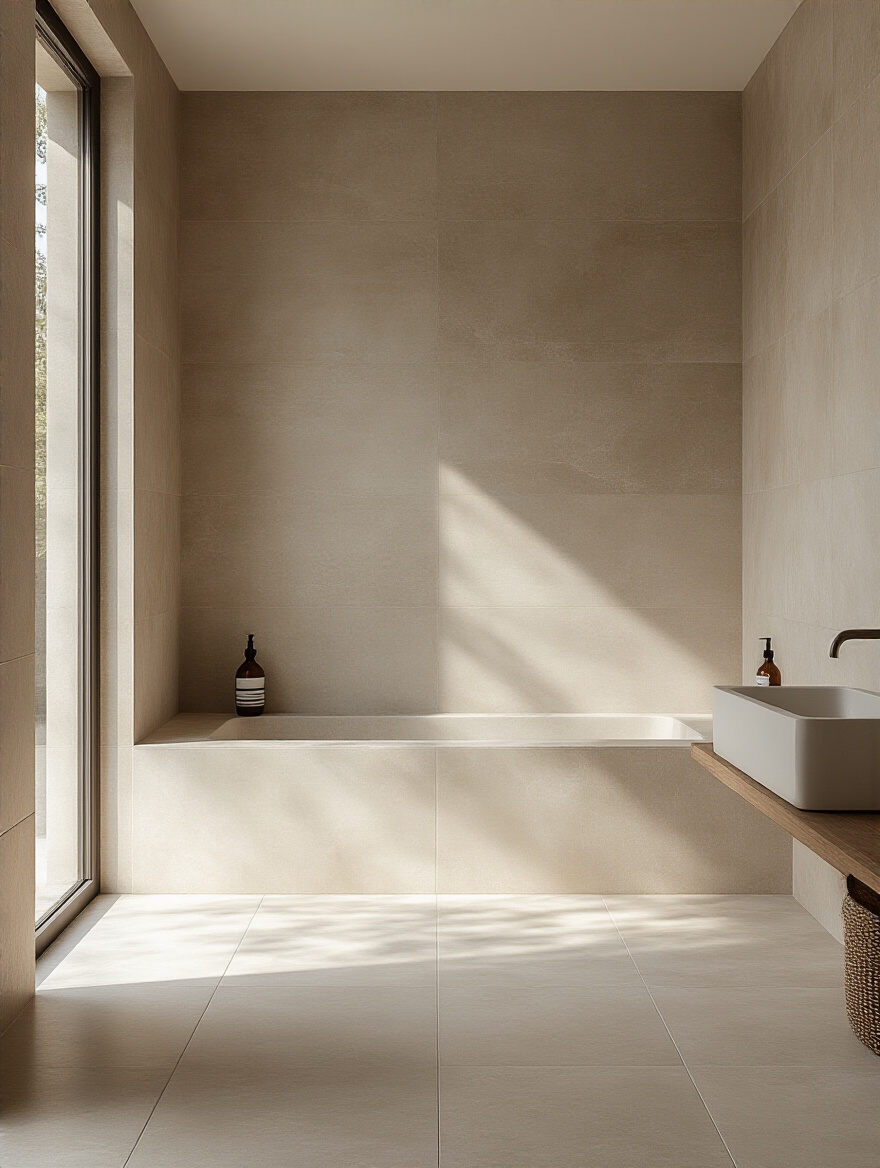
There’s a massive practical benefit, too: grout is a magnet for dirt, mildew, and grime. Fewer grout lines means drastically less scrubbing. This is a choice that buys you back your time and contributes to a more hygienic space. Just a word of caution: installing large-format tiles is a job for a pro. They’re heavy and require a perfectly level surface to avoid cracking. Don’t skimp here.
Once you have your clean canvas, it’s time for the “art.”
12. Select a Statement Mirror for Practicality and Aesthetic Focus
In a minimalist room, you have very few opportunities for decoration. That’s why the mirror is so important. It’s not just for checking your reflection; it’s the primary piece of “art” in the space. Instead of a standard, builder-grade plate mirror, choose one with character. This is where you can inject personality.
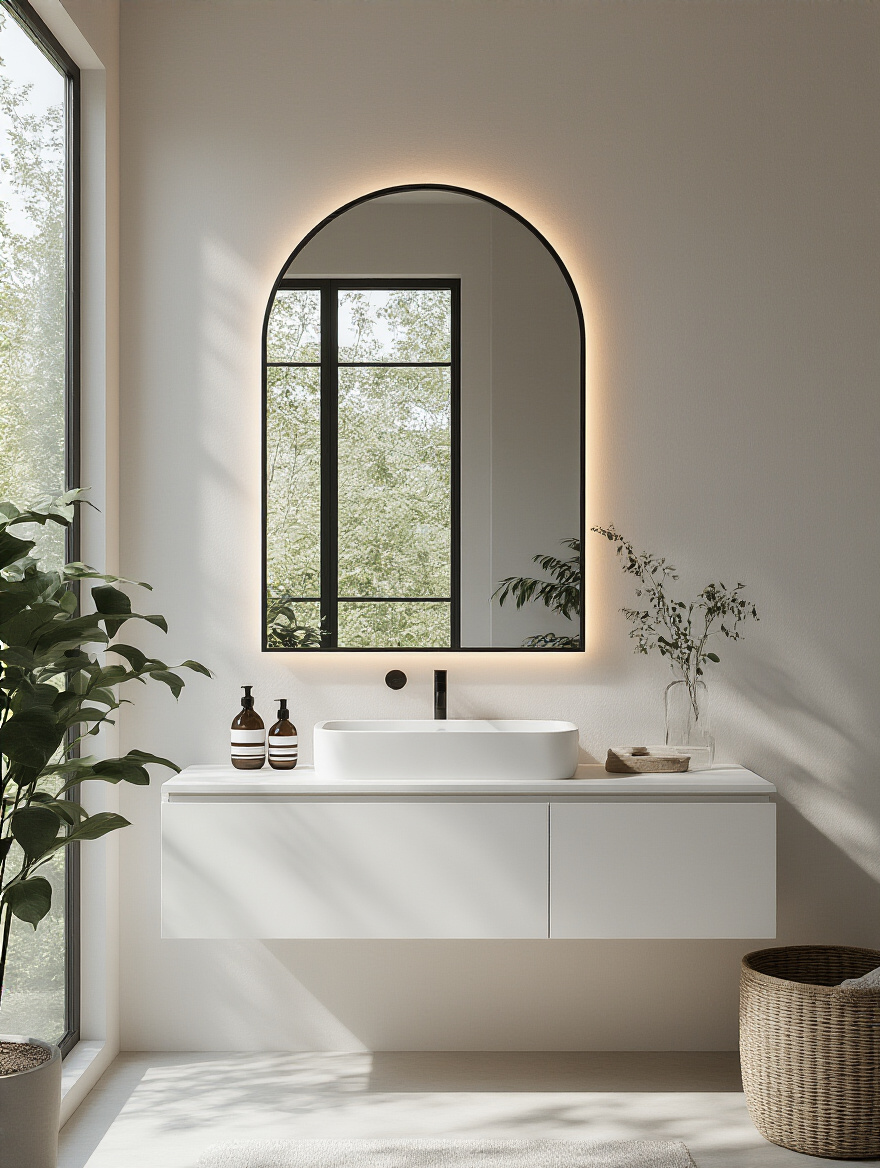
Consider a mirror with a unique shape, like an arch or an organic, asymmetrical form. Or choose one with a slim, elegant frame in a material that provides a bit of contrast, like matte black or warm brass. Go bigger than you think you need. A large mirror will make the entire room feel bigger and brighter by reflecting light and space. Some of the best options now come with integrated backlighting, which provides a beautiful, even glow without the need for clunky vanity light fixtures.
Speaking of light, it’s a critical and often-overlooked element.
13. Incorporate Strategic Lighting to Create an Inviting Ambiance
Relying on a single, harsh overhead light is the fastest way to make a beautiful bathroom feel like a hospital operating room. Good lighting is all about layering. You need at least three types: ambient (overall illumination), task (focused light for the vanity), and accent (subtle light to highlight a feature).
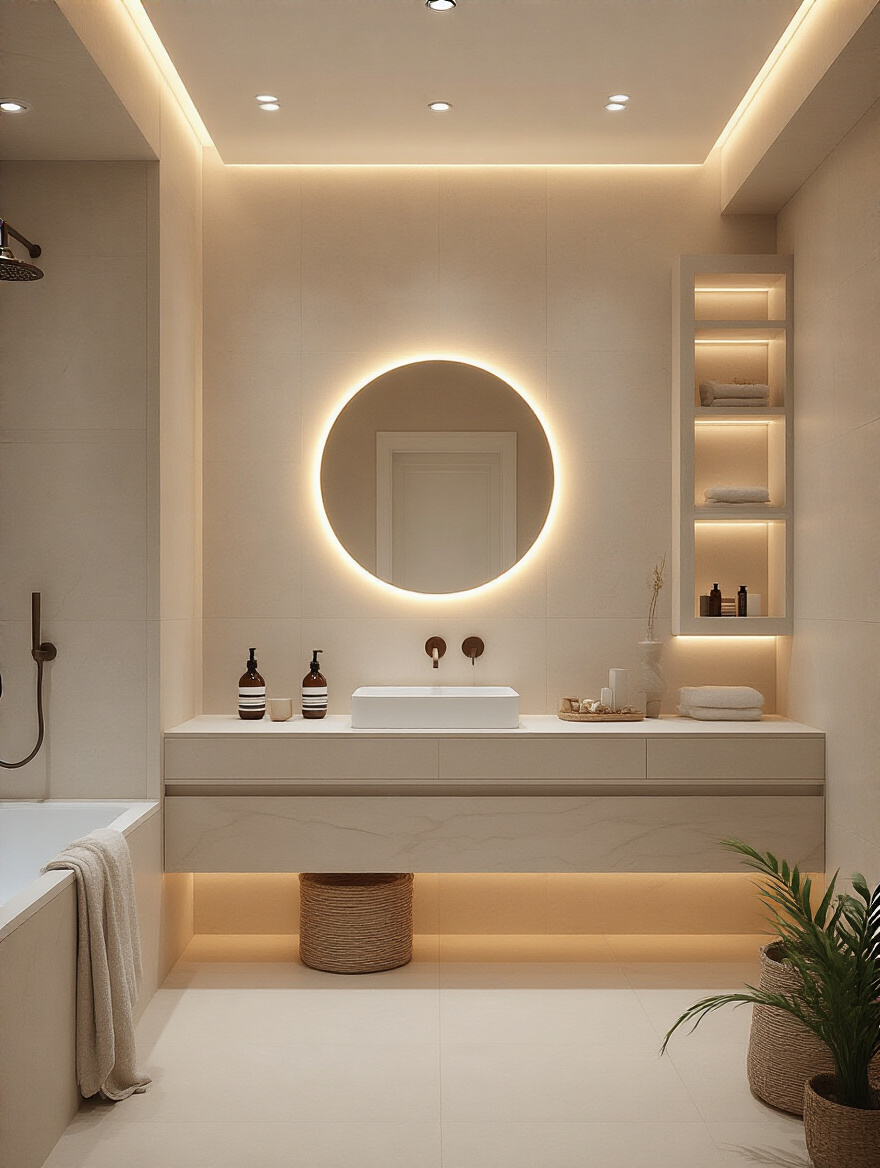
Install recessed ceiling lights on a dimmer switch for your ambient light. For the vanity, sidelights or a backlit mirror are far better than an overhead bar, as they eliminate shadows on your face. And a small, waterproof recessed light in a shower niche is a touch of pure luxury. Pay attention to color temperature, too. A warm white (around 2700K-3000K) creates a relaxing, spa-like vibe. This strategic approach to light completely transforms the mood of the room.
Now, for what doesn’t go in the room.
14. Minimize Decor to Only One or Two Intentional Accents
Here’s the rule: if it doesn’t have a job or you don’t find it truly beautiful, it doesn’t belong here. Forget the little trays of decorative soaps and jars of colored sand. Your decor should be intentional. My advice is to let functional items be your decor. A beautiful wooden stool next to the tub is both a sculptural element and a place to set your book.
If you want a purely decorative accent, limit yourself to one or two items. A single, hardy plant like a snake plant adds a touch of life and color without being distracting. A small piece of framed art that you love can work, too. The point is to give your eye a place to rest. A room filled with many small things feels busy and chaotic; a room with one beautiful thing feels curated and calm.
This philosophy extends to the very materials you build with.
15. Prioritize Quality Over Quantity in All Material Selections
This is the “buy it for life” principle. In a minimalist space, every single element is on display, so quality matters. It’s better to have one solid brass faucet that will last for decades than to have a cheap, plated one that you’ll have to replace in five years. Quality isn’t just about looks; it’s about how things feel and perform over time.

Invest in the foundational elements: the tiles, the fixtures, the countertop. These are the things that are difficult and expensive to change. A solid-surface countertop like quartz is non-porous and incredibly durable. Marine-grade plywood for your custom vanity won’t swell in the humid environment. Choosing high-quality materials means your bathroom will not only look good on day one, but it will continue to look and function beautifully for years to come.
And to keep it from feeling too cold, we need one more thing.
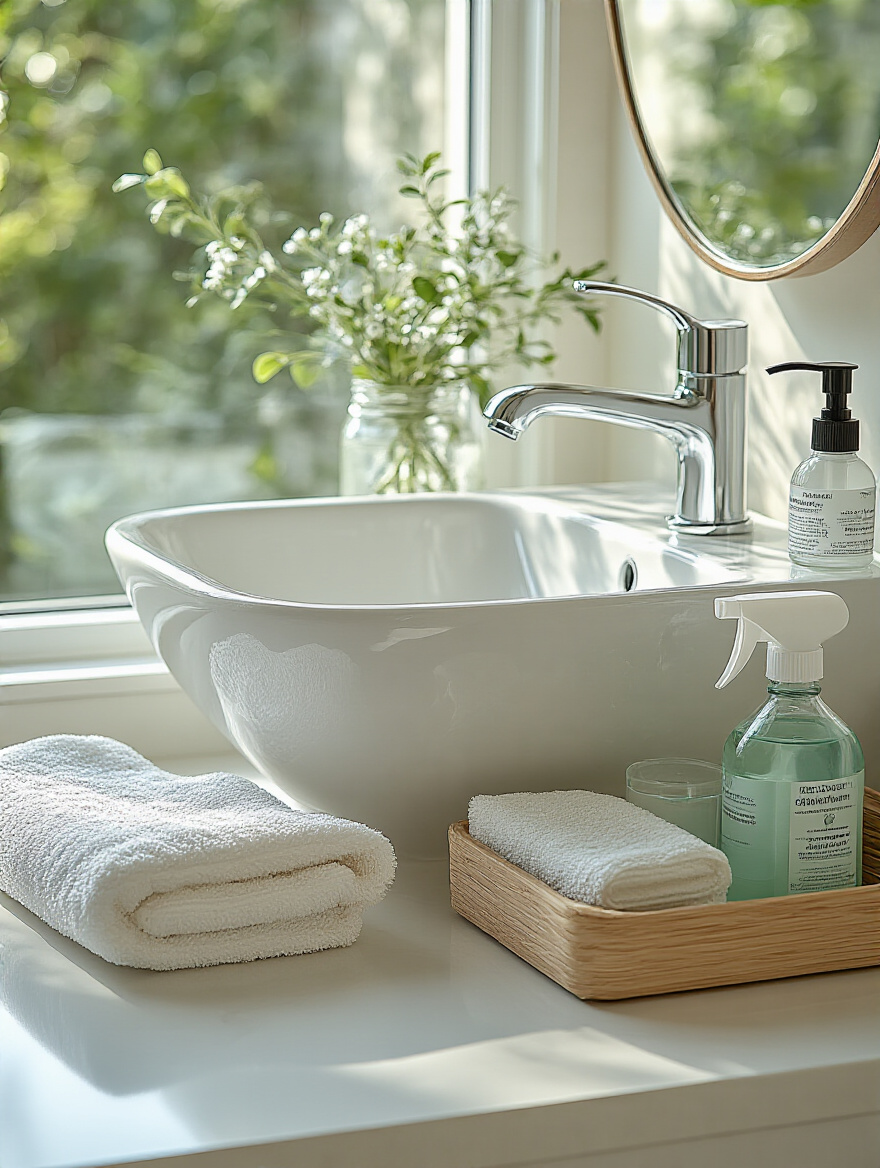
16. Integrate Natural Elements for a Calming, Organic Touch
A minimalist bathroom runs the risk of feeling cold and sterile if it’s all hard, slick surfaces. The antidote is to bring in natural elements. The warmth of wood, the texture of stone, the life of a plant—these things connect the space to the natural world and make it feel more human and inviting.
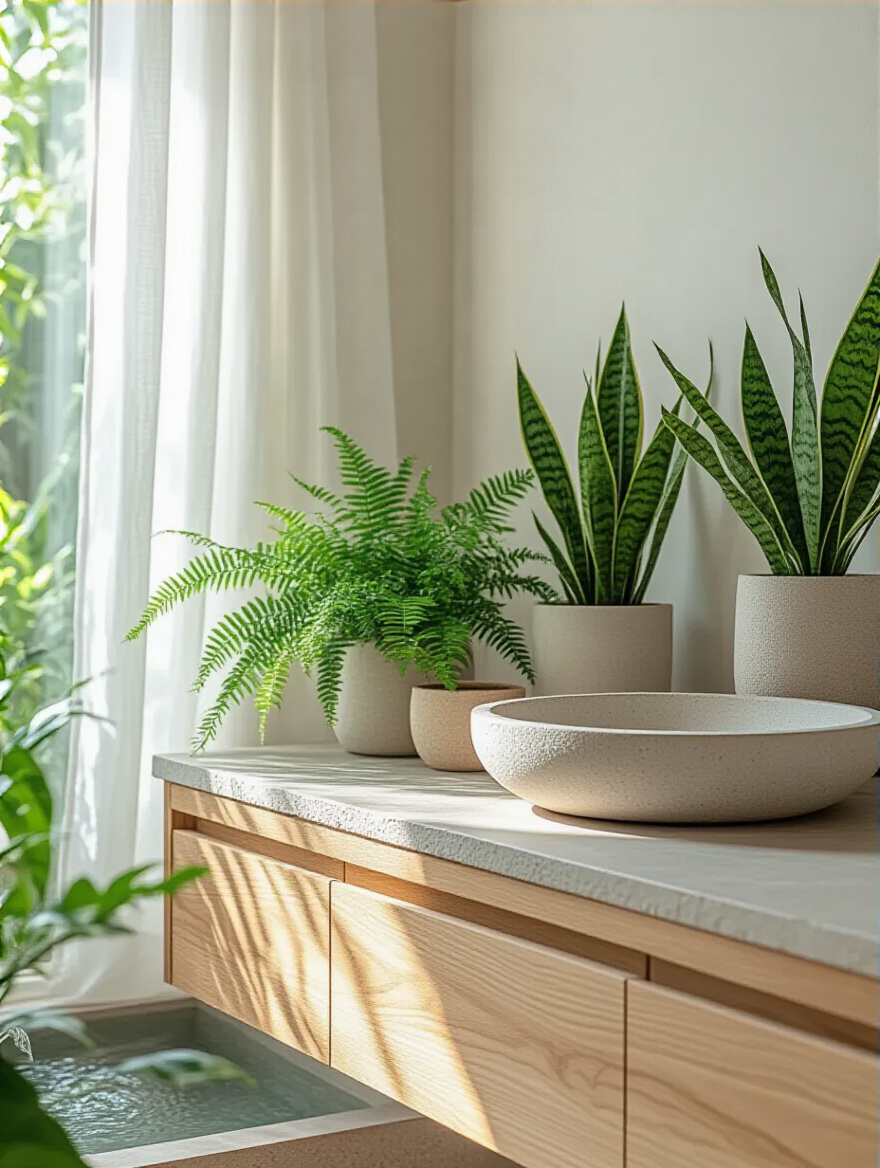
This can be as simple as a bamboo bath mat, a teak shower bench, or a small stone tray on your vanity. Linen or cotton towels add a soft, organic texture. If you have a window, make sure you’re maximizing the natural light. These elements provide a necessary balance to the clean lines of minimalist design, creating a space that is both peaceful and warm.
Functional Fixtures & Finishes: Sleek Efficiency
Now we get into the hardware. The fixtures you choose should be as hardworking and efficient as they are beautiful. The goal here is sleek lines, easy maintenance, and enhanced functionality.
17. Install floating vanities for a Lighter, More Open Floor
A floating, wall-mounted vanity is probably the single most impactful fixture you can choose for a minimalist bathroom. By lifting the cabinet off the ground, you allow the flooring to extend all the way to the wall, which creates a powerful illusion of more space. The room immediately feels lighter, more open, and less cluttered.
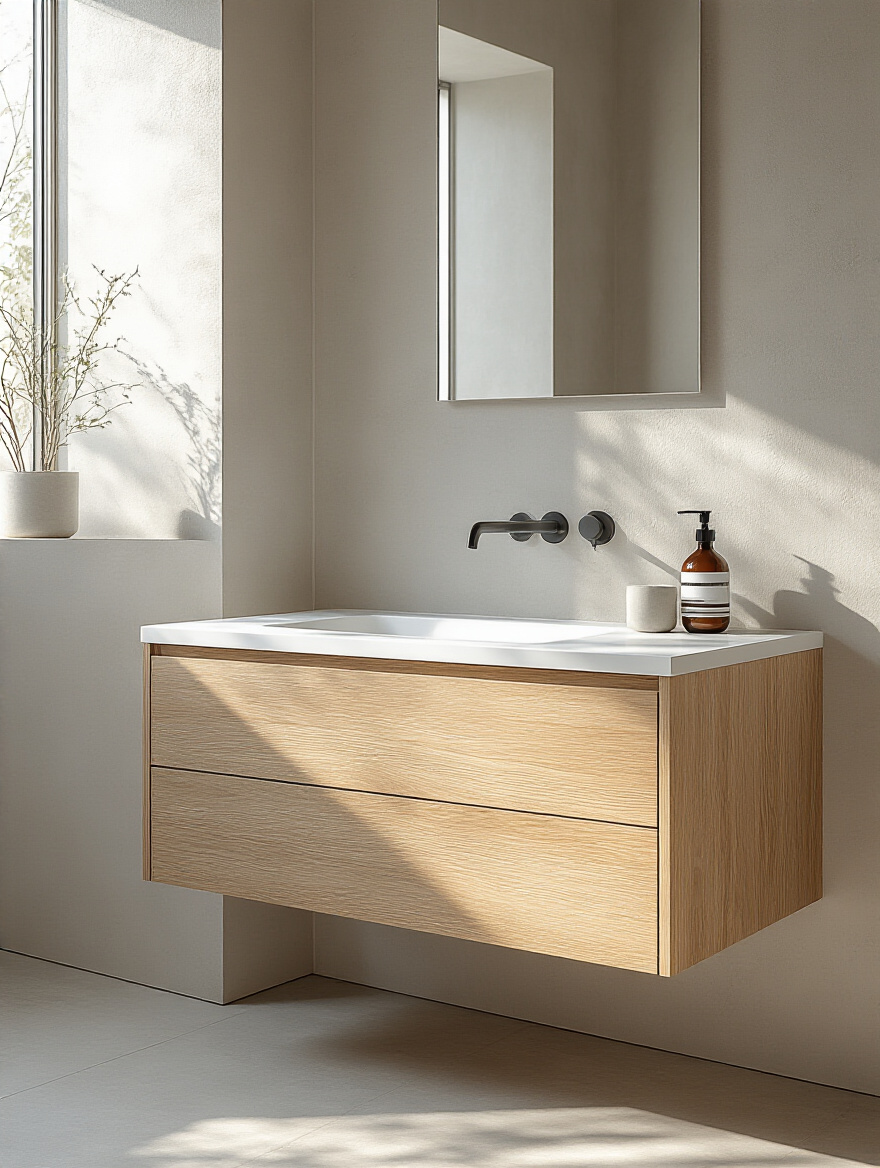
From a practical standpoint, it’s a dream to clean. There are no legs or awkward toe-kicks to trap dust and hair. You can just sweep or mop right under it. One warning from my cabinetry side: make sure your wall has proper blocking to support the weight. A floating vanity needs to be anchored securely to the wall studs, so this is a detail you need to plan for.
Let’s continue that clean, uncluttered look on the countertop itself.
18. Select Wall-Mounted Faucets to Simplify Countertop Cleaning
If you truly want to achieve that serene, uncluttered countertop, a wall-mounted faucet is the way to go. Because the faucet comes out of the wall behind the sink, the entire countertop is left as a single, smooth surface. It completely eliminates that grimy, hard-to-clean area around the base of a traditional faucet where water and toothpaste always seem to collect.

This choice elevates the entire look of the bathroom, giving it a high-end, custom feel. Like a floating vanity, this requires planning. The plumbing has to be routed inside the wall, so it’s a decision you need to make before your drywall and tile go up. But the payoff in both aesthetics and ease of cleaning is massive.
And for the ultimate in seamless design, we take this concept to the shower.
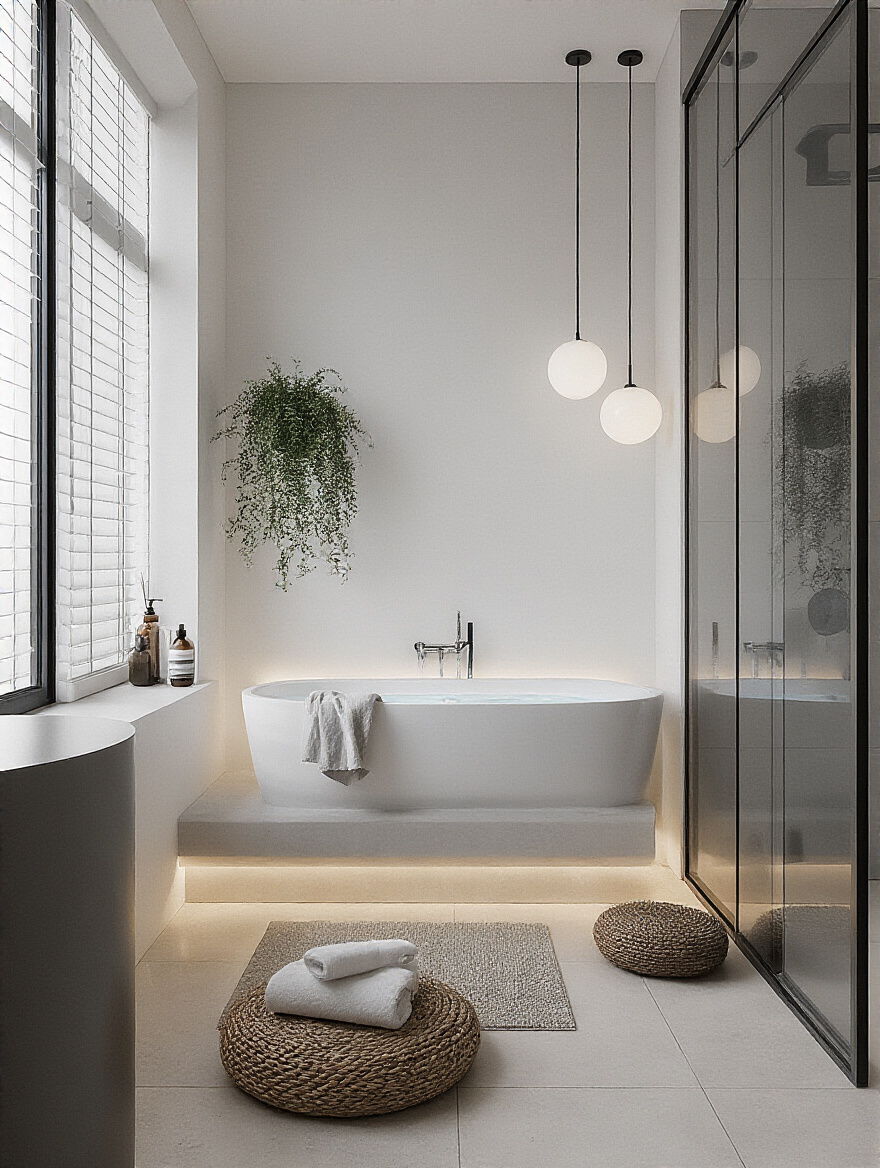
19. Opt for a Curbless Shower to Create a Seamless Look
A curbless, or zero-entry, shower is the pinnacle of minimalist bathroom design. By eliminating the curb or threshold, the bathroom floor flows uninterrupted directly into the shower. It creates a completely open, expansive look that can make even a small bathroom feel like a luxurious spa.
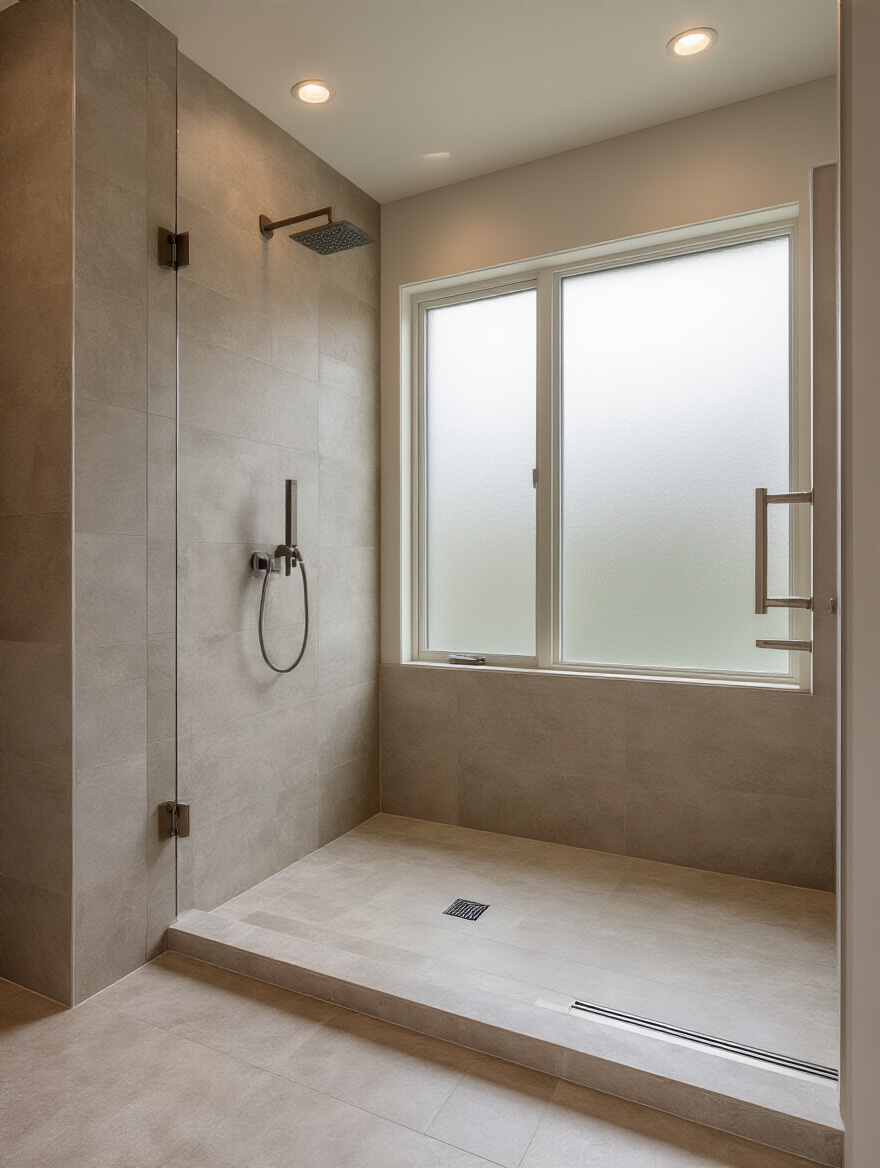
The key to a successful curbless shower is expert waterproofing and a properly sloped floor that directs all the water toward the drain. Often, a sleek linear drain placed along one wall is the best option. This is absolutely not a DIY project. You need a professional who understands the complex waterproofing systems required to prevent catastrophic leaks. But when done right, the result is stunningly beautiful and incredibly accessible, eliminating a trip hazard.
Ongoing Habits & Refinement: Sustaining Serenity
You’ve done the hard work of creating your sanctuary. Now, the final step is to build simple habits that keep it that way. These aren’t chores; they are small rituals that maintain the calm.
20. Implement a One-In, One-Out Rule for New Products
This is the golden rule for preventing clutter from ever taking over again. It’s simple: for every new product you bring into the bathroom, one old product of the same type must go. New bottle of shampoo comes in? The nearly-empty old one gets used up and recycled immediately. Bought a new lipstick? An old one you never wear gets tossed.
This rule forces you to be a mindful consumer. It makes you pause and question whether you really need that new item if it means getting rid of something else. It stops the slow accumulation of products that leads to cluttered cabinets and drawers. It’s a powerful, lifelong habit for maintaining order.
And for daily maintenance, this next habit is a game-changer.
21. Commit to Daily Wipe-Downs for Effortless Cleanliness
This might sound like a chore, but I promise it will save you hours of deep cleaning. All it takes is 60 seconds. After you brush your teeth, take a microfiber cloth and quickly wipe down the faucet, the sink basin, and the countertop. Wipe any splatters off the mirror. That’s it. You’re done.
By doing this every day, you prevent water spots, soap scum, and toothpaste from ever building up and hardening. Your bathroom will always look pristine. Keep a small squeegee in the shower and give the glass a quick wipe after you use it, too. This “little and often” approach is the secret to a bathroom that feels effortlessly clean all the time.
Finally, a habit that simplifies your routine and your space.
22. Shift to Multi-Purpose Products to Reduce Bottle Count
Look for workhorse products that can do more than one job. A high-quality solid bar can be used for your hair, face, and body, replacing three separate plastic bottles. A beautiful bottle of castile soap can be used for hand washing, body washing, and even light cleaning. Jojoba or argan oil can be a moisturizer, a hair serum, and a makeup remover.
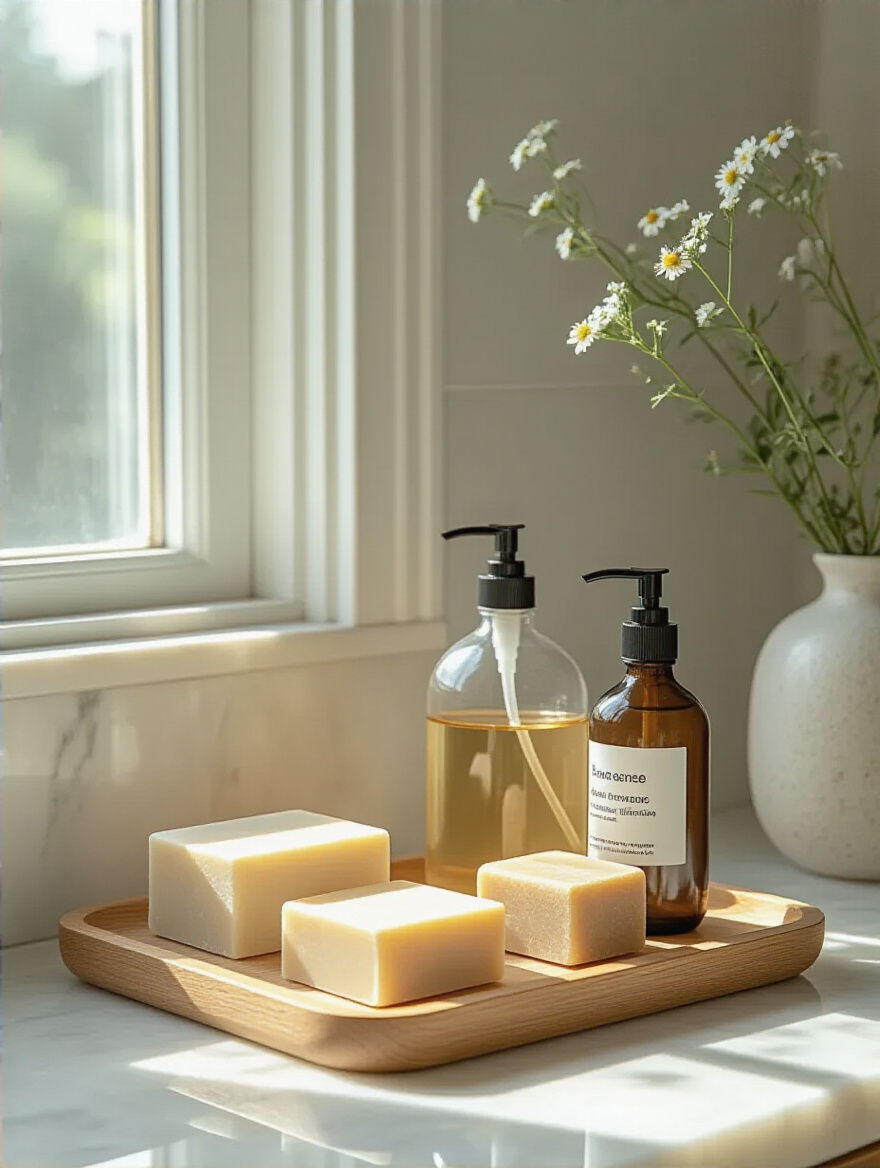
This approach dramatically cuts down on the number of bottles you need to store, which instantly declutters your shower and vanity. It simplifies your routine, saves you money, and is better for the environment. It’s the final refinement—achieving more with less, which is the very essence of minimalist design.
Your Sanctuary Awaits
Look, transforming your bathroom into a minimalist sanctuary isn’t about following a rigid set of rules or creating a room devoid of personality. It’s about designing a system that works for you. It’s about stripping away the excess to reveal a space that is efficient, beautiful, and profoundly calm. It’s a space that sets you up for a great day and helps you unwind peacefully at night.
Don’t get overwhelmed by all 22 ideas. Just pick one. Maybe this weekend you’ll do that ruthless declutter. Or maybe you’ll just start with the 60-second wipe-down. Small, intentional steps are what lead to lasting change. Start today, and you’ll be well on your way to creating a bathroom that doesn’t just look good, but feels good, too.


